Load DataSnyders JerkyReloading EverythingMidSouth Shooters Supply
RotoMetals2Lee PrecisionInline FabricationWideners
Repackbox Titan Reloading
Results 1 to 14 of 14

Thread: My PID controller DIY

  1. #1
    Boolit Buddy edadmartin's Avatar
    Join Date
    Jul 2013
    Location
    colorado springs CO
    Posts
    194

    My PID controller DIY

    I finally finished my PID controller. It uses parts and instructions from Johnnys reloading bench you tube site. The visual instructions are perfect for non electronics savy Diyers. I had some items and bought most on ebay or the surplus electronics store here in town. Everything checks out. No smoke no fire .
    All i need to do is get the lead melted and run the auto tune setting.ill post more after that is done.Had to give it a name too Stu P.I.D.
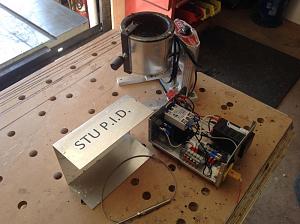
 Click image for larger version. 

Name:	IMG_0807.jpg 
Views:	210 
Size:	65.8 KB 
ID:	197268Click image for larger version. 

Name:	IMG_0809.jpg 
Views:	164 
Size:	64.6 KB 
ID:	197269
    "Make things as simple as possible, but no simpler" Albert Einstien

  2. #2
    Boolit Bub darrondb's Avatar
    Join Date
    Apr 2016
    Location
    NE KS
    Posts
    74
    Well done! Building and using my PID was one of the more satisfying and useful things that I have done recently.

  3. #3
    Boolit Grand Master

    dragon813gt's Avatar
    Join Date
    Feb 2012
    Location
    Somewhere in SE PA
    Posts
    9,989
    Name is great

  4. #4
    Boolit Master


    Walter Laich's Avatar
    Join Date
    Aug 2005
    Location
    Cypress, Republic of Texas
    Posts
    3,495
    love the name, too

    I really feel adding a PID has improved my casting sessions.

    + as was said above it was fun to build it
    NRA Life
    USPSA L1314
    SASS Life 48747
    RVN/Cambodia War Games, 2nd Place

  5. #5
    Boolit Master


    TexasGrunt's Avatar
    Join Date
    Dec 2016
    Location
    Kaufman, Texas!
    Posts
    1,049
    About what did it run you cost wise?
    Semper Fi!


    Currently casting for .223, .308, .30-06, .30-40 Krag, 9mm, .38/.357, 10mm, 44 Mag and 45 ACP.

    I like strange looking boolits!

    NRA Patriot Life Endowment member.

  6. #6
    Boolit Grand Master

    Join Date
    Oct 2009
    Location
    England,Ar
    Posts
    7,696
    Love the name! What a sense of humor.

  7. #7
    Boolit Master
    Join Date
    Jan 2013
    Location
    Baldwin Co, across bay from Mobile, AL
    Posts
    1,128
    Good job - did you make the enclosure? Sure looks good. How far away from pot do you plan to use it? I just finished a PID controller myself. I made the enclosure from aluminum and mounted to rear of pot as shown.
    Click image for larger version. 

Name:	PID_Pot.jpg 
Views:	99 
Size:	38.8 KB 
ID:	197284

    I'm a bit concerned about amount of heat that will build up, but in the one casting session I've done, about an hour - I think it's ok. Gets warm, but not too hot to hold hand on controller. You can see the spacer to give a bit more air flow. I think I might mount a small fan to force a bit of cooling.

    I did mount a plexiglas cover to protect the PID display from lead splashes.

    Ken H>

  8. #8
    Boolit Master

    Join Date
    Nov 2011
    Location
    East Arkansas where I55 & I40 come together and then split
    Posts
    694
    I really like the way some of you guys do things on this site. KenH that is just plain using your noggin.

    As for the OP, I like your comments. I got a kit from HE WHO MUST NOT BE NAMED and had a bit of fun putting the thing together and
    more fun using it. Not sure if he is around any more as his website has been taken down.

  9. #9
    Boolit Grand Master

    dragon813gt's Avatar
    Join Date
    Feb 2012
    Location
    Somewhere in SE PA
    Posts
    9,989
    He was active on a Ruger forum last time I was in there. But that was a few months ago.

  10. #10
    Boolit Buddy edadmartin's Avatar
    Join Date
    Jul 2013
    Location
    colorado springs CO
    Posts
    194
    I had the hobby box and auto fittings but bought the rest online. Id say i have about 50-70 bucks in it.i got some items from my local electronics store so some items are recycled. It was an easy fun build. All i have to do is make a mount for the thermo coupler. The new pot stand was cnc done by a member on this forum but i cant remember his name.
    "Make things as simple as possible, but no simpler" Albert Einstien

  11. #11
    Boolit Master

    Join Date
    Nov 2011
    Location
    East Arkansas where I55 & I40 come together and then split
    Posts
    694
    As for a thermocouple mount, the first one I made was out of plumbers pipe strap, doubled over for a bit of stiffness. It worked well on that old Lee 4-20.
    I got the Idea off this website so it isn't original but it was on the cheap.

  12. #12
    Boolit Buddy edadmartin's Avatar
    Join Date
    Jul 2013
    Location
    colorado springs CO
    Posts
    194
    I made sort of a spring out of 12awg copper wire,twisted about 8 coils around the thermocoupler rod,then brought the ends back and crimped on an automotive ring connector with the yellow insulator removed and used one of the screws on top of the pot to mount it. Now it sits about 1/4" away from the sides and its 1/4" off the bottom of the pot.works great and its out of the way.sorry no pic though. Note i tried it with thinner copper wire and it got way to hot turned all sorts of mad colors,so id say use a minimum of 12 awg wire from a piece of romex.
    "Make things as simple as possible, but no simpler" Albert Einstien

  13. #13
    Boolit Master
    Join Date
    Mar 2017
    Location
    Oklahoma City
    Posts
    507
    Excellent!! Finished my first one as well.....and it actually works! LOL

    Sent from my SM-N920V using Tapatalk

  14. #14
    Boolit Buddy edadmartin's Avatar
    Join Date
    Jul 2013
    Location
    colorado springs CO
    Posts
    194
    Thats a classy box. One thing i wanted to tell future builders of PIDs the flat blade thermocoupler plugs that come in 5-6 packs , are really junk. search on line for the heavy duty round pole plug it fits in so much better and you can shrink tube the leads and still tighten the tiny screws
    "Make things as simple as possible, but no simpler" Albert Einstien

Posting Permissions

  • You may not post new threads
  • You may not post replies
  • You may not post attachments
  • You may not edit your posts
  •  
Abbreviations used in Reloading

BP Bronze Point IMR Improved Military Rifle PTD Pointed
BR Bench Rest M Magnum RN Round Nose
BT Boat Tail PL Power-Lokt SP Soft Point
C Compressed Charge PR Primer SPCL Soft Point "Core-Lokt"
HP Hollow Point PSPCL Pointed Soft Point "Core Lokt" C.O.L. Cartridge Overall Length
PSP Pointed Soft Point Spz Spitzer Point SBT Spitzer Boat Tail
LRN Lead Round Nose LWC Lead Wad Cutter LSWC Lead Semi Wad Cutter
GC Gas Check