RepackboxWidenersLee PrecisionReloading Everything
Inline FabricationSnyders JerkyTitan ReloadingLoad Data
MidSouth Shooters Supply RotoMetals2
Results 1 to 11 of 11

Thread: Knife build-along.

  1. #1
    Boolit Master Any Cal.'s Avatar
    Join Date
    Dec 2011
    Posts
    580

    Knife build-along.

    Just for fun, here is a pictorial of part of my process. First pic is after design has been hammered out on paper, along with steel type, blade length, etc.

    Click image for larger version. 

Name:	IMG_20160509_131206.jpg 
Views:	27 
Size:	26.6 KB 
ID:	182967

    Shape is cut out, then glued to steel, and blank cut out on bandsaw.

    Click image for larger version. 

Name:	IMG_20160509_132603.jpg 
Views:	28 
Size:	32.8 KB 
ID:	182968

    See the resemblence? The owner LOVED the Spyderco Manix, so we used the same handle shape, but adapted the blade and steel to his uses.

    Click image for larger version. 

Name:	IMG_20160509_133328.jpg 
Views:	25 
Size:	24.1 KB 
ID:	182969

    Finishing the shaping of the blank. This is the small wheel attachment, made to order for finger grooves...

    Click image for larger version. 

Name:	IMG_20160509_133841.jpg 
Views:	24 
Size:	22.1 KB 
ID:	182970

    Once the blank is shaped, the handles are cut out to match. This step could have been done later too, but there was a reason I did it this way on this knife- if only I could remember what it was!

    Click image for larger version. 

Name:	IMG_20160509_175944.jpg 
Views:	25 
Size:	31.0 KB 
ID:	182971

    And into the heat treat oven. This is my oven, just warming up in the pic. It will be running at 1650*f or so to treat the A2.

    Click image for larger version. 

Name:	IMG_20160510_175147.jpg 
Views:	29 
Size:	44.6 KB 
ID:	182972

    After the heat treat, it goes into a dry ice bath. This helps it hold a sharper edge, and prevent any cold weather brittleness.

    Click image for larger version. 

Name:	IMG_20160510_165548.jpg 
Views:	28 
Size:	41.6 KB 
ID:	182973

    And then into a toaster oven for tempering. Monitoring the temp with a thermocouple. Trying to keep the blade pretty hard, it isn't going to be a rough use knife. Remember- a Spyderco owner.

    Click image for larger version. 

Name:	IMG_20160510_171729.jpg 
Views:	29 
Size:	41.1 KB 
ID:	182974

    Checking the hardness. I think this was a check in between a couple of tempers, it ended up around 61.5rc as I recall.

    Click image for larger version. 

Name:	IMG_20160510_171426.jpg 
Views:	32 
Size:	35.6 KB 
ID:	182975

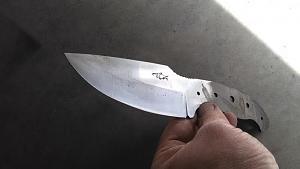
    Blade is done! Grinds complete, logo etched.
    Click image for larger version. 

Name:	IMG_20160516_164736.jpg 
Views:	40 
Size:	29.2 KB 
ID:	182976
    Last edited by Any Cal.; 12-17-2016 at 07:21 PM.

  2. #2
    Boolit Master Any Cal.'s Avatar
    Join Date
    Dec 2011
    Posts
    580
    Gluing up the handle scales. Gtech marine epoxy, so it will sit like this overnight. Gtech is not brittle and a touch stronger than regular epoxies.

    Click image for larger version. 

Name:	IMG_20160516_174555.jpg 
Views:	26 
Size:	43.0 KB 
ID:	182977

    And all done. Sheath is completed, knife is sharp, owner is waiting for me to get done taking pics so he can take his knife away...

    Click image for larger version. 

Name:	IMG_20160525_135518.jpg 
Views:	40 
Size:	30.7 KB 
ID:	182978
    Last edited by Any Cal.; 12-17-2016 at 07:19 PM.

  3. #3
    Moderator Emeritus


    MrWolf's Avatar
    Join Date
    Apr 2013
    Location
    NE West Virginia
    Posts
    4,895
    Nice job and thanks for showing how it is done.

  4. #4
    Boolit Bub
    jakemo's Avatar
    Join Date
    Nov 2009
    Location
    West Coast of Florida
    Posts
    32
    Great looking knife. I have some that I want to put new handles on and wondered if there's a company that sells knife making parts, like to studs to connect the handle to the tang.

  5. #5
    Boolit Master Dapaki's Avatar
    Join Date
    Jan 2020
    Location
    Minne-Snow-Ta!
    Posts
    600
    NICE! I love watching talented people make knives, I am neither talented or artistic so I use used up saw blades to make my knives I am just make functional blades, nothing fancy.

    Do you have any video? I would love to see your process.

  6. #6
    Boolit Buddy

    45&30-30's Avatar
    Join Date
    Jan 2009
    Location
    Montana, USA
    Posts
    191
    Great grind lines. What grinder are you using? What hardness tester are you using? Did you build your own furnace? Thank you for sharing your work!
    I Like Guns - Steve Lee

  7. #7
    Banned

    Join Date
    May 2012
    Location
    South Texas
    Posts
    1,419
    How much do you charge for a knife like that?

  8. #8
    Moderator


    Join Date
    Apr 2014
    Location
    Way up in the Cascades
    Posts
    8,164
    Very interesting and educational post. Nice looking knife.

  9. #9
    Moderator


    Minerat's Avatar
    Join Date
    Jun 2008
    Location
    Jefferson County, CO
    Posts
    9,633
    Quote Originally Posted by jakemo View Post
    Great looking knife. I have some that I want to put new handles on and wondered if there's a company that sells knife making parts, like to studs to connect the handle to the tang.
    Try this one. Have not used them but they have some nice toys.

    https://knifemaking.com
    Last edited by Minerat; 05-25-2020 at 05:07 PM.
    Steve,

    Life Member NRA
    Colorado Rifle Club member
    Rocky Mtn Gun Owners member
    NAGR member

  10. #10
    Boolit Master Any Cal.'s Avatar
    Join Date
    Dec 2011
    Posts
    580
    Quote Originally Posted by 45&30-30 View Post
    Great grind lines. What grinder are you using? What hardness tester are you using? Did you build your own furnace? Thank you for sharing your work!
    Thanks!

    The grinder is one I built using a Polar Bear Forge frame kit. and a VFD drive/motor. Any would likely work, but speed control is helpful for work flow.

    The hardness tester is one of the C-frame ones. They work fine, and are easy to store.

    Furnace is one I built.

  11. #11
    Boolit Bub
    Join Date
    Jan 2017
    Location
    Sweden
    Posts
    70
    a really nice pictorial

Posting Permissions

  • You may not post new threads
  • You may not post replies
  • You may not post attachments
  • You may not edit your posts
  •  
Abbreviations used in Reloading

BP Bronze Point IMR Improved Military Rifle PTD Pointed
BR Bench Rest M Magnum RN Round Nose
BT Boat Tail PL Power-Lokt SP Soft Point
C Compressed Charge PR Primer SPCL Soft Point "Core-Lokt"
HP Hollow Point PSPCL Pointed Soft Point "Core Lokt" C.O.L. Cartridge Overall Length
PSP Pointed Soft Point Spz Spitzer Point SBT Spitzer Boat Tail
LRN Lead Round Nose LWC Lead Wad Cutter LSWC Lead Semi Wad Cutter
GC Gas Check