RotoMetals2MidSouth Shooters SupplyReloading EverythingLoad Data
Lee PrecisionSnyders JerkyRepackboxInline Fabrication
Titan Reloading Wideners
Results 1 to 17 of 17

Thread: Deep cleaning the Black hawk

  1. #1
    Boolit Master fastdadio's Avatar
    Join Date
    Feb 2014
    Location
    Mi.
    Posts
    979

    Deep cleaning the Black hawk

    Need advice on maintenance/cleaning my Bisley .44. Not the typical post range scrub, buff n loob, but a good strip and clean. My Bisley is about 25 years old and has been hunted with in the field every year plus carried on woods walks and camping trips regularly. It gets used. I've never disassembled and cleaned it. I estimate about 5000 rounds fired in total? It still works fine, but I think it's time. So how far do I go with the disassembly? I'm comfortable with removing the grip frame but that's as far as I've ever gone. I'm thinking about just spraying it out with solvent and oiling it up from there and putting it back together. Is that good enough or should I drive pins and remove the hammer/trigger assy also? What say the collective? I'm a pretty handy guy but may lack any special tools needed.

  2. #2
    Boolit Grand Master Tatume's Avatar
    Join Date
    Jan 2010
    Location
    VA
    Posts
    5,589
    Get some good screwdriver tips that are close to the screws you need to remove. Those five screws look like the same screw slot, but on all the guns I've taken apart the screw heads are different.

    Using files, match bits to screw slots, and remember which is which. Otherwise, you will have buggered screw slots, a sure sign of an amateur at work.

    Here's a pair of video lessons on disassembly and reassembly, produced and distributed by Sturm Ruger & Company. Scroll to the bottom.

    http://www.ruger.com/products/newMod...ed/models.html

    Take care, Tom

  3. #3
    Boolit Grand Master Tatume's Avatar
    Join Date
    Jan 2010
    Location
    VA
    Posts
    5,589
    P.s., I like to degrease the five main screws (not the grip panel screw) and use NON-permanent thread sealer on them.

  4. #4
    Boolit Master Thumbcocker's Avatar
    Join Date
    Oct 2007
    Location
    East Central Illinois
    Posts
    4,511
    YouTube has excellent disassembly and reassembly videos put out by Ruger.
    Paper targets aren't your friends. They won't lie for you and they don't care if your feelings get hurt.

  5. #5
    Boolit Grand Master Tatume's Avatar
    Join Date
    Jan 2010
    Location
    VA
    Posts
    5,589
    Why go to YouTube when you have them right here, right now?

  6. #6
    Boolit Master fastdadio's Avatar
    Join Date
    Feb 2014
    Location
    Mi.
    Posts
    979
    Thanks guys. I have a nice screw driver set and drift punches. I'll get to the video later this weekend. Mom's in the hospital with a broken hip and a date with the surgeon at noon. Gotta go.

  7. #7
    Boolit Master
    contender1's Avatar
    Join Date
    Sep 2011
    Location
    Lake Lure NC
    Posts
    2,445
    One of the "pitfalls" of a NM Blackhawk is in reassembly. One of the pins holds the cylinder latch spring, and it can be a bugger to get it back together. The other one is the loading gate, which uses the tip of the same spring. Basically, that spring is a "problem" area,,, especially for a first timer. Other than that,, go for it. Pay attention to the pins & make sure you put them back correctly. And you can work that spring with a flat bladed screwdriver, OR,,, there is a compression tool sold by Brownells, as it seems to need 4 hands to reassemble that one area. Do a study of that before you attempt the disassembly,, and then only you can decide if you can do the work. Most folks who are comfortable in tinkering with handguns can do it,, but they understand what they need to do w/o forcing stuff.

  8. #8
    Banned

    44man's Avatar
    Join Date
    Mar 2005
    Posts
    22,705
    The cylinder latch spring and pawl is in the grip frame hole. The gate spring has only three functions.
    It holds the gate shut and open, holds the trigger pin in and drops the latch when the gate is open.
    An easy way to install it is to let the end that goes to the gate pin float and install the trigger pin first. Then use a small screwdriver to lift the gate end onto the gate pin.
    Put the trigger pin in left to right so it holds the trigger and latch in place so you don't have to hunt holes.

  9. #9
    Vendor Sponsor

    DougGuy's Avatar
    Join Date
    Apr 2013
    Location
    just above Raleigh North Carolina
    Posts
    7,409
    You really do not need to go any further than removing the grip frame. All the parts are accessible from here with brake clean and an air hose. There is no need to remove any of the internals, unless you are simply curious, just hose them down with break clean and blow it dry with an air hose. Oil it lightly as you reassemble.

    3 things to pay close attention to. First off you will need to get a small pin or allen wrench so that when you cock the hammer you put the pin in the hammer strut to capture the mainspring so when you let off the hammer, it will remove spring tension so you can disassemble and reassemble without fighting the spring. Then, when you remove the grip frame there are two springs and plungers that can fall and get lost. One is under the cylinder bolt latch, the other is in the back and it pushes against the pawl so make sure you carefully remove the grip frame and catch both these springs and plungers and lay them safely aside.

    Second, pay close attention to the screws in the bottom of the grip frame. One of the screws beside the trigger guard is longer than the other and has a pin made onto it. The screw in the front of the grip frame is slightly shorter than the two that go in the back so you will want to make sure it doesn't get mixed up. Only the two screws in the back of the grip frame can be swapped around, the other three MUST go back in the same hole they were in.

    Third, on reassembly, there is the spring and pin in the bottom that rests against the bolt latch and it can very easily get crossed up so you will want to push the bottom of the grip frame upwards against the frame, and then observing the tiny spring in the back, make sure it gets pushed into the hole and not bent over as you slide the grip frame forward, then start one of the screws in the back first. Heh, all the while, making sure the trigger spring goes over the tab on the back of the trigger and not under it.

    If you have trouble with the trigger return spring wanting to go under the trigger and not over it, take the legs of that spring off the pin that holds them and let them dangle, and if that don't help then take that spring out and put it in after you get the grip frame mated up to the cylinder frame.

    DO USE some hollow ground screwdrivers, and make sure the bit fits the screw slot very tightly, press HARD against the screwdriver when you break the screws loose, it is very very VERY easy for the screwdriver to slip and burr up the screw slot.

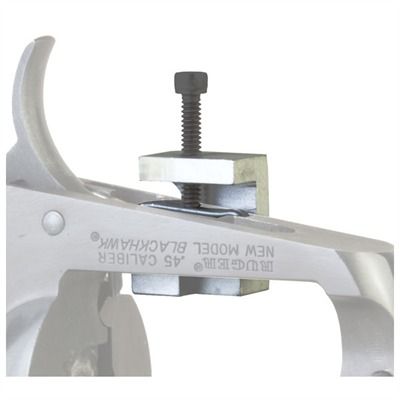
    If you simply must venture farther and take it completely down, the Ruger video posted on youtube is essential. It is very good. I can also suggest the Ruger Gate Detent Spring tool that you can get from Brownell's or Midway, this spring is a real bear and is the cause of MANY idiot scratches on the frame trying to wrestle it back in place..

    Last edited by DougGuy; 12-06-2016 at 05:22 PM.
    Got a .22 .30 .32 .357 .38 .40 .41 .44 .45 .480 or .500 S&W cylinder that needs throats honed? 9mm, 10mm/40S&W, 45 ACP pistol barrel that won't "plunk" your handloads? 480 Ruger or 475 Linebaugh cylinder that needs the "step" reamed to 6° 30min chamfer? Click here to send me a PM You can also find me on Facebook Click Here.

  10. #10
    Boolit Buddy huntrick64's Avatar
    Join Date
    Mar 2012
    Location
    North Central Oklahoma
    Posts
    329
    That Gate Detent Spring tool looks awesome, I made mine from a 1" C-clamp by grinding the sides off of the metal "swivel pad" so that it could fit in the frame as you tightened it (Gary Bunker's idea). Padded it with adhesive mole skin and it worked perfectly. I will, however go ahead and buy the tool you showed, but what I used can be done in a pinch. As said above, don't attempt this without a tool. If you do, you will probably scratch your frame.

  11. #11
    Banned

    44man's Avatar
    Join Date
    Mar 2005
    Posts
    22,705
    Nice tool but not needed. The gun is like a Mark that can be taken apart and put together with a blindfold on.

  12. #12
    Boolit Grand Master Tatume's Avatar
    Join Date
    Jan 2010
    Location
    VA
    Posts
    5,589
    Quote Originally Posted by 44man View Post
    Nice tool but not needed. The gun is like a Mark that can be taken apart and put together with a blindfold on.
    +1 I've had so many Blackhawks apart and back together again I can't even estimate how many, and I've never used a spring compressor. However, I do admit the utility. It looks like a nice touch.

  13. #13
    Boolit Buddy huntrick64's Avatar
    Join Date
    Mar 2012
    Location
    North Central Oklahoma
    Posts
    329
    I need one of you to show me (like a video) how to do that without some type of tool. I was able to put my first one back together without a tool, but once I used a tool, I couldn't imaging doing it again without it. But it could be like me putting together a Ruger MK III. I wrestle and wrestle with it to the point of frustration, and then, all of the sudden without any explanation, it falls together! Maybe that is why I do something else for a living.

  14. #14
    Boolit Grand Master Char-Gar's Avatar
    Join Date
    Mar 2005
    Location
    Deep South Texas
    Posts
    12,820
    I clean the bore, cylinder and frame window after every shooting. I keep it well lubricated. I have never felt the need to detail strip a Ruger for cleaning. I can and have taken them down, but not for cleaning.
    Disclaimer: The above is not holy writ. It is just my opinion based on my experience and knowledge. Your mileage may vary.

  15. #15
    Moderator Emeritus

    Join Date
    Apr 2005
    Posts
    7,620
    Once a year or so, I like to give all my guns a 100% total detail strip, and soak the parts in solvent to remove any gum, wax, etc. that might have accumulated along with the normal crud. Then I reoil, wipe off the excess, and reassemble. I'll also pay attention if any parts have any burrs that need to be removed, but that's seldom so, so mostly, it's just a good, full detail strip, solvent cleaning and relubing, with reassembly. That's really all that's ever really necessary, unless repairs are needed, or replacement of parts.

  16. #16
    Boolit Master fastdadio's Avatar
    Join Date
    Feb 2014
    Location
    Mi.
    Posts
    979
    To strip, or not to strip, that is the question. We're still talkin gunz here right? I knew it was a loaded question when I posted it. We got answers ranging from 'not necessary' to 'I do it annually' I think the right answer lies some where in between. There is a lot of variables, Age, type of loob currently in there, number of rounds fired, amount of exposure and to what type of environment. ect. In my case, I'm going to take DougGuy's advice and just pull the grip frame and flush it. That is what I set out to do any way. I will say this to the "never strip it' guys. I'm an HVAC guy and ran a service van for years. About every two years I would empty my tool bag on the bench and there would be about 1/8" of dirt in the bottom of the bag. Not an earthen dirt, but a grungy, oily crud. The question is, where did this come from? Ever notice how much crud can end up in the pockets of your hunting coat? Not just sticks and twigs, but dirt. How did that get there? I'm not rolling around in the dirt here. I don't have the answers to those questions, but that's the kind of crud I expect to see running out of my Bisley.

  17. #17
    Banned

    44man's Avatar
    Join Date
    Mar 2005
    Posts
    22,705
    Quote Originally Posted by Tatume View Post
    +1 I've had so many Blackhawks apart and back together again I can't even estimate how many, and I've never used a spring compressor. However, I do admit the utility. It looks like a nice touch.
    Looks good though but done my way there is no need to force the spring. I found it by accident when I did not engage the gate pin once. Easy to slip in place. I don't have to struggle getting the trigger pin in anymore.
    I had a Mark I way back and never had a problem. Instructions were clear and it was easy. It is just understanding how things work.
    There must be more cussing about the great gun then any so Ruger made it easy with new ones.
    Some can't shave without removing lips!

Posting Permissions

  • You may not post new threads
  • You may not post replies
  • You may not post attachments
  • You may not edit your posts
  •  
Abbreviations used in Reloading

BP Bronze Point IMR Improved Military Rifle PTD Pointed
BR Bench Rest M Magnum RN Round Nose
BT Boat Tail PL Power-Lokt SP Soft Point
C Compressed Charge PR Primer SPCL Soft Point "Core-Lokt"
HP Hollow Point PSPCL Pointed Soft Point "Core Lokt" C.O.L. Cartridge Overall Length
PSP Pointed Soft Point Spz Spitzer Point SBT Spitzer Boat Tail
LRN Lead Round Nose LWC Lead Wad Cutter LSWC Lead Semi Wad Cutter
GC Gas Check