RotoMetals2Lee PrecisionInline FabricationMidSouth Shooters Supply
WidenersSnyders JerkyLoad DataRepackbox
Reloading Everything Titan Reloading
Results 1 to 8 of 8

Thread: Burris FastFire mount for S&W 617

  1. #1
    Boolit Master
    Join Date
    Mar 2009
    Location
    Misty Mountains
    Posts
    923

    Burris FastFire mount for S&W 617

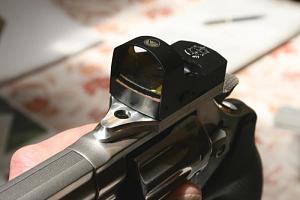
    I just got a Burris Fastfire III sight for my new S&W 617 revolver. I do not like the cheap general purpose Weaver rail mount as it is rather large and puts the sight up high. There is a semi-custom one for lower mounting but it is rather dear.

    So I have designed one in MasterCAM and milled it out on my CNC machine. Pictured below is the first prototype. There are a couple of tweaks I will make to the design but not much different in appearance other than some added 0.005" finish machine passes and a wider tang in the rear.

    The machining looks rough is a couple of photos due to angle and lighting. Surfaces are very smooth. and will be even slicker with the pending finish passes.

    The sight fits like a glove on the mount as does the mount on the revolver.

    Click image for larger version. 

Name:	resize_IMG_3830.jpg 
Views:	36 
Size:	53.2 KB 
ID:	171556

    Click image for larger version. 

Name:	resize_IMG_3844.jpg 
Views:	35 
Size:	54.6 KB 
ID:	171557

    Click image for larger version. 

Name:	resize_IMG_3858.jpg 
Views:	35 
Size:	37.7 KB 
ID:	171558

    Click image for larger version. 

Name:	resize_IMG_3861.jpg 
Views:	34 
Size:	33.8 KB 
ID:	171559
    Attached Thumbnails Attached Thumbnails IMG_3830.jpg  
    ph4570

  2. #2
    Boolit Grand Master

    imashooter2's Avatar
    Join Date
    Mar 2005
    Location
    PA
    Posts
    7,923
    Looks very similar to the Allchin STS mount. Nice and low. I like it.
    ”We know they are lying, they know they are lying, they know we know they are lying, we know they know we know they are lying, yet they are still lying.” –Aleksandr Isayevich Solzhenitsyn

    My Straight Shooters thread:
    http://castboolits.gunloads.com/show...raight-shooter

    The Pewter Pictures and Hallmarks thread:
    http://castboolits.gunloads.com/show...-and-hallmarks

  3. #3
    Boolit Master
    Join Date
    Feb 2014
    Location
    North of Palacios about 1400 miles
    Posts
    570
    I like that, must be nice to have those tools to use.

  4. #4
    Boolit Master
    Join Date
    May 2013
    Location
    MUSKOGEE
    Posts
    1,516
    now if only someone made the mounts for 1911 pistols with the "LPA" cut in the slide.

  5. #5
    Moderator

    W.R.Buchanan's Avatar
    Join Date
    Mar 2011
    Location
    Ojai CA
    Posts
    9,888
    That looks good. With the current trend in pistols being the move to Red Dot Sights, I can definitely see a market for this part, and depending on how many others there are like it, and how much you want for it, those factors will govern how many you sell.

    If you don't want to sell them,,, then You can take pride in being Unique!

    I don't know how advanced into machining you are, but standard practice is to do roughing passes and then a finish pass, and also your finish pass would be done in such a way as to have as few lines as possible and as many lines as possible going in the same direction...

    One of the major benefits of CNC machines is that if you aren't all mired down in the actual machine time like so much of Corporate America is,,, you can see the benefit of having the machine do everything to the part even if it takes a little longer.

    Rule #1 in the shop: The less Human Hands touch a given part,,, the better off that part will be.

    Also Finish Techniques like tumbling would make your parts look better as a prep for Anodizing which I assume you will be doing. The amount of time the parts sit in the tumbler will govern how much of the machining marks show thru the anodizing.

    If you have looked at the Buchanan Precision Machine Hand Press which I sold 50 of here in the last 3 months, all the major parts are made from Aluminum and Machined on a CNC Machining Center, and then wet tumbled to impart a Mottled Surface Finish, and then Black Anodized. This breaks any sharp edges left behind by the machining operations and leaves a slight radius on all edges. It leaves a part that feels good in your hands. This last thing is a big deal IE: Feels good in your hands.

    Now all you have to do is make a bunch more and see if anyone else wants one.

    This is the formula for new product development,,, Make something you want, and then see if anyone else wants it too.

    Sometimes you win big,,, sometimes you don't... You still have to try!

    Hope some of this helps.

    Randy
    "It's not how well you do what you know how to do,,,It's how well you do what you DON'T know how to do!"
    www.buchananprecisionmachine.com

  6. #6
    Boolit Master
    Join Date
    Mar 2009
    Location
    Misty Mountains
    Posts
    923
    Randy,

    Thank you so much for taking the time to post your thoughts on the mount. I am a novice at this machining stuff. I worked as an electronics engineer for 40 years and when I retired I wanted a CNC mill to monkey with. I could not justify a high or even medium end machine so I bought a hobby grade machine -- Grizzly G0704. I replaced the lead screws with ball screws and made the components necessary for conversion to CNC. I built the control electronics box from scratch. It turned out well.

    Since posting the prototype mount pictures I have added finish passes and done speed optimization on tool paths. After machining I glass bead blast and that results in parts that are attractive and smooth to the feel with no visible machining marks.

    I decided to do a small production run of 6 units. I listed them on the S&W forum yesterday afternoon and sold the 6 plus 2 more units within 18 hours of the listing.

    Wish I had a fancier machine with an auto tool changer!
    Last edited by ph4570; 07-22-2016 at 08:40 PM.
    ph4570

  7. #7
    Boolit Grand Master

    imashooter2's Avatar
    Join Date
    Mar 2005
    Location
    PA
    Posts
    7,923
    Might I suggest making the dot surface flat and drill blind holes for short pins instead of integral posts? That should cut down the machine time a bit and make finishing easier.
    ”We know they are lying, they know they are lying, they know we know they are lying, we know they know we know they are lying, yet they are still lying.” –Aleksandr Isayevich Solzhenitsyn

    My Straight Shooters thread:
    http://castboolits.gunloads.com/show...raight-shooter

    The Pewter Pictures and Hallmarks thread:
    http://castboolits.gunloads.com/show...-and-hallmarks

  8. #8
    Boolit Master
    Join Date
    Mar 2009
    Location
    Misty Mountains
    Posts
    923
    Quote Originally Posted by imashooter2 View Post
    Might I suggest making the dot surface flat and drill blind holes for short pins instead of integral posts? That should cut down the machine time a bit and make finishing easier.
    Golly I like this forum. Thank you guys for suggestions to help out this novice.

    The topside machining is the least time consuming. I have it down to less than 5 minutes. Without an auto tool changer doing holes and pins vs. Integral nibs would take more time and more hands intervention. Now if I here an auto tool changer...

    Thanks again guys.
    ph4570

Posting Permissions

  • You may not post new threads
  • You may not post replies
  • You may not post attachments
  • You may not edit your posts
  •  
Abbreviations used in Reloading

BP Bronze Point IMR Improved Military Rifle PTD Pointed
BR Bench Rest M Magnum RN Round Nose
BT Boat Tail PL Power-Lokt SP Soft Point
C Compressed Charge PR Primer SPCL Soft Point "Core-Lokt"
HP Hollow Point PSPCL Pointed Soft Point "Core Lokt" C.O.L. Cartridge Overall Length
PSP Pointed Soft Point Spz Spitzer Point SBT Spitzer Boat Tail
LRN Lead Round Nose LWC Lead Wad Cutter LSWC Lead Semi Wad Cutter
GC Gas Check