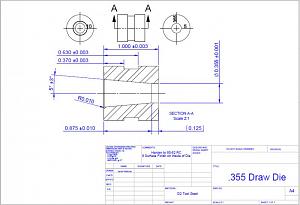
Alright, here is the revised drawing, as per some of the suggestions ya'll offered. Changed it to be one sided die and opened up the tolerance for the lead in angle.


|
   
   
|


|


Alright, here is the revised drawing, as per some of the suggestions ya'll offered. Changed it to be one sided die and opened up the tolerance for the lead in angle.


I would think that if the jacket is difficult to push through you may need a shorter "sizing" section. Maybe either longer lead in, shorter bushing, or counterbore on top side. I haven't made any drawing dies yet, but just thinking possible issues. I am sure others with true experience will chime in.
Drawing looks great! Very professional!
My Feedback : http://castboolits.gunloads.com/show...iscoyotehunter
An armed society is a polite society.
the BB knows


On the draw dies I make I relieve the top portion so that the part of the die that does the drawing to final dia. is only about .050 long. I have often heard these dies called "ring" dies.
Bob
Si hostes visibilis, etiam tu
To Coyotehunter's point I think that lengthening out the lead is a good idea. Unfortunately I don't know how short or long to make the working section, is there an advantage to having a short working section verses a longer section?
Here's the current revision of the drawing, thanks again for the input.
The longer the working section the more surface area there is "grabbing" the jacket, thus making it more difficult to push through. Even with proper lube, if the working section is too long then sizing can be (more) difficult.
You may need to experiment, because remember that the lead will also be "working" too. It will begin the sizing process. You may find you need to adjust your lead angle. Its trial and error. Having fun yet? LOL!
My Feedback : http://castboolits.gunloads.com/show...iscoyotehunter
An armed society is a polite society.
the BB knows
I'm always having fun
I'll have to decide on a design, give a try and go from there.
Cool! If you don't mind let us know what you find out because this is towards the top of my list of things I need to machine. THanks!
My Feedback : http://castboolits.gunloads.com/show...iscoyotehunter
An armed society is a polite society.
the BB knows
I will for sure. I am always a little uncertain how things turn out. It would be one thing if I could do the work myself and be into it only my time and cost of materials. I hate having to work with someone else and having to do multiple iterations until it's right. Oh well, such is life....
Well, it�s been three years since I booted up Solid Works and drafted up a draw die. Since then I�ve gotten married, had two kids, switched jobs, and haven�t swaged much of anything.
Finally, this past few weeks I got access to a lathe and some time to actually make chips.
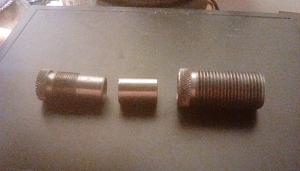
They are a first attempt, and made from some steel we had in the shop. I suspect it�s 1018 or something that really isn�t particularly pleasant to machine. That and I am very much a beginner, so they look a little rough, however the die holder and the die are done. I�m hoping to give it a test run tomorrow.
Later next week I plan on ordering a 12in bar of 1in diameter O1. If this geometry seems to work, I�ll remake the die, if it doesn�t work, I�ll have enough stock for at least 4 or 5 more attempts.
Looking to draw down .401 cal jackets to .338 and to able to draw .223 and 9mm cases for use in .338. Form past experience I know I need an intermediary die. So this is what I settled on.
Sent from my iPhone using Tapatalk
Check out my website http://www.theballisticassistant.com/
I am pretty excited about this.
Got the press all set up and tried my luck.
I also annealed some 9mm cases and some 223 cases. Once annealed they both went through like butter. I�ll need to repeat the test with my Corbin .375-.338 die however I believe that these will fly through.
There are two problems that I had with the Corbin set up that this die and holder accomplished marvelously.
1st was that I couldn�t draw down these .404 diameter jackets.
2nd was the stroke length wasn�t long enough to do a full jacket for 300gr 338 Cal bullets. You could push the jacket 85% of the way through but had to use another jacket to push the remaining 15%. Due to the Corbin design there wasn�t an easy way to adjust this.
This holder allows me to adjust the die into a position where it pushes the jacket through the whole stroke. Since the die is only 1in diameter and 1in tall they are fairly cheap and easy to make on a lathe.
Thanks everyone for the their input on this, ya�ll helped me turn an idea into a successful project. Even if it was three years in the works. I appreciate it!
Sent from my iPhone using Tapatalk
Check out my website http://www.theballisticassistant.com/


Velnor, I had some button dies made, but your prototype seems better for my intermediate need. I can't seem to get the right combination of events to make the casing/jackets clear the die so the next one reduces without engaging the previous casing. How my thoughts are making new or modifying the existing close to your design. More or less a hybread of 2 designs, since flipping the die may get what I need for the use on a modified reloading press.
I'd definitely be open to giving a hand coming up with something. All of my design work is open source, I have my information on the prints, but people are free to use them as they see fit.Originally Posted by just bill

What Press are you using? What diameters are looking to draw down from?
"What Press are you using? What diameters are looking to draw down from?"
I'm using a Blackmon modified Rockchucker. My current project is reducing .223 casings to .358 jackets for .357 rimless max ar pistol.
I'm assuming it still uses a 7/8-14 die?
I'll throw together a print tomorrow.
I used three set 1/4-20 screws to hold the die in place on my die holder. With the smaller 7/8, I'll either have to go with smaller screws, or as someone else previously suggested a clip.
Thanks, I don't need a print, I need to modify my holder to put the reducer in the top of the die to get the press arm at or near mid stroke to get the best leverage. Your holder uses set screws which when mine is modified that way it can be used upside down to eliminate the knurled anchor pin my die uses.
Last edited by just bill; 06-11-2019 at 10:09 PM.
Gotcha!
Look forward to seeing the results!
Sent from my iPhone using Tapatalk
Check out my website http://www.theballisticassistant.com/
 Posting Permissions


| BP | Bronze Point | IMR | Improved Military Rifle | PTD | Pointed |
| BR | Bench Rest | M | Magnum | RN | Round Nose |
| BT | Boat Tail | PL | Power-Lokt | SP | Soft Point |
| C | Compressed Charge | PR | Primer | SPCL | Soft Point "Core-Lokt" |
| HP | Hollow Point | PSPCL | Pointed Soft Point "Core Lokt" | C.O.L. | Cartridge Overall Length |
| PSP | Pointed Soft Point | Spz | Spitzer Point | SBT | Spitzer Boat Tail |
| LRN | Lead Round Nose | LWC | Lead Wad Cutter | LSWC | Lead Semi Wad Cutter |
| GC | Gas Check |

 Reply With Quote


