WidenersLee PrecisionTitan ReloadingReloading Everything
RotoMetals2RepackboxInline FabricationSnyders Jerky
MidSouth Shooters Supply Load Data
Results 1 to 17 of 17

Thread: DIY Taper Attachment

  1. #1
    Boolit Buddy map55b's Avatar
    Join Date
    Oct 2013
    Location
    Santa Clara, CA
    Posts
    297

    DIY Taper Attachment

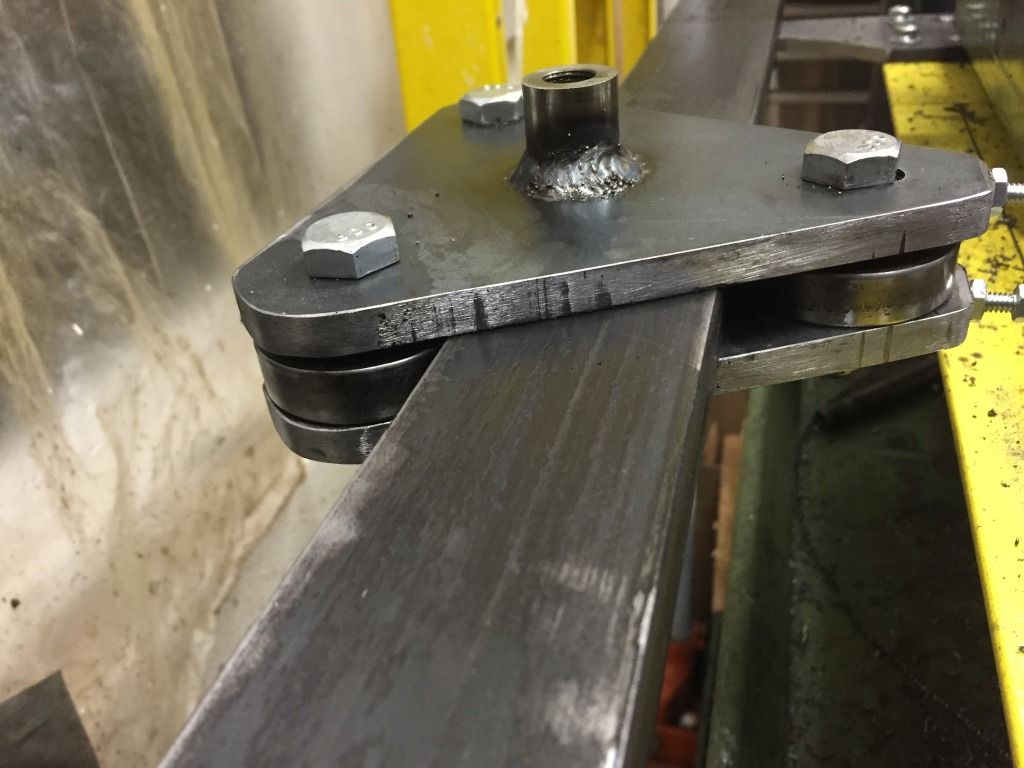
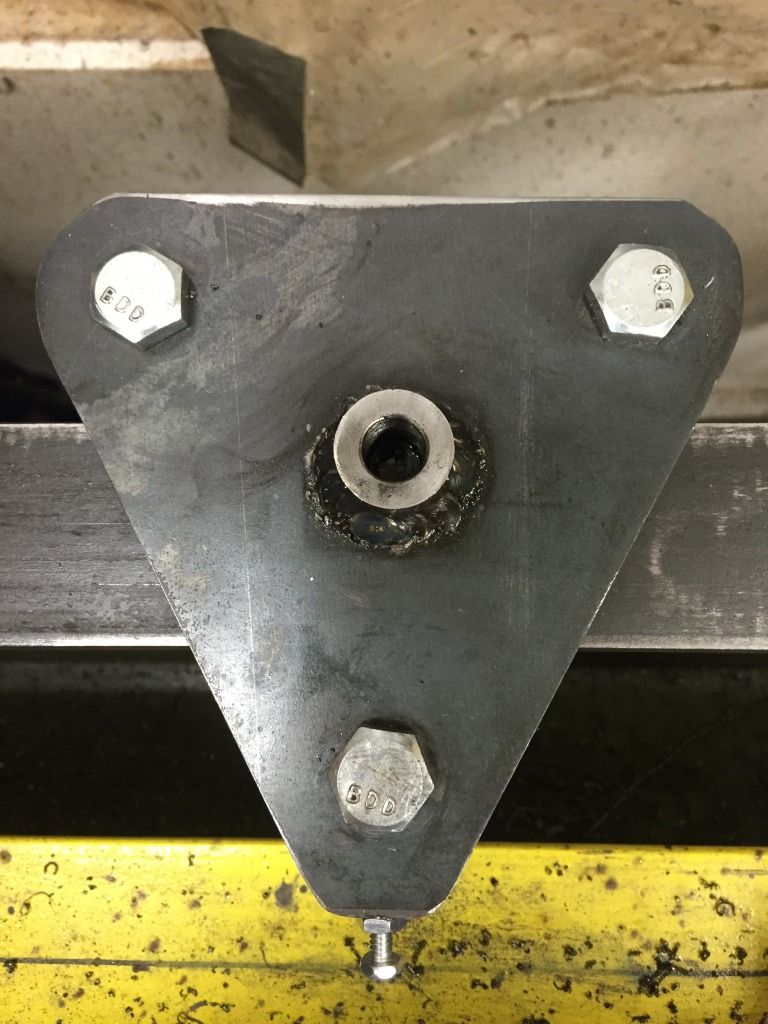
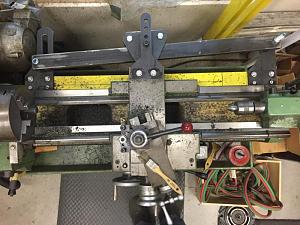
    While building a 38-55 on a Arisaka 38, I decided the barrel was too heavy. Turning long tapers is an issues on my Jet 10x24 but kind of my only limitation for what I work on so I built the following. Still have a few things to do to it, but it worked great!

    Click image for larger version. 

Name:	IMG_2491_zpsl8gskn8c.jpg 
Views:	122 
Size:	37.4 KB 
ID:	158608

    Click image for larger version. 

Name:	IMG_2489_zps73ybsdil.jpg 
Views:	153 
Size:	80.1 KB 
ID:	158607

  2. #2
    Boolit Master BigEyeBob's Avatar
    Join Date
    Apr 2014
    Location
    South of the Equator and North of Capricorn
    Posts
    508
    That's a fine looking taper attachment .
    I have a set of plans for a taper attachment for my Myford lathe , but like a lot of my projects its not done , I keep getting side tracked .
    In place of the dovetailed guide bar I was considering a length of 1" hydraulic cylinder rod and a linear bearing to slide along it .

    My new lathe I bought recently has a taper attachment as an accessory so I added that feature when I bought it .
    The lathe is still in its box , I keep getting side tracked.

  3. #3
    Boolit Master


    Join Date
    Feb 2013
    Posts
    837
    A fine looking project map.

  4. #4
    Boolit Buddy
    Join Date
    May 2006
    Posts
    159
    Map,
    Thats a fun project for sure. I haven't spent much time with the 38-55. An interesting and under appreciated cartridge for sure. I have a Monarch EE lathe that has the Taper attachment with it. I still haven't used it yet. In fact I don't even know how it works. It was one of those things that I thought I needed at the time.

  5. #5
    Boolit Buddy
    Join Date
    Aug 2012
    Posts
    129
    I read your thread with great interest! My friend and I spent about 5 hours attempting to set up an attachment designed around a 3/4" round guide bar that runs about 30" in length. We finally abandoned the effort (before making a pretzel of the rod) due to too much flex in the bar and to much friction on the cross slide. My attachment worked fine for maybe 16" and then the cross slide would suddenly jump maybe 10-20 thousandths. My buddy and I talked about up-sizing the diameter of the rod to 1.5" but decided that would require to much additional effort and materials. I like your flat bar setup. I would like some detail on materials and design of the follower you mounted on your guide bar. Is the guide bar cold rolled steel? Did you use any special grade of steel to get uniform width? Does the follower that straddles the bar have roller bearings? Or are they just spacers? I suppose the bearings or spacers would put pressure on the offside of the bar and there could be a loose fit on the inboard side of the straddle? I would appreciate any help you can offer. Pictures of the part that straddles the guide bar, from top, bottom and side would help too. I know its a lot to ask, but I just gotta know! Thanks in advance!

  6. #6
    Boolit Buddy map55b's Avatar
    Join Date
    Oct 2013
    Location
    Santa Clara, CA
    Posts
    297
    Hello Fishoot,

    I'm happy to elaborate on what I did. I started off with my guide bar being a piece of .75 drill rod with a reamed follower and promptly learned that wasn't going to be adequate, as you learned too.

    My bar is cold roll ~32" long .625" think and and 2" wide, the accessory could allow me to use the full 24" of my lathe bed (if I removed the chuck and went center to center). I figure I could use my steady rest and cut tapers longer than ~18" too, although it would require some blending. The follower is made of two pieces of 3/8 plate stock cut into a triangular shape. There are three R14-2RS bearing used, the two in the rear that take the most load are fixed. The front bearings mount is in a slot with a tension bolts (upper and lower) that allo we to adjust the tension of the bearing on the bar. The bearing utilize a bushing that goes from 7/8 od (bearing)to 1/2 id (mounting bolts) and they are about .645 thick. These allow it to sandwich the guide bar but not drag. I used a 1/2 NF cap screw to attach to the lathes cross feed, the cross feed attachment has 1/2 dia reamed holes and this has very little slop too. Please let me know if you have any other questions.


  7. #7
    Boolit Buddy
    Join Date
    Aug 2012
    Posts
    129
    Map55b, Thanks a ton for the detail. Its just what I need! I bought 2" wide, 1/2" bar today, before I read your post. I hope its rigid enough. I'm sure its better than the 3/4 rod I used for the first attempt. I happen to have some bearings like what you used. I'm going to rig some up and see how it goes. Thanks again for your support!

  8. #8
    Boolit Buddy map55b's Avatar
    Join Date
    Oct 2013
    Location
    Santa Clara, CA
    Posts
    297
    I'm thinking your tool would fail before you bent the 1/2x2 plate or start to bend something else on your attachment. I think an important part is being able to adjust the clearance between the rear and front bearings so you minimize backlash. Good luck and I'd love to see what you come up with.

  9. #9
    Boolit Buddy
    Join Date
    Jun 2008
    Posts
    145
    Taper was so much you couldn't have just offset the tailstock?

    The only time I ever needed the actual taper attachment was when I needed to thread NPT.

  10. #10
    Boolit Master Hannibal's Avatar
    Join Date
    Sep 2013
    Location
    East of KCMO
    Posts
    2,213
    Cut a #2 Morse taper today using my compound slide. Would have been faster and easier with a taper attachment, but I don't know if this will be a one time need or not yet.

    I prefer to purchase pre-profiled barrels, but not everyone looks at things the same way I do.

    Very informative post. Thank you VERY much for sharing it. I will have to keep this in mind.

  11. #11
    Boolit Buddy map55b's Avatar
    Join Date
    Oct 2013
    Location
    Santa Clara, CA
    Posts
    297
    ProfGa101: I've off set the tail stock a couple of times, but with my new attachment I can now do length longer than the bed of my lathe, if I so choose.

    Hannibal: I too prefer pre-profiled, but sometime I need/want to change an existing profile and sometime the only practical option is to start with a blank. One such use case it re barreling my Hopkins Allen Saddle Ring falling block in 44-40. Thank you, I hope my endeavor may help someone else. This project didn't take too much time and I think my investment was south of $40, not to mention the challenge is always fun and rewarding.

  12. #12
    Boolit Master Hannibal's Avatar
    Join Date
    Sep 2013
    Location
    East of KCMO
    Posts
    2,213
    No kidding? I've got a Southbend Heavy 10. Look on EvilBay and see what a taper attachment goes for. Holy sheep!

  13. #13
    Boolit Buddy map55b's Avatar
    Join Date
    Oct 2013
    Location
    Santa Clara, CA
    Posts
    297
    Yep and they are short, normally <14" max, which would mean I would have to do two phases for practically every barrel.

  14. #14
    Boolit Master


    SSGOldfart's Avatar
    Join Date
    Sep 2011
    Location
    East Texas
    Posts
    2,184
    Wow you guys are amazing with the shop tools,if you don't have it,and see a need for you make it awesome work
    I started out with nothing and I still have most of it left.
    Paralyzed Veterans of America

    Looking for a Hensly &Gibbs #258 any thing from a two cavity to a 10cavityI found a new one from a member here

  15. #15
    Boolit Master Hannibal's Avatar
    Join Date
    Sep 2013
    Location
    East of KCMO
    Posts
    2,213
    Necessity is the Mother of Invention.

    And being a poor Son-Of-A-Gun has something to do with it, in my case at least.

    In the past 2 weeks, I've made a boring bar holder, barrel vice and a floating reamer holder.

    No, Not because I was bored.

  16. #16
    Boolit Buddy
    Join Date
    Aug 2012
    Posts
    129

    Ready for first run

    I was helped by the posts Map55b put on the board and he asked me to show what I came up with, so here goes. The guide bar follower is made from a block of plastic I had on hand. The bottom of the follower is milled to allow the plastic to straddle the 5/8" guide bar snugly (the guide bar stock was thicker than I thought when I posted earlier). I borrowed a little from several different designs on other websites in putting this together. I put a dial indicator on a barrel and traversed its full 22" length and the needle moved smoothly with no jumps like I had with the 3/4" round guide bar I tried first. I would like to add some kind of taper indicator at a future date, but for now I think I better fire it up and see if it functions as I hope. Thanks to Map55b for inspiration and help!
    Attached Thumbnails Attached Thumbnails IMG_2886.jpg   IMG_2887.jpg   IMG_2888.jpg   IMG_2889.jpg   IMG_2890.jpg  

    IMG_2891.jpg   IMG_2892.jpg  

  17. #17
    Boolit Buddy map55b's Avatar
    Join Date
    Oct 2013
    Location
    Santa Clara, CA
    Posts
    297
    Nice! How does it work for you?

Posting Permissions

  • You may not post new threads
  • You may not post replies
  • You may not post attachments
  • You may not edit your posts
  •  
Abbreviations used in Reloading

BP Bronze Point IMR Improved Military Rifle PTD Pointed
BR Bench Rest M Magnum RN Round Nose
BT Boat Tail PL Power-Lokt SP Soft Point
C Compressed Charge PR Primer SPCL Soft Point "Core-Lokt"
HP Hollow Point PSPCL Pointed Soft Point "Core Lokt" C.O.L. Cartridge Overall Length
PSP Pointed Soft Point Spz Spitzer Point SBT Spitzer Boat Tail
LRN Lead Round Nose LWC Lead Wad Cutter LSWC Lead Semi Wad Cutter
GC Gas Check