Titan ReloadingInline FabricationReloading EverythingRotoMetals2
RepackboxMidSouth Shooters SupplyWidenersLee Precision
Snyders Jerky Load Data
Page 1 of 2 12 LastLast
Results 1 to 20 of 32

Thread: 1911 front strap stippling

  1. #1
    Love Life
    Guest

    1911 front strap stippling

    Good evening to all.

    I am working on a retro hardball 1911. I have the AMU books, and have searched the internet, but always come home for good info!

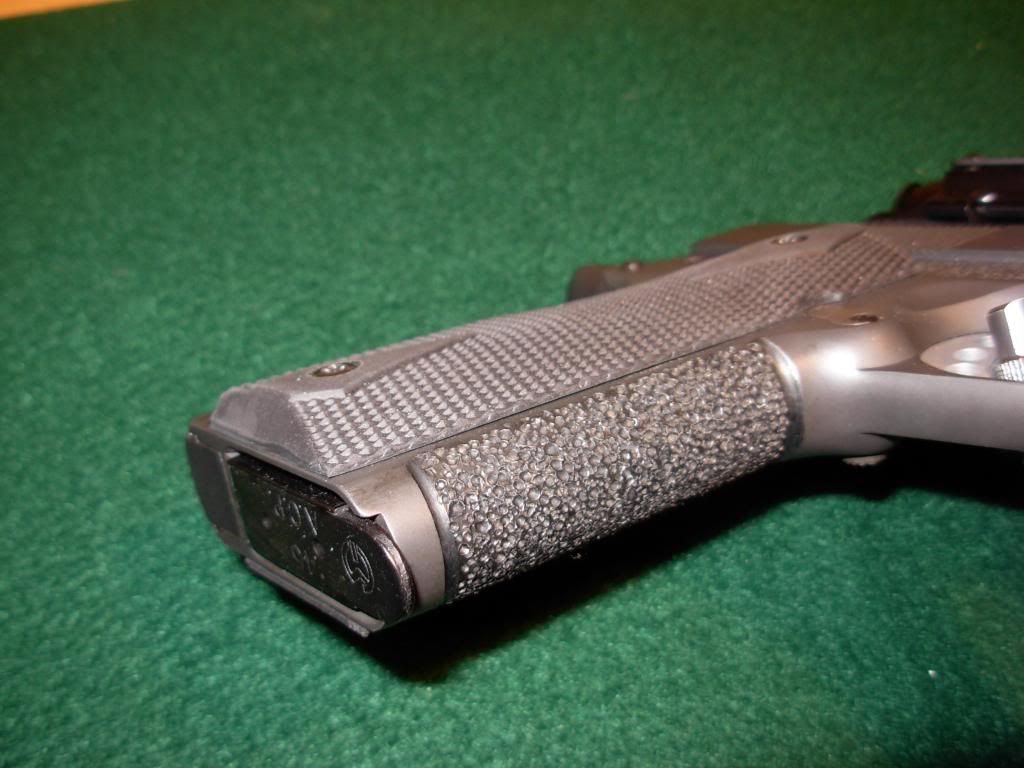
    How did the old AMU gunsmiths stipple 1911 front straps? What tools did they use? Nail punches, armor piercing bullet cores, etc?

    Thank you for any and all information you can provide!

  2. #2
    Boolit Grand Master

    Join Date
    Mar 2013
    Location
    Northwest Ohio
    Posts
    14,542
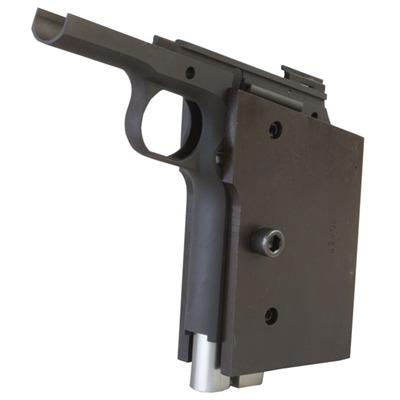
    Most used a prick punch and small hammer 4-6 ounce. They got very good at this. The trick is not to set the punch on the surface but hold it 1/8"-1/4" above the surface and hit it lettig it "bounce" you do this in a continuous cycle quickly mocing the punch as you go. Setting the punch and hitting it gives rows and columuns that isnt as functional or pleasing to the eye. Bounceing and hitting continuously while moving the pucn gives a nondirectional surface more pleasing to the eye. Also when doing this make a steel filler for the mag well to support it so it doesnt get sprung or bent. The added support also gives a more consistant finish as you go. Its quick to learn grab up a piede of cold rolled steel sharpen up a true prick punch (Sharper angle than center punch) and start trying it. I ground some punches for stipling wood cane handles that really did a nice eye pleasing and greatly improved gripping surface. It dosnt take alot of force to do this.

  3. #3
    Love Life
    Guest
    Thank you for the information Country Gent. So something like this?

    Click image for larger version. 

Name:	prick-punches-250x250.jpg 
Views:	2271 
Size:	13.5 KB 
ID:	153449

  4. #4
    Boolit Master


    Join Date
    May 2015
    Location
    Anchorage, AK
    Posts
    1,113
    Yup that's a prick punch. As CG stated. If you can get some 1/4-3/8 plate for the edges and clamp it in the vice it will prevent loosing the lines along the edge. As stated, hover the punch just above the surface and quick light tapes. On your practice piece you can play around with force of the blow. It won't take much more on the hardened frame.

  5. #5
    Love Life
    Guest
    Thank you!

    So to make sure I understand the purpose of the plates: They are to line up with the line where the flat transitions to the rounded front strap? That is to make sure I don't beat the sharp transition out of shape? Great tip and thank you.

  6. #6
    Boolit Grand Master

    Join Date
    Mar 2013
    Location
    Northwest Ohio
    Posts
    14,542
    Another trick that helps alot coat area wanted with layout blue or ink so you can see where you are at and working easier. Good even light helps alot also. What you are looking to do with the punch is raise a sharp edge on the edge of the prick punch mark. The plate guides are a big help. Ink these also to cut down on glare. Ive been known to even lightly hone the point sharp on the punch. We used drill blanks shrapened to the angle / shape we wanted. In the wood I used an oval .093 long and .030 wide. A little practice on a piece of scrap goes a long ways here. Some would also use a flat paint on the surface supposedly to help keed punch from sliding, Ive never tried it. Find a stool that is comfortable hieght for your vise. Get comfortable and look at the piece imagine what you want and place the punch where you want to start. 1/8"-3/16" above and start tapping the punch while slowly moving it . work a border and then try small circular movement going in a direction. The reason stippling was done was it is faster and easier than checkering, Some frames housing arnt quite thick enough for checkering, and 4 axis cnc equipment that could do this unattended .002 at a time werent redialy available. Stippling done correctly is an art form and can be an interesting surface. Oh and when you get a finger or knuckle with that small ball peen it still hurts like the dickens. Dont watch the piece or the pattern watcth the top end of the punch. When your looking somewhere else thats where the hammer goes. LOL

  7. #7
    Boolit Master
    seagiant's Avatar
    Join Date
    May 2005
    Posts
    3,100
    Hi,
    You might want to use a 4 sided punch point instead of round?

    I don't stipple 45's but do stipple BHP's

    Mark Graham at Arizonia Response Systems has a nice DVD on rebuilding BHP and goes into stippling quite heavy.

    It is a nice DVD if you enjoy working on Hi Powers also! ALL knowledge is good!
    “If ye love wealth better than liberty, the tranquility of servitude better than the animating contest of freedom, go home from us in peace.
    We ask not your counsels or arms.
    Crouch down and lick the hands which feed you.
    May your chains set lightly upon you, and may posterity forget that ye were our countrymen.” -Samuel Adams
    Janet Reno, killed more children at Waco, with Bill Clinton's permission, than Adam Lanza killed, at Sandy Hook.

  8. #8
    Love Life
    Guest
    Thank you for the advice. I like the looks of the hardball guns of yestercentury. Good advice to protect my thumb as well. I learned that the hard way using a gas check making tool, lol.

  9. #9
    Boolit Grand Master

    Join Date
    Mar 2013
    Location
    Northwest Ohio
    Posts
    14,542
    Experiment with diffrent punch points 3 sided, 4 sided, ovals or even Vees. all give a diffrent look to the stippling and all can be very effective. Alot of the old armorers used the standard prick punch they used to pre punch layed out holes, mainly because it was handy and there. Some ground special punches up. In wood I pefer the oval 3/32 long 1/16 wide with a radioused end intead of sharp. This gives a nice gripping surface and dosnt cut the grain as bad. Stippled a piece of lexan with this style punch at work one night and it was a good gripping surface and really looked interesting. Must have looked to good as with in 2 days the handle was gone some one took it home with them.

  10. #10
    Boolit Grand Master
    Mk42gunner's Avatar
    Join Date
    Aug 2005
    Location
    Butler, MO
    Posts
    9,046
    I've stippled a few mainspring housings, with a lot finer/ smoother stippling than the level A and B match 1911A1's. What I used was a combination of a smallish prick punch and a small chisel. Like 1/16" or so edge.

    The best advice I can give long distance is to get a 4-6" black iron 3/8 or 1/2" pipe nipple and practice on that. Mount the work piece solidly in a vise, rest your fingers on it and let them provide the spring for the punch.

    Have at it and do at least try to miss your fingers.

    Robert

  11. #11
    Boolit Master jmsj's Avatar
    Join Date
    Nov 2009
    Location
    New Mexico
    Posts
    1,166
    Love Life
    I have stippled quite a few 1911's for myself and for Bullseye shooters. I try and use multiple different shaped punches, resharpen the punches often and vary the amount of force I strike the punches with. I feel the key to stippling is the randomness of the stippling and stippling tight to all edges . I try to make sure that no set pattern in the stippling shows on the front strap.
    I like to cut an upper and a lower border to help define the stippling. I lay out the borders on the frame and cut them to about half depth, do the stippling then go back and cut them to full depth. This method allows you to clean up any errant stippling that might end up in the border cuts.

    The frame needs to be supported during the stippling. I use the Power Custom frame support system. I adjust the side plates even with the flat to round transition. This allows me to use the plates as guides to get the stippling tight to edge of the front strap without getting errant marks on the sides of the frames.


    I have learned the hard way that that if you want to stipple a front strap and want a very accurate pistol, to do the stippling first. The stippling does displace metal and can cause the frame to move in other areas. I once was brought a pistol that had Accu-Rails installed, guy wanted the front strap stippled, I did the stippling job and after the stippling the slide/frame did not cycle as smoothly as before. This can hold true for barrel fitting as well when you are trying for minimal hood clearances and even bearing on all three barrel/slide lugs.
    One other thing, I have found that cast frames are much easier to stipple than forged frames. It will take more force to get the same depth of stippling on forged frames. Forged frames can also have areas that are harder in spots making more difficult to get the depth of stippling even.
    Good luck, jmsj

  12. #12
    Moderator Emeritus

    Join Date
    Apr 2005
    Posts
    7,620
    Love Life, FWIW, jsmj gives good advice. An old WWII vet gunsmith locally, who's now 90 years old, sharp as a tack, but deaf as a board, went into gunsmithing, and became a local legend at shooting. His specialty and first love was the .45, and he built many, many very highly accurate ones. He almost always stippled the front straps, and his manner was rather unique, but not unlike the one jsmj shows above. It's smooth enough that your hand can slip or move as you want/need to when you loosen your grip a tad, but rough enough that it won't move when you grip it with some firmness. As such, it's rather a unique setup that I like very much. I have two old Colt Combat Commanders set up like that, and I love them.

    There are many ways to stipple, all giving varying results. Some target shooters who were afrad the gun would move in your hand, which always seems to change POI very slightly with the .45, liked our local smith to put "hooks" into the stippling on their guns. Some insisted that blood be drawn after a shooting match, but most prefer something more "betwixt and between," so that there's no blood loss, and the hand can move when the shooter wants it to.

    I think stippling is a legitimate art form, and there are any number of ways to go about it. The suggestion above to try it on some scrap or bar stock is, I think, a good one, until you get your own technique down to where you really like it. Trying it on a piece of bar stock would likely be even better, so you could afterward, grab it and feel what it performs like in your hand. I've done a little, but abandoned the practice pretty much, since I couldn't get it to come out quite like I wanted. Just really never had the time to pursue it as a hobbyist. That's what I'd do if it was me, at least, which of course it ain't. Hope this helps you find your muse in it. Like I said, I really think it's a bonafide art form.

  13. #13
    Boolit Buddy
    Join Date
    Aug 2010
    Location
    San Antonio, Texas
    Posts
    416
    In one of Brownell's 'kinks books was a drawing of a light brass hammer, 3-4oz IIRC, that had a lathe bit fitted to each end. A set screw in the hammer held them in. The points were sharpened to the punch shape desired. The punches were also set to be left and right. Use it like an engraving hammer, as far as swinging it. Haven't tried it but looks like it should work if you can hit where you're aiming, I can't

  14. #14
    Boolit Grand Master Char-Gar's Avatar
    Join Date
    Mar 2005
    Location
    Deep South Texas
    Posts
    12,820
    There is, or at least was, such a thing as a stippling punch. Brownell sold these some years back, but I don't know if they still do. However in my opinion stippling is just cosmetic with whatever benefit being between the ears. I have been shooting unstippled 1911s for 55 years and have not missed a target because there was no stippling.
    Disclaimer: The above is not holy writ. It is just my opinion based on my experience and knowledge. Your mileage may vary.

  15. #15
    Love Life
    Guest
    JMSJ, thank you for that information and the pictures. I'm going to practice it a good bit before I go to beating on one of my guns. Once I feel comfortable, the Norinco will get stippled. If works well, then I plan to do one of my Colts.

    So just to verify, do the stippling before I do any slide to frame fit adjustments and barrel fitting?
    Last edited by Love Life; 11-16-2015 at 01:26 PM.

  16. #16
    Boolit Grand Master

    Join Date
    Mar 2013
    Location
    Northwest Ohio
    Posts
    14,542
    Along with fitting of the trigger and trigger parts. Stippling does stretch the surface of the frames grip area and the vibrations changes can cause movement elsewhere in the frame. Stippling is moving metal around one or to pricks not to much but when mutiplied buy the huundreds of pricks in a pattern it can cause movement.

  17. #17
    Love Life
    Guest
    So should the stippling occur before I do any other work to the gun? Stipple first, and then do any other mods or work?

    An aside: I love the AMU books because it shows a slide being squeezed in a vise to tighten/eliminate the horizontal play. I did just that on another gun, and peened the frame rails, lapped them in. The more I play with these guns, the less I fear doing stuff to them.

  18. #18
    Boolit Master jmsj's Avatar
    Join Date
    Nov 2009
    Location
    New Mexico
    Posts
    1,166
    [QUOTE=Love Life;3438468]So should the stippling occur before I do any other work to the gun? Stipple first, and then do any other mods or work?

    That would be my suggestion.
    Just a heads up, Norinco's are notorious for being very hard. Please let me know your opinion of the hardness of the Norinco frame. I've got a line on a couple of them locally I'm thinking about for a couple of projects.
    Thanks, jmsj

  19. #19
    Love Life
    Guest
    I haven't had any issues stoning them or swaging down rails, but I'll let you know when I start punching on them.

    2 of the ones I bought had the notorious lug peening issue.

  20. #20
    Boolit Master JHeath's Avatar
    Join Date
    Mar 2012
    Location
    WA state/ BC mountains
    Posts
    619
    I should be embarrassed even to speak up in this company, but . . .

    I masked this with tape around the edges, and stippled it with the point of an ordinary spade bit (wood drill bit). I put the bit in contact before striking it.

    The spade bit raised sharp -- but not too-sharp -- directional "teeth" that I could orient or angle as desired.

    This is a Tokarev, a cheap pistol that I really like. I wasn't uptight about the risk of "ruining" it.
    Attached Thumbnails Attached Thumbnails image.jpg  

Page 1 of 2 12 LastLast

Posting Permissions

  • You may not post new threads
  • You may not post replies
  • You may not post attachments
  • You may not edit your posts
  •  
Abbreviations used in Reloading

BP Bronze Point IMR Improved Military Rifle PTD Pointed
BR Bench Rest M Magnum RN Round Nose
BT Boat Tail PL Power-Lokt SP Soft Point
C Compressed Charge PR Primer SPCL Soft Point "Core-Lokt"
HP Hollow Point PSPCL Pointed Soft Point "Core Lokt" C.O.L. Cartridge Overall Length
PSP Pointed Soft Point Spz Spitzer Point SBT Spitzer Boat Tail
LRN Lead Round Nose LWC Lead Wad Cutter LSWC Lead Semi Wad Cutter
GC Gas Check