Inline FabricationSnyders JerkyReloading EverythingTitan Reloading
WidenersLee PrecisionMidSouth Shooters SupplyLoad Data
RotoMetals2 Repackbox
Page 1 of 2 12 LastLast
Results 1 to 20 of 30

Thread: 357 max and PP

  1. #1
    Boolit Bub
    Join Date
    Nov 2008
    Location
    adirondacks
    Posts
    62

    357 max and PP

    I've tried paper patching a few years back with a 45colt rifle with so-so results. Never revisited it since.. seemed like a lot of work and no great return, though I'm sure there was plenty I could have done differently. Fast forward a few years. I recently built a stub 357max for an H&R. Barrel used is a Green Mountain .347/.356 1-20 twist. Used the Graybeard PTG reamer and so far it has been almost boringly accurate. Only things I've had trouble getting to shoot is the Lyman 358430, but anything with a copper jacket has been either good or great.

    Bored last weekend, I started looking into paper patching. One thing I came across was a guy who made his own mold for a PP boolit. So I put some aluminum in the lathe and made a mold, and made a .350 size die. Due to the slow twist of the barrel I feel I'm limited to boolit weight/length, and the weight of it drops at 184gr. It wasn't as easy as it sounds.. I made a first mold that cast at 210gr, I feared it was a bit too long, so I shaved it down to 190gr. boolits didn't want to drop out too well so in trying to put a slight taper I did something wrong and the boolit grew about .020 in diameter! oops.. chucked up about piece of aluminum and this time got what I wanted, .0015" taper and drops out of the mold well. Couldn't find the paper I was looking for to use, and ended up grabbing a notebook in my gunroom and started cutting some strips. Couldn't even begin to tell you anything about the paper except it mic's at .003". Boolits sized to .350, wrapped then sized through a .356 die with past wax, and end diameter is .357. Didn't think it was ideal, but it'll get me started...

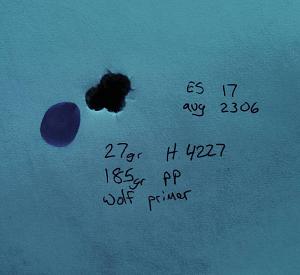
    My gun has been very partial to the H4227 with anything short seated and heavy charges. Granted I didn't have high expectations with my poor experience before with paper patching, and first time at it again with this gun. First few loads impressed me, thinking there's hope here! At 50 yards they were all about ~1.5". Then when I shot 27gr H4227 I stopped after 3 and was afraid to shoot the next two, knowing I would mess it up! Not the case, and although its only at 50 yards, I was pretty pumped.

    Sorry if its a long post, but after reading lots on here I felt I had to contribute something back. If it wasn't for the stuff I read here this week I wouldn't have had any of this happen. Thought it was pretty cool to go from making a mold to shooting a tight group with it. So once again, Thank you to everyone here

    Click image for larger version. 

Name:	bc1cd263-0414-420d-8a30-8bc12be3358d.jpg 
Views:	42 
Size:	29.1 KB 
ID:	143659
    Click image for larger version. 

Name:	ess1436031891077.jpg 
Views:	38 
Size:	35.4 KB 
ID:	143660

  2. #2
    Boolit Grand Master
    Join Date
    May 2007
    Posts
    5,302
    Ya done good. Hope you have lots of room in the freezer, you're going to need it. Way to go!

  3. #3
    Boolit Bub
    Join Date
    Nov 2008
    Location
    adirondacks
    Posts
    62
    Thanks for the kind words. Wondering if PPing is really this easy and maybe I over complicated it before, or maybe I just got lucky? My two biggest concerns were the bullet being sized to .350 instead of bore size of .347 or just over at .348. The other being the paper, since I used the cheap lined notebook paper that was right in front of me. I have a box of the green bar printer paper but couldn't find it when I first looked. I've since found it but now wondering if its worth my time since this worked so well? Also like the lines to use for reference when cutting strips, sure made it quick and easy.

    Anyways, here's a picture of the mold and a boolit before sizing, cast of 30:1. Don't mind the cude looking spru cutter, its stoned nice and smooth on the bottom


    Click image for larger version. 

Name:	ess1436073809094.jpg 
Views:	50 
Size:	49.1 KB 
ID:	143708
    Click image for larger version. 

Name:	ess1436073864054.jpg 
Views:	44 
Size:	28.5 KB 
ID:	143709

  4. #4
    Boolit Grand Master 303Guy's Avatar
    Join Date
    Oct 2008
    Location
    New Zealand
    Posts
    9,078
    Very impressive. Nice mold. Nothing wrong with the sprue cutter.
    Rest In Peace My Son (01/06/1986 - 14/01/2014)

    ''Assume everything that moves is a human before identifying as otherwise''

  5. #5
    Boolit Master
    Join Date
    Mar 2007
    Location
    PA
    Posts
    683
    How sweet it is! Congrats on the PP group!

    Best regards,

    CJR

  6. #6
    Boolit Grand Master
    Join Date
    May 2007
    Posts
    5,302
    moto357 -- This is very neat. Can you post more pictures on how the mold works? I can't figure out how the boolit is taken from the mold.

  7. #7
    Boolit Bub
    Join Date
    Nov 2008
    Location
    adirondacks
    Posts
    62
    725, the mold was cut with a slight taper, the bottom being about .0015 larger than the front on the bearing surface. This helps it drop right out with a few taps. On the first mold I made, the boolit had straight sides and as the mold heated up, giving better fill, the bullets weren't dropping out too easily. Upon trying to give that mold a slight taper I messed up something on the lathe and the boolit was then about .365+, so the second mold was made. The whole idea was to make something simple that worked, but not my idea - can't take credit for that! A gentleman here rbertalotto posted about it with a link to an article on his webpage, http://rvbprecision.com/shooting/sho...ting-mold.html
    Although slightly different in my process, I used this for my reference. Here is a picture of the top of the mold if that helps

    Click image for larger version. 

Name:	ess1436106578675.jpg 
Views:	33 
Size:	31.8 KB 
ID:	143722

  8. #8
    Boolit Grand Master
    Join Date
    May 2007
    Posts
    5,302
    Wow. I'm amazed. No parting lines on your stuff! I've never seen a mold like that before. Learn something new everyday. How did you bore the boolit shape? Cut the taper you desired? Polish the interior of the mold? This is all very interesting to me.

  9. #9
    Boolit Grand Master
    Join Date
    May 2007
    Posts
    5,302
    I read the article, and it answered my questions. Thanks.

  10. #10
    Boolit Grand Master
    Join Date
    May 2007
    Posts
    5,302
    moto357 -- I assume brass would be a good medium for a mold like this. I have a small piece that might be suitable. Hmmm...

  11. #11
    Boolit Bub
    Join Date
    Nov 2008
    Location
    adirondacks
    Posts
    62
    Good question, I've only ever used steel or aluminum molds ever but always wanted a brass mold. Tonight I'll chuck up a piece of brass and see what I can make. I'm no professional machinist so anything's possible

  12. #12
    Boolit Grand Master
    Join Date
    May 2007
    Posts
    5,302
    Your results sure look professional to me.

  13. #13
    Boolit Bub
    Join Date
    Nov 2008
    Location
    adirondacks
    Posts
    62
    Thanks! Almost finished with the brass mold, just need to make the sprue cutter and finish the handle. I added a little more to this one so its taking a bit longer. The brass machined real easy though, just have to wait till tomorrow for a finished product

  14. #14
    Boolit Grand Master
    Join Date
    May 2007
    Posts
    5,302
    Photos ! Photos !!

  15. #15
    Boolit Bub
    Join Date
    Nov 2008
    Location
    adirondacks
    Posts
    62
    The last photo is the reamer I made, the bottom edge is the cutting edge. Its basically the nose profile and the widest part ends up cutting the boolit body as I run the carriage in/out.

    Click image for larger version. 

Name:	ess1436193752150.jpg 
Views:	33 
Size:	68.7 KB 
ID:	143809
    Click image for larger version. 

Name:	ess1436193706907.jpg 
Views:	29 
Size:	47.3 KB 
ID:	143810
    Click image for larger version. 

Name:	ess1436129301026.jpg 
Views:	22 
Size:	40.1 KB 
ID:	143811

  16. #16
    Boolit Grand Master
    Join Date
    May 2007
    Posts
    5,302
    The off side mounting of the sprue plate because you ran out of room or to save the brass from pounding when the sprue is cut? Eager to see the boolit it produces and hear your comments on brass. When I can see my way clear, I'm going to the shop and give it a whorl. (That maybe next winter )

  17. #17
    Boolit Bub
    Join Date
    Nov 2008
    Location
    adirondacks
    Posts
    62
    The offset was just to give myself more room, no function to it though. If the brass rod I had was even just 1.5 instead of the 1.25" I would feel more comfortable. Everything just seemed so tight together on the aluminum.

    First attempt the boolits didn't want to fall out of the mold. Not sure why because there is a taper of about .001" along the bullet. I dropped about 5 or 6, pulling them out gently with pliers so I could inspect and measure. Hard seeing anything since they were so wrinkled. After things cooled I put some lapping compound on the rear of the boolit and spun it with the drill. Next attempt my pot wasn't quite up to temp yet, but the boolits literally fell out of the mold when I tipped it upside down over the towel. Probably won't be till tomorrow before I can get a quality casting session in and see how it runs. So far I like it and I'm hoping the brass holds the heat better/more consistent than aluminum.

    Oh, these boolits are measuring .356-.357 top to bottom and weigh 210gr. Thinking I can size for PP or unsized for powder coat

  18. #18
    Boolit Grand Master
    Join Date
    May 2007
    Posts
    5,302
    Sounds near perfect. You're going to have some fun with those! I'm inspired.

  19. #19
    Boolit Bub
    Join Date
    Nov 2008
    Location
    adirondacks
    Posts
    62
    Finally got another day at the range. My time in the reloading room didn't feel as it went quite as constructively... still learning this PP stuff! I have a few questions maybe some of you with more experience can help with. This week I used the printer paper, which is almost a full .001" thicker, being about .0038". Having thicker paper and plenty of room in the chamber I enlarged my size die to .3575" from .356", leaving sized PP boolits .358+ which still chambers easily.

    First question is about the paper, this stuff seems to tear much easier when wet than the notebook paper I used last week. Is this a sign of something, or just something to get used to as I'm wrapping with no other worries?

    My next question is on brass sizing. I've read to leave brass unsized, but all my readied brass was sized since this wasn't thought of till time to reload! The paper I assume would remain better intact upon loading, but my other concern is when seating the boolit. The top leading edge seems to catch on something inside the die, but not every time, and pulls down and wrinkles part of the top layer. Sometimes more than others. After shooting today it seems to have very little effect on accuracy which also amazed me.

    Last question deals with the wrapping of the boolit with the paper. First let me give some specific figures to help you know where I'm at. My bore diameter is about .3475" and my boolits are sized to .349-.3495". I noticed after wrapping and sizing, if there was a paper tear or anything else when loading or whatever I unwrap and see the boolit is now a few thou smaller, around .346" under where the paper was wrapped. Is it best to wrap the full bearing surface of the boolit, or can I leave some of this .349 area exposed, which would act like a bore riding nose? and if so would leading be an issue? Reason I ask, if I wrap with shorter paper, not going all the way up the bearing surface it allows me to keep a small amount of the boolit in the case, leaving room for more powder and chambering in the gun easier.

    Like I said, didn't get as much loaded as I wanted to try, but a good start and makes me feel confident that this PP stuff isn't voodoo, but actually fairly easy aside from time consuming(which I enjoy). The 212gr boolits were forced into the leade/rifling upon chambering. The 185g boolits loaded easily similar to last week. I n case its hard to read, top left is 27gr Reloader 7 and 212gr boolit. Bottom left is 28gr H4198 and 212gr boolit. Top center 27gr Reloader 7 and 185gr boolit, last the top right is the same load that did so well last week, only difference this week is the paper, and all 5 of these had the wrinkled down top edge from the seating die, some worse than others but all had it. This one was 27gr H4227 and 185gr boolit and still impressive I thought. ALL shots were 50yrds again this week!

    Sorry for the long post, learning as I go and finding more questions as I go... Thanks again for all the help along the way!

    Click image for larger version. 

Name:	71215.jpg 
Views:	32 
Size:	178.3 KB 
ID:	144375

  20. #20
    Boolit Master
    Join Date
    Mar 2007
    Location
    PA
    Posts
    683
    Moto357,

    Some comments:

    1. The CB diameter should be 0.001-0.0015 larger than your rifle's bore diameter.
    2. Ungrooved CB can be tricky to PP for hi-vel. The NRA documented their work on PP and found paper retaining grooves were required for hi-vel. Rolling the CB between files can help a little to retain the PP, i.e it depends on the velocity you want. Likewise, good paper shrinkage is required.
    3. Print type papers are treated to be water-repellent so that the ink is not absorbed into the paper , while drying, to blur the print characters. The paper is made so the ink drys on the paper's surface to give well defined print characters. Some add baking soda to the wetting solution to get the paper to absorb more water and shrink tighter on the CB. I tried that; sometimes it absorbed water (shrunk tightly) and sometimes it did not absorb water (no shrinkage). When the paper didn't shrink enough and I final sized the PPCB, the CB diameter was smaller than bore diameter and the loads were inaccurate. I eventually went to Mead tracing paper, wetted with water + Carpenter's glue(PVA) to strengthen it. I adjusted the final diameter using 2 or 3 wraps and I didn't have to search for some odd paper thickness. This works well for my hi-vel loads(3000+fps).
    4. Some place the PP over the start of the CB ogive and seat the ogive into the chamber's forcing cone. I tried that and it didn't work for me. So I went back to what the NRA did in their PP research; i.e. seat the forward cylindrical part of the the CB into the bore rifling so it engraves about an 1/8" or more. Then locate the leading edge of the PP against the chamber's forcing cone. This allows the CB to be aligned with the bore rather than with the chamber's forcing cone which can be machined in at an angle or offset (common problems in factory rifles). If de-bulleting becomes a problem, shorten the OAL so the alignment portion of the CB is shorter. Try an OAL to give 1/16" engraving of the forward cylindrical section of the CB .

    Finally, keep an open mind. What works for some may not work for you. Your rifle will eventually tell you what it likes. Hope this helps!

    Best regards,

    CJR

Page 1 of 2 12 LastLast

Posting Permissions

  • You may not post new threads
  • You may not post replies
  • You may not post attachments
  • You may not edit your posts
  •  
Abbreviations used in Reloading

BP Bronze Point IMR Improved Military Rifle PTD Pointed
BR Bench Rest M Magnum RN Round Nose
BT Boat Tail PL Power-Lokt SP Soft Point
C Compressed Charge PR Primer SPCL Soft Point "Core-Lokt"
HP Hollow Point PSPCL Pointed Soft Point "Core Lokt" C.O.L. Cartridge Overall Length
PSP Pointed Soft Point Spz Spitzer Point SBT Spitzer Boat Tail
LRN Lead Round Nose LWC Lead Wad Cutter LSWC Lead Semi Wad Cutter
GC Gas Check