Snyders JerkyLoad DataTitan ReloadingLee Precision
MidSouth Shooters SupplyInline FabricationRotoMetals2Reloading Everything
Wideners Repackbox
Page 1 of 2 12 LastLast
Results 1 to 20 of 38

Thread: Smelting pot...threads on 20lb propane tank?

  1. #1
    Boolit Master

    SeabeeMan's Avatar
    Join Date
    Aug 2011
    Location
    Spooner, WI
    Posts
    693

    Smelting pot...threads on 20lb propane tank?

    I'm getting one of BigBlack's smelter valves and am trying to figure out what to put it in. My thought is a typical cut-in-half 20lb propane tank, but rather than using the bottom, use the top. I could take the smelting valve, have it threaded or weld it to a threaded adapter, and then put it right in the bottom (was the top) of the tank, allowing me to get every last bit of lead. I cannot find what kind of threads are in the top of a 20lb tank. Not the POL/valve assembly, but the threads that are part of the tank that the assembly screws in to.

  2. #2
    Moderator Emeritus fishhawk's Avatar
    Join Date
    Apr 2007
    Location
    wausau wis
    Posts
    3,654
    3/4 pipe thread
    Moderating is a responsibility not a privilege, abuse your power and you lose, no matter how powerful you may think you are.

  3. #3
    Boolit Master
    Join Date
    Apr 2009
    Location
    Houston TX
    Posts
    761
    The valves on the propane tank are screwed in very tight.

    I make a water tank for cooling on the milling machine and lathe.

    To get the valve out I had to weld the tank to my welding table at the base of the tank remove the guard ring at the top and use a big wrench with a cheater pipe to unscrew the valves from the tank.

    Who ever installs the valves puts them in there very tight.

  4. #4
    Boolit Master

    SeabeeMan's Avatar
    Join Date
    Aug 2011
    Location
    Spooner, WI
    Posts
    693
    Good to know. I'm thinking this might work. I'll post pics of my build and hopefully I'll end up with something along the lines of a Satan's Little Smelter for a fraction of the cost.

  5. #5
    Boolit Master justingrosche's Avatar
    Join Date
    Mar 2008
    Location
    Auburn, Wa.
    Posts
    520
    Rich, based on past experience with bottom pour pots, you really don't want to get every last bit out. You'd be digging dross out of what ever type of nozzle you are using. If you didn't get every bit out, you'd likely call your pot the "Leak Master 1000" It wouldn't hurt to leave 5# a pot that will likely hold a hundred and a half. Even switching grades of alloy, you would never see an appreciatable difference to your final product.

  6. #6
    Boolit Master
    Join Date
    Apr 2009
    Location
    Houston TX
    Posts
    761

    Smelting Pot

    Drawing of a tank I thought about building.

    I never built the pot but follows your concept.

    The valve looks the same.
    Attached Files Attached Files

  7. #7
    Boolit Master

    SeabeeMan's Avatar
    Join Date
    Aug 2011
    Location
    Spooner, WI
    Posts
    693
    Good point on leaving some in there. I think I would just use this for the initial bulk cleanup and go back to my dutch oven for mixing alloys outside of the casting pot.

    Bstone5, thats pretty much it. I want to avoid welding that nice valve in if at all possible in case I change my mind in the future. I figure if the outlet of the valve goes to a piece of angle iron, that should keep the whole contraption nicely in the flame and from freezing up.

    I think I'll just weld on 4 legs of angle iron that put the chute just above the burner, as well as tack on a sheet metal windscreen around the legs to keep the heat on the pot.

  8. #8
    Boolit Master
    Dragonheart's Avatar
    Join Date
    Jan 2012
    Location
    Katy, Texas
    Posts
    2,705
    I considered using the top, but since I wanted a bottom pour a hole in the center would be in the way. I copied the RCBS pour design. Additionally, I found adding a skirt around the pot traps the heat, speeds up the melting and makes the pot very stable. My pot easily holds 200+ pounds and makes quick work of range lead.
    Attachment 142460

  9. #9
    Boolit Master
    Join Date
    Apr 2009
    Location
    Houston TX
    Posts
    761
    Three legs might be better, four legs might make the pot wobble if not on a level surface.
    The valve like on a RCBS pot looks good and keeps the machined parts off the bottom and out of the lead.
    There are a lot of ways to build the pot with a little welding.

  10. #10
    Boolit Master

    alamogunr's Avatar
    Join Date
    Mar 2005
    Location
    Tennessee
    Posts
    4,509
    Quote Originally Posted by bstone5 View Post
    The valves on the propane tank are screwed in very tight.

    I make a water tank for cooling on the milling machine and lathe.

    To get the valve out I had to weld the tank to my welding table at the base of the tank remove the guard ring at the top and use a big wrench with a cheater pipe to unscrew the valves from the tank.

    Who ever installs the valves puts them in there very tight.
    Several years ago I had a couple of propane tanks with the old valves. A friend owns a fuel company(propane, gasoline, etc.) so I asked about replacing the valve. They had a clamping arrangement for the tank and a huge pipe wrench. Piece of cake. The clamp was a metal strap arrangement with possibly a rubber lining. The tank didn't slip when they put the twist on the valve. I'm still using the tanks with the new valves.
    John
    W.TN

  11. #11
    Boolit Buddy
    Join Date
    Jan 2015
    Posts
    184
    A drain hole at the lowest point will clog with gunk often. Better to have a flat bottom pot if using bottom pour.

  12. #12
    Boolit Bub
    Join Date
    Feb 2011
    Posts
    56
    Have you never noticed that lead is much heavier than "gunk"? How does it clog the valve if you always leave a layer of lead at the bottom at the end of a casting session?

  13. #13
    Boolit Master
    Mal Paso's Avatar
    Join Date
    Jun 2010
    Location
    Carmel, Ca
    Posts
    4,121
    Quote Originally Posted by GunStuff View Post
    Have you never noticed that lead is much heavier than "gunk"? How does it clog the valve if you always leave a layer of lead at the bottom at the end of a casting session?
    Surface tension can hold an amazing amount crud on the bottom of the pot.
    Mal

    Mal Paso means Bad Pass, just so you know.

  14. #14
    Boolit Master

    SeabeeMan's Avatar
    Join Date
    Aug 2011
    Location
    Spooner, WI
    Posts
    693
    Would I be better off scrapping the top of a propane tank idea and just building myself a pot? It would be easy enough to cut a tank apart so there are just the straight sides and weld a piece of plate onto the bottom, or just make it square. Round seems to be easier to flux and scrape the edges, but I don't have a way to make a hoop other than cutting something apart.

  15. #15
    Moderator
    RogerDat's Avatar
    Join Date
    Nov 2013
    Location
    Michigan Lansing Area
    Posts
    5,750
    Steel pipe gives you something to use for the round sides, weld a plate to the bottom drilled out for your valve. I know at least one member posted pictures of his built like this. Needed it for smelting sailboat keels by lowering them into a really big pot from a hoist. Heavy but solid build.
    Scrap.... because all the really pithy and emphatic four letter words were taken and we had to describe this source of casting material somehow so we added an "S" to what non casters and wives call what we collect.

    Kind of hard to claim to love America while one is hating half the Americans that disagree with you. One nation indivisible requires work.

    Feedback page http://castboolits.gunloads.com/show...light=RogerDat

  16. #16
    Boolit Master
    Mal Paso's Avatar
    Join Date
    Jun 2010
    Location
    Carmel, Ca
    Posts
    4,121
    Melting range scrap or any scrap lead always leaves some crud on the bottom. I think if the valve were 1/4" off the bottom or extended 1/4" into the bottom that would eliminate most of it. It's surface tension that holds it there and with lead on top it doesn't move much. If you want a round bottom weld a 3/4" coupling more toward the edge so it isn't the very bottom.

    I buy my steel from a metal fabrication shop. I have had them roll 12ga steel into a 10" cylinder when I needed a custom size tube, that's a lot heavier than a propane tank. Off cuts from well casing is another idea.
    Mal

    Mal Paso means Bad Pass, just so you know.

  17. #17
    Boolit Master

    SeabeeMan's Avatar
    Join Date
    Aug 2011
    Location
    Spooner, WI
    Posts
    693
    Time to put my picture posting skills to the test.

    I finished building my pot tonight with BigBlack's valve, a 20lb tank, and a whole bunch of advice from this wonderful forum. The goal was to build a bottom pour smelting pot and keep the cost to a minimum. I inherited my dad's habits of saving anything that could ever possibly be of use, which includes pulling anything made out of tube, angle or sheet steel apart before recycling/throwing away the rest of it. I managed to build the entire thing out of metal I had under the bench...and it looks like it. I also had to build this between a 4 year old sticking her head into the garage while I was trying to weld, a 6 month old needing naps, and my wife trying to sneak in some hours for work. Tack welding 22ga for the windscreen with a flux core welder is also not the easiest thing in the world, so those aren't the best welds in the world. Here we go!

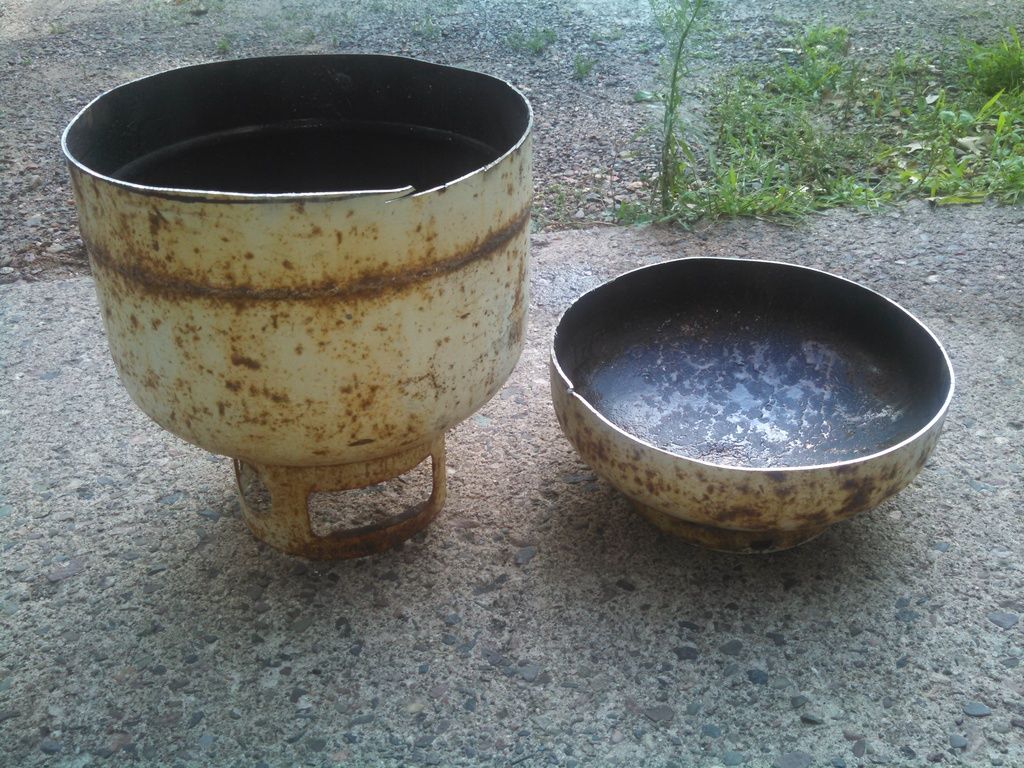
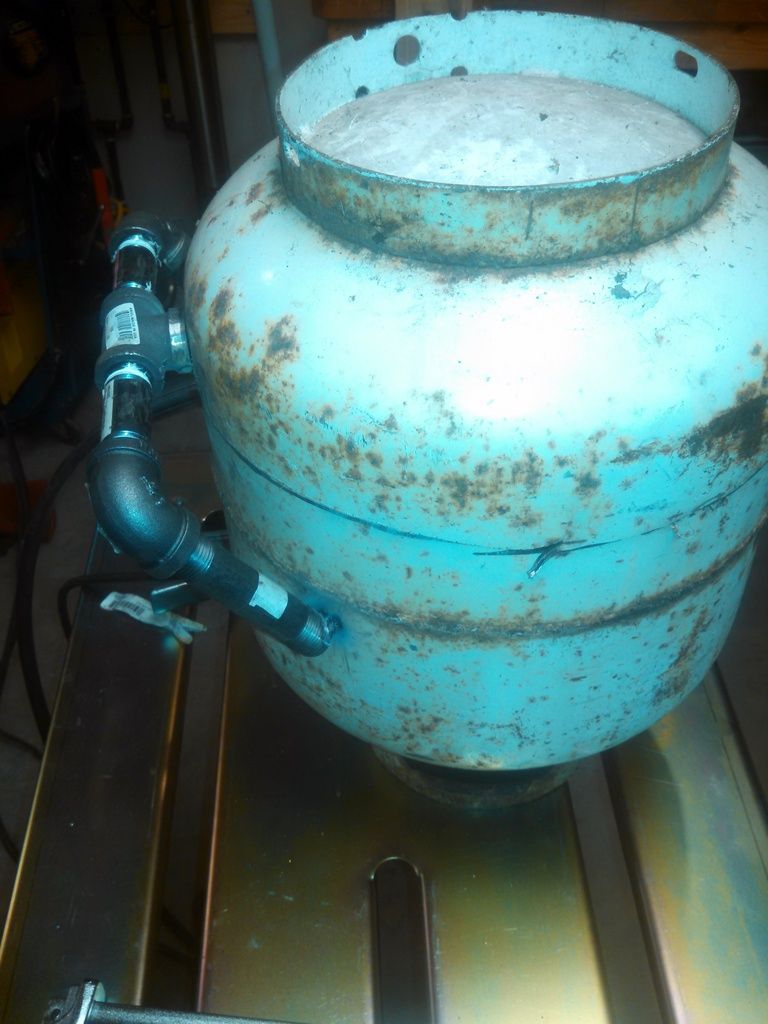
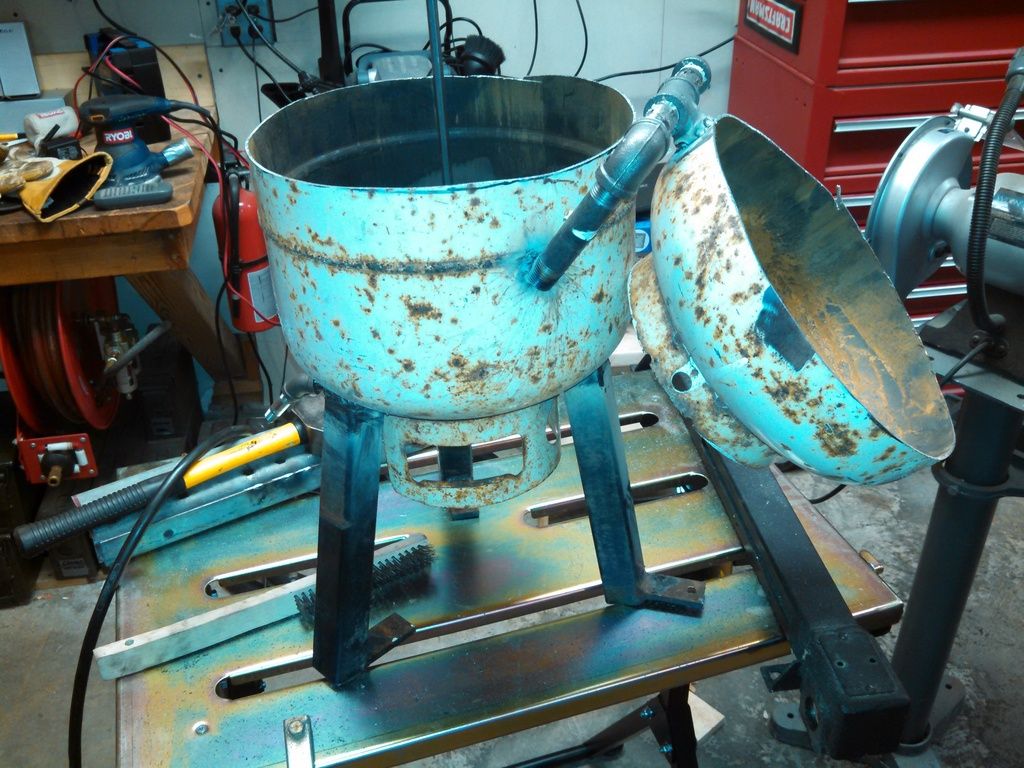
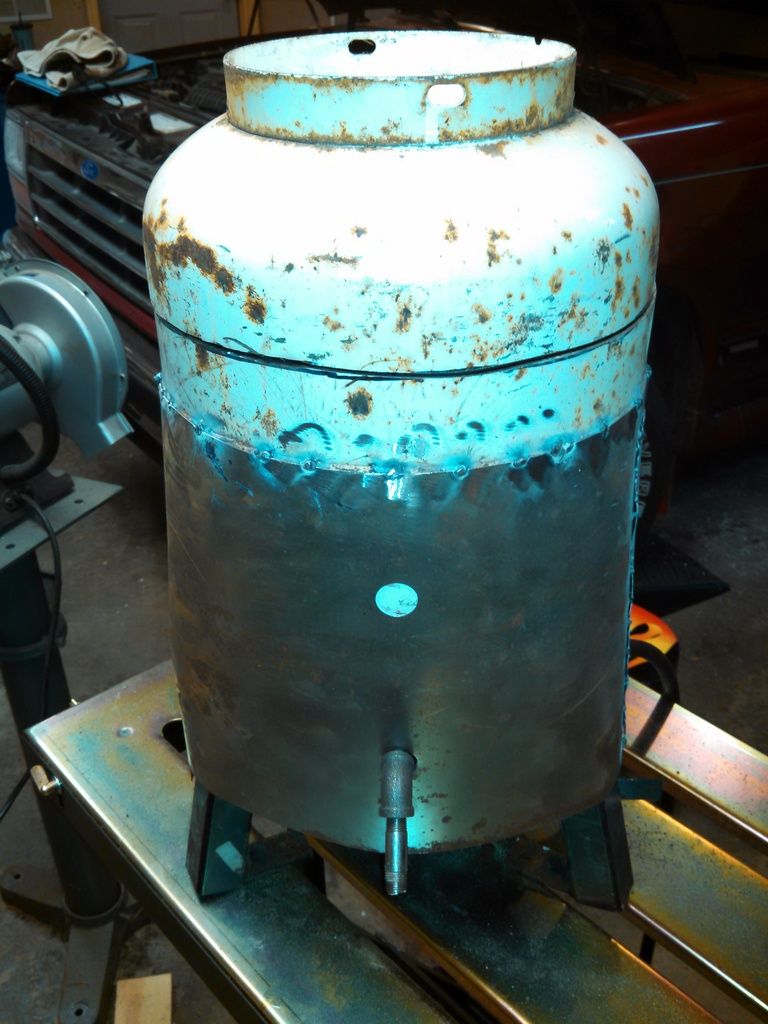
    Started with a 20lb tank I got for free from a supplier when I refilled 2 other tanks. The valve was already out and I left it filled with water for about a week. I cut it in half about 3 inches *below* the weld...remember that this is upside down. I started it with an air cutoff wheel but switched to the sawzall. It was tough to keep a straight line and you can see I got a little off at the end. My plan for the bottom half means it doesn't really matter how straight the cut is, but I'm not happy with that little cut. Next time I'll use the plasma cutter but I was a bit nervous about plasma and propane despite it being filled with water.

    [IMG][/IMG]

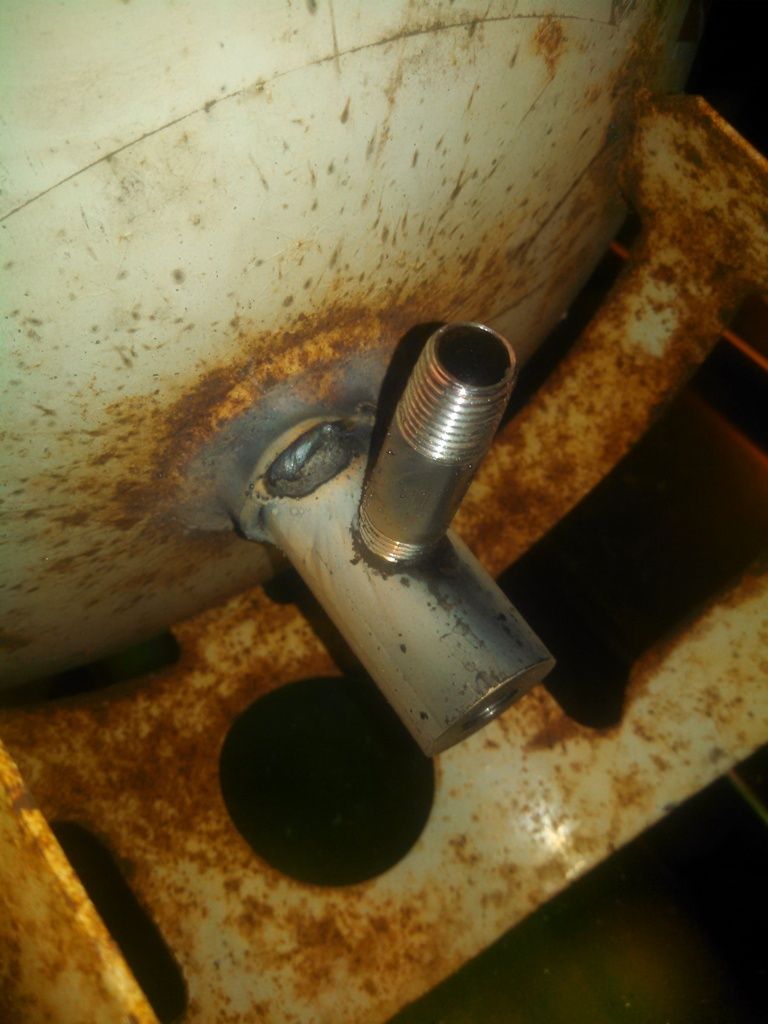
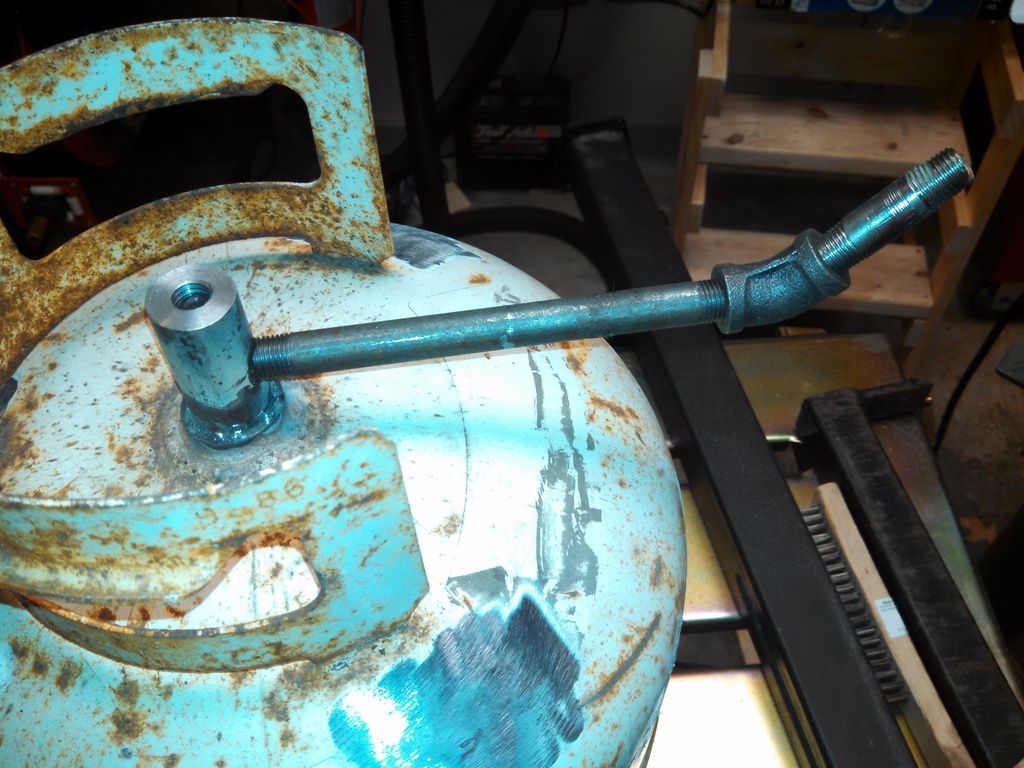
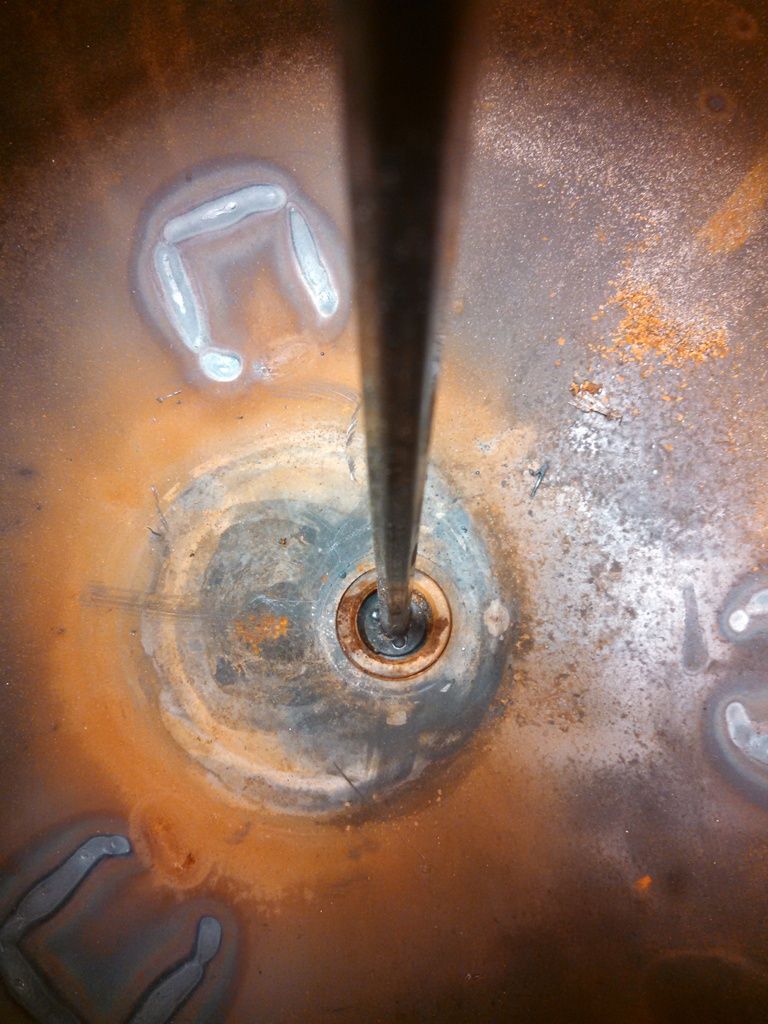
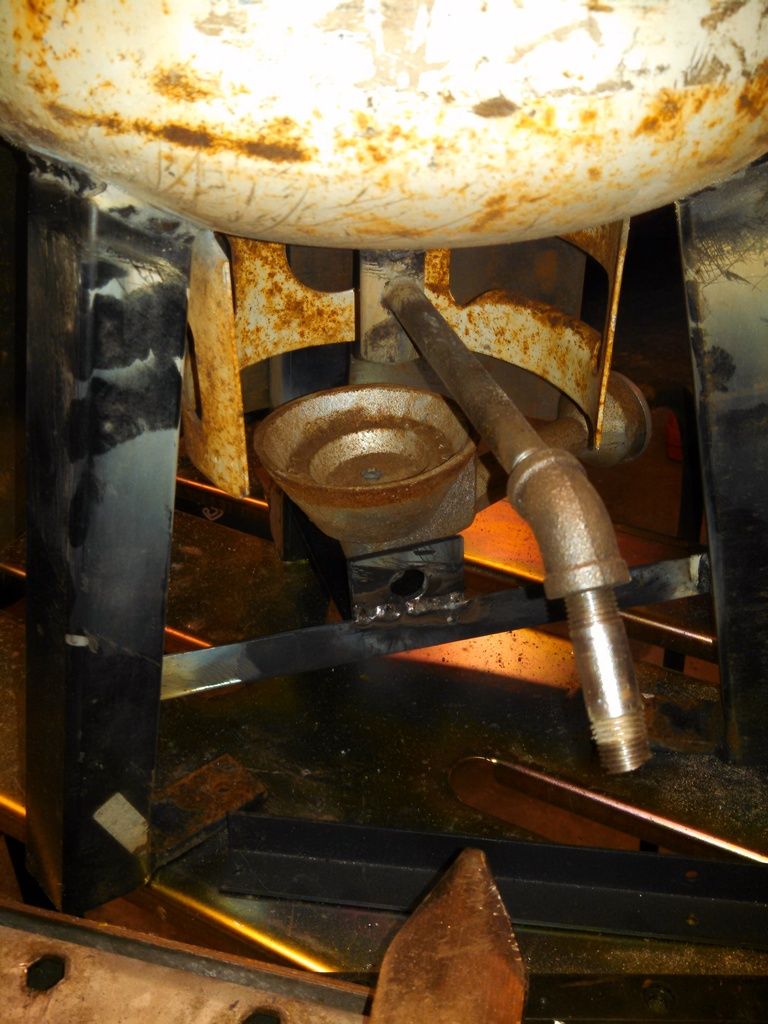
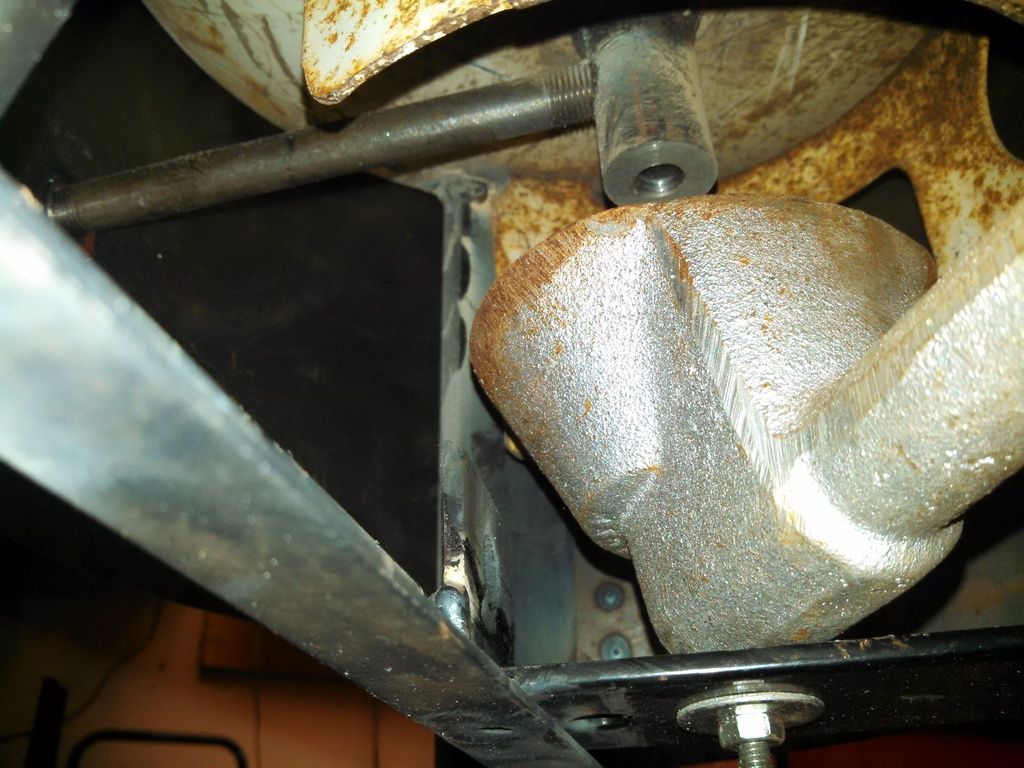
    Then came the valve. Tacked in place and welded in. I swapped out the small nipple BigBlack had in there for a 6" nipple, a 45" elbow, and then the original to get a downward angle on the spout and to get it away from the pot.

    The original plan involved having BigBlack turn the valve down a bit and threading it for 1/2" NPT, which would then be installed using a 1/2"-3/4" bushing in the original threads. We had a few issues making that work out and eventually I just ended up with a valve to weld in. It looks like it is going to work great and I love how he took material off the shank of the bolt to allow better flow. I also ground the outer edge of the bolt, above the mating surface) so that there would be better flow between the outer edge of the head and inner edge of the tank threads.

    [IMG][/IMG]
    [IMG][/IMG]

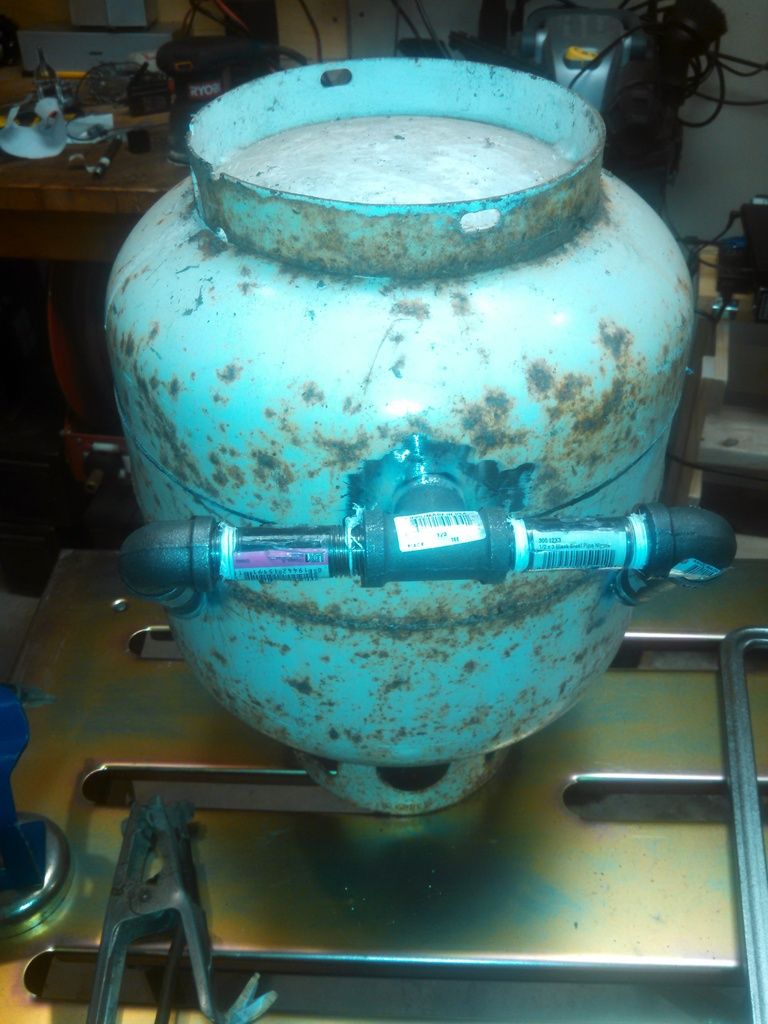
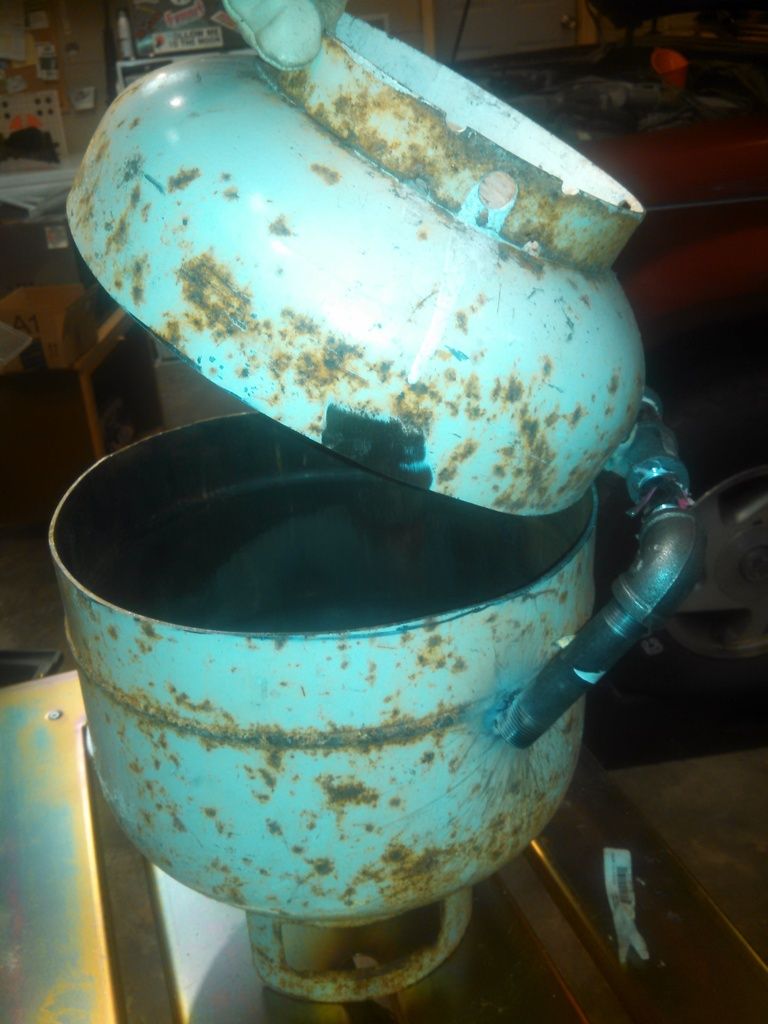
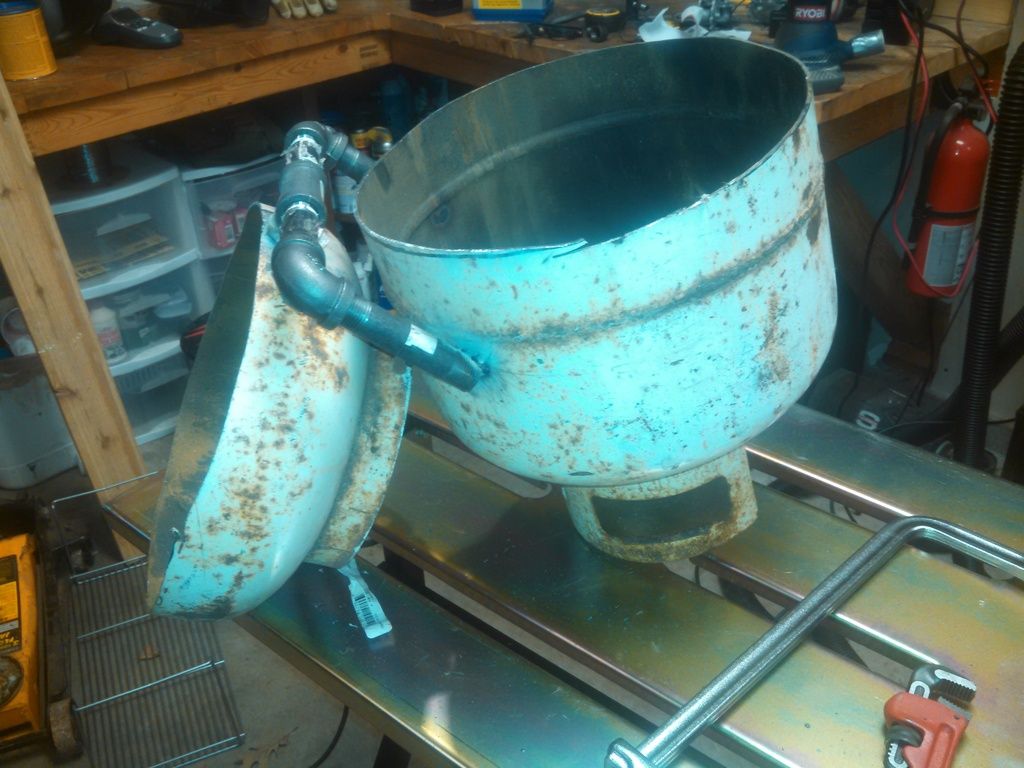
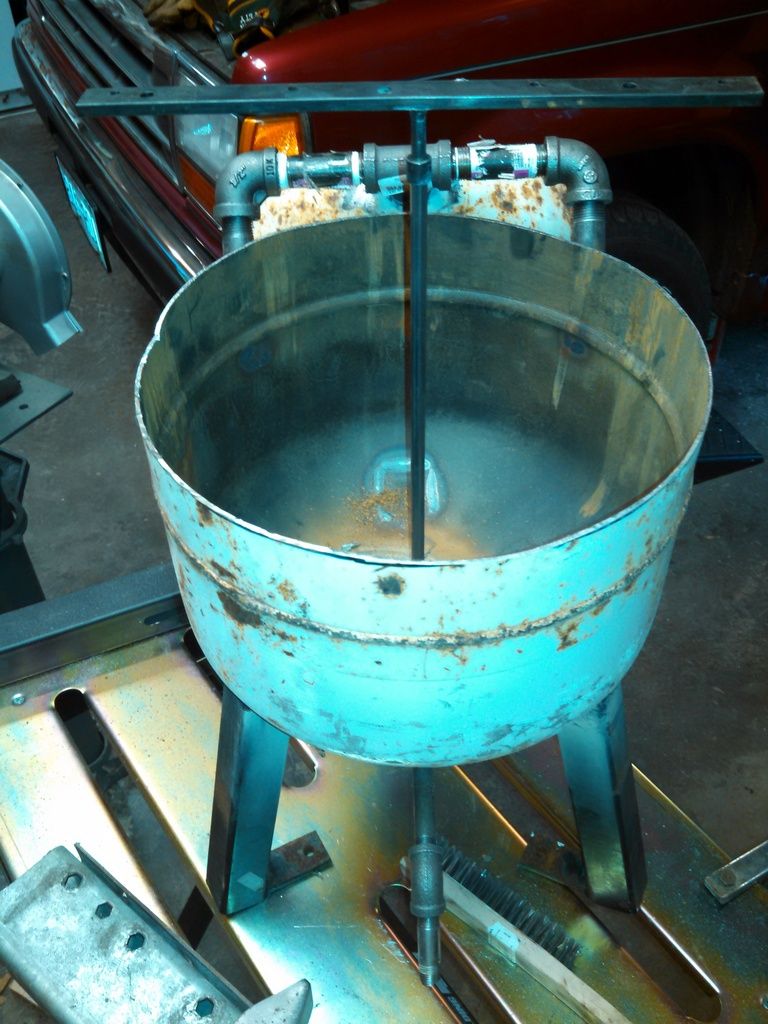
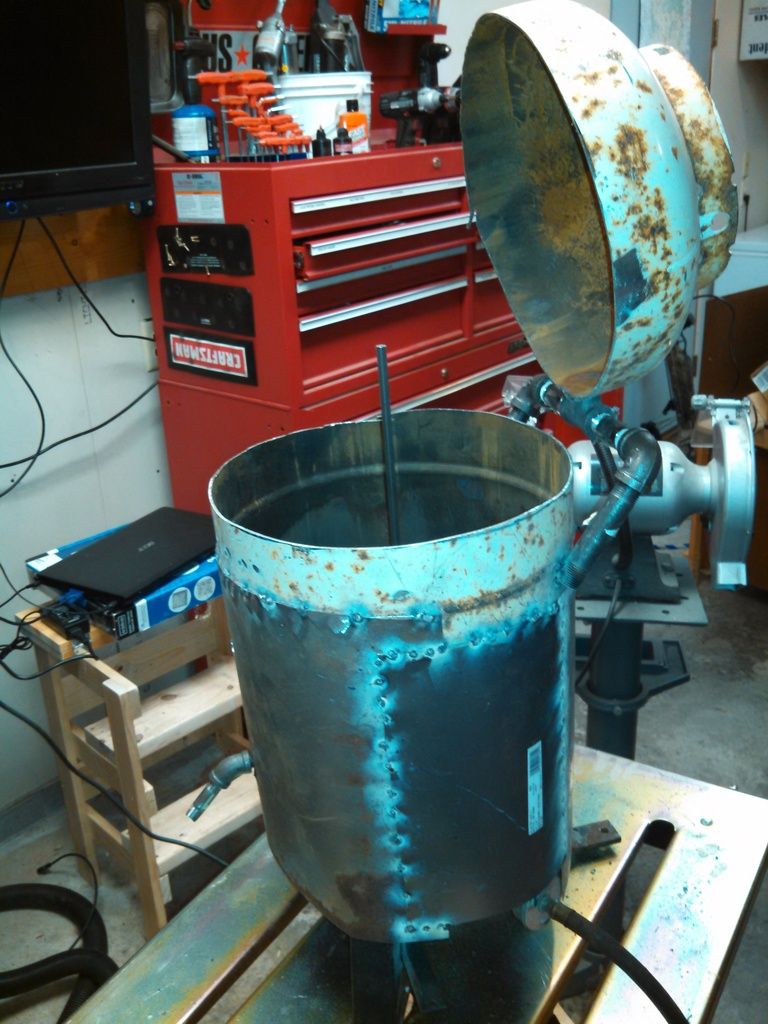
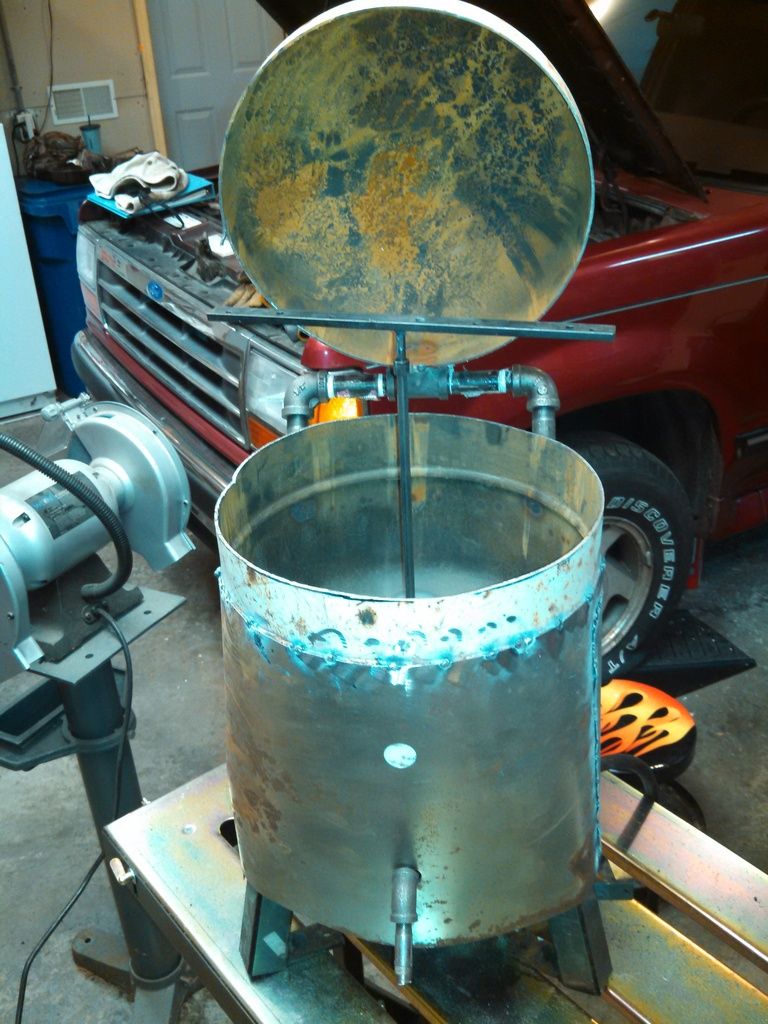
    Originally I was just going to leave it open, but I took some knowledge from the stories of tinsel faires and live 22 rounds in smelting pots and figured that the bottom of the tank would make a great lid. I took some inspiration from another member, who I cannot remember and cannot find at this point, and made a hinge for the bottom of the pot from 1/2" black pipe elbows, nipples, and a tee. Now the bottom will act as a lid, allowing it to warm up faster and keeping things under control should some water get below the surface of the lead. I don't know if I'll need to add a hole or two to vent fumes but that is easy later.

    [IMG][/IMG]
    [IMG][/IMG]
    [IMG][/IMG]
    [IMG][/IMG]

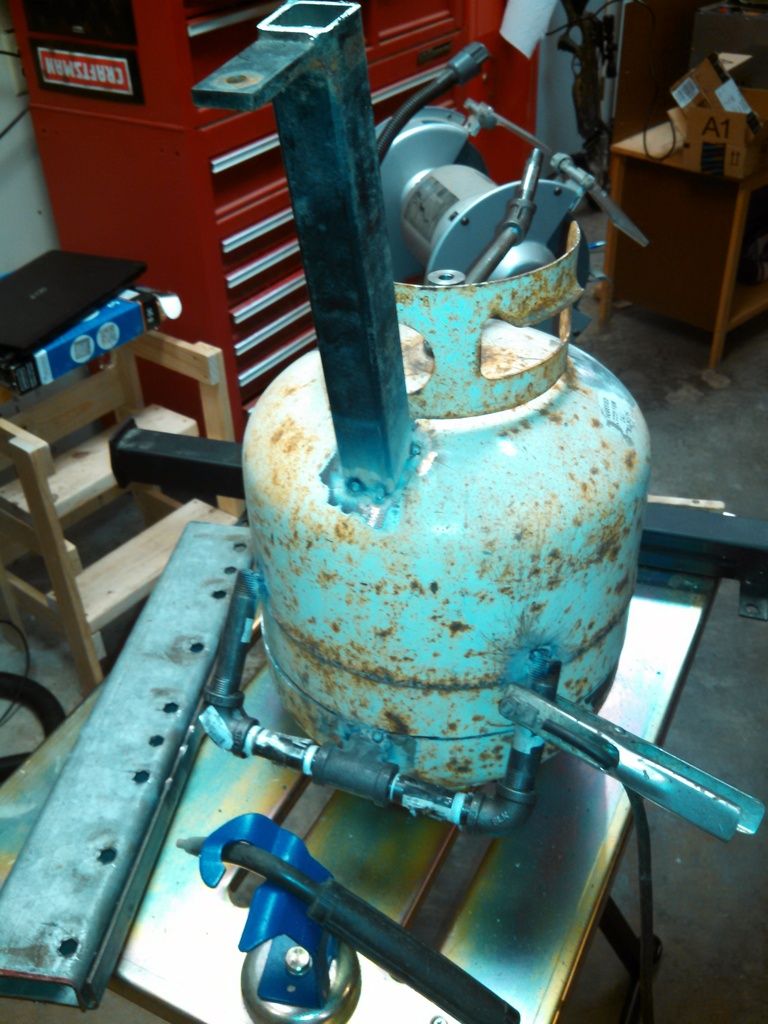
    It needs legs. I figured out an angle that would allow the legs to sit nicely on the bottom curve and still end up wide enough for some stability. They are 3/16" walled 1 1/2" square tube that I got from a gang reel mower that somebody gave me. The mower sucked, but there was 30' of good tubing in the frame!

    [IMG][/IMG]
    [IMG][/IMG]

    With a little more planning I could have ended up with all the feet sticking out, but I wasn't going to cut up more material. The feet actually work really well the add stability and will keep it from sinking into my gravel driveway when I'm working with it.

    Now to control the valve. I had some 5/15" hex stock left over from who knows what.

    [IMG][/IMG]
    Last edited by SeabeeMan; 08-18-2015 at 10:50 PM.

  18. #18
    Boolit Master

    SeabeeMan's Avatar
    Join Date
    Aug 2011
    Location
    Spooner, WI
    Posts
    693
    Another random piece of metal...this one from an elliptical, I think...and an extra nut driver laying around make a nice wrench that can be removed to close the lid. Here you can see how far the spout gets the lead out from the pot.

    [IMG][/IMG]
    [IMG][/IMG]

    I thought about building this to sit over my fryer but then realized that my burner is only held on with one nut. Some cross bracing on the legs and a hole in just the right spot makes the burner an integral part of this pot. I can remove it to put it back on the fryer when needed, or I'll just but a different one.

    [IMG][/IMG]
    [IMG][/IMG]

    And last but not least, a windscreen. I had a few sheets of 12x18 22ga steel around, again from who knows what, so they were pressed into service. Remember, flux core welder on thin metal...not easy. I still need to clean things up so there is residue from the flux core wire everywhere.

    [IMG][/IMG]

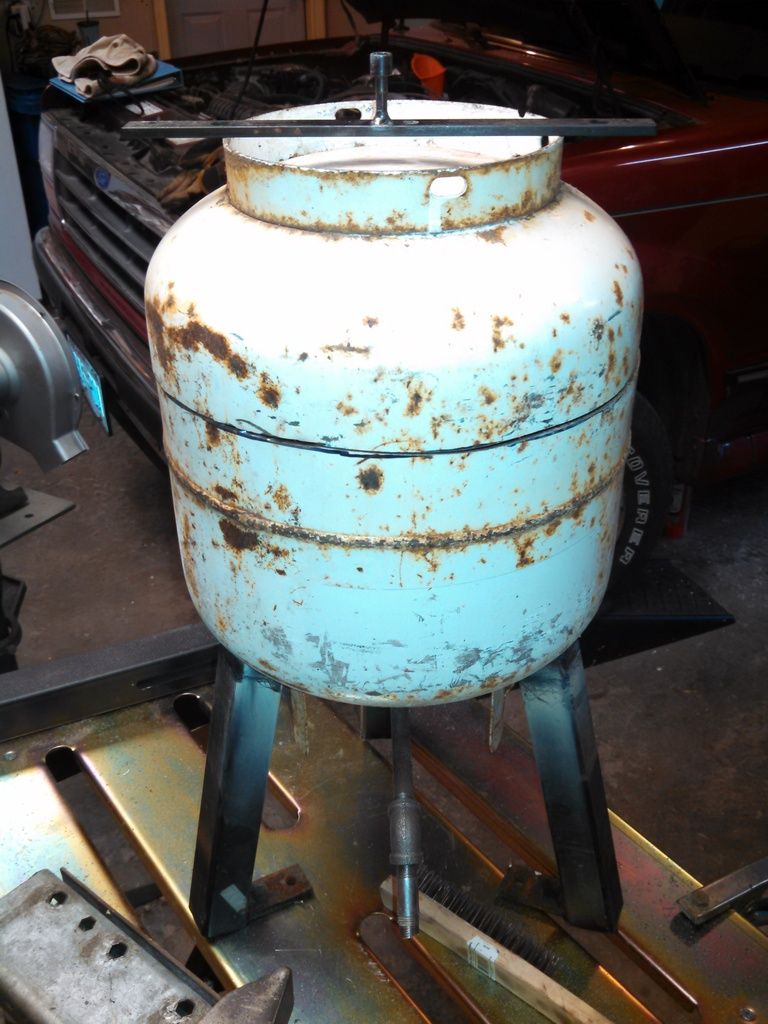
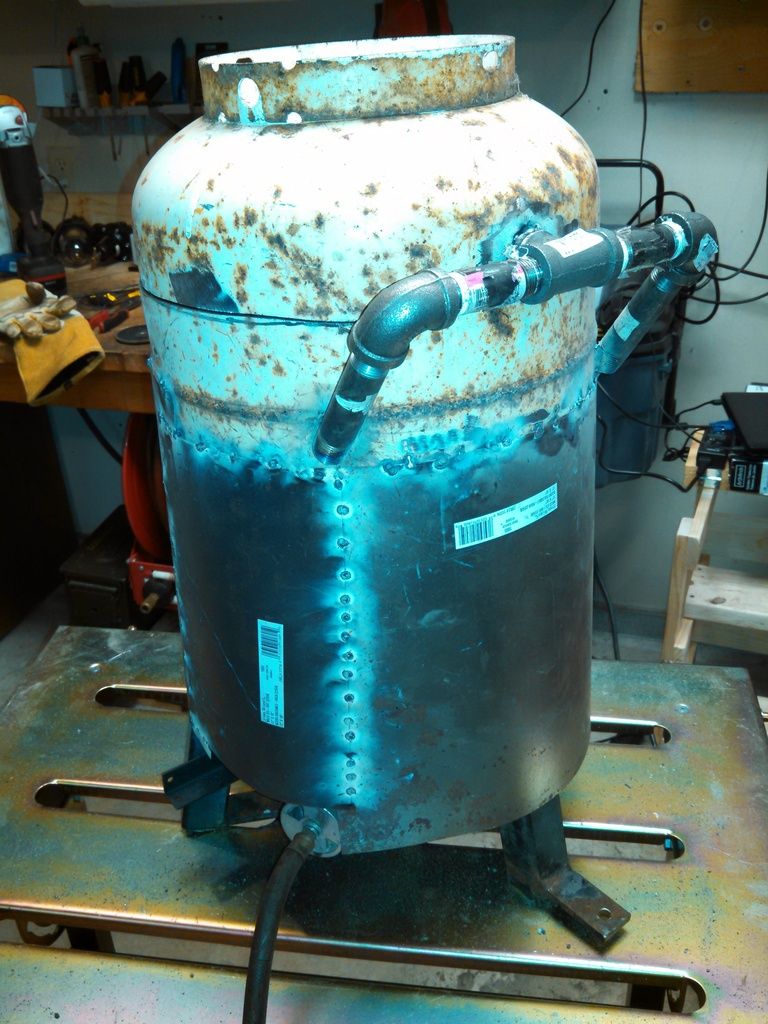
    And the complete finished product, minus some brushing and grinding.

    [IMG][/IMG]
    [IMG][/IMG]
    [IMG][/IMG]

    Not bad for starting with a rusty propane tank and nothing but scrap metal. I'm hoping to get some pure lead I have in blocks and sheets melted down this weekend so I'll report back. I figure a cinder block or paver under the spout should work nicely to get the molds up to the right level. I'm slightly concerned that the spout is to close to the windscreen to get the middle row of my mini muffin tins, but another pipe nipple would fix that.
    Last edited by SeabeeMan; 08-18-2015 at 10:53 PM.

  19. #19
    Boolit Master
    Mytmousemalibu's Avatar
    Join Date
    May 2015
    Location
    Wichita, KS
    Posts
    1,277
    I need to build be a good smelter for the raw scrap I have! Well done! You might need some venting in the upper portion of the windscreen to keep a vertical pattern of heat and exhaust moving so your burner won't flame out.
    ~ Chris


    Casting, reloading, shooting, collecting, restoring, smithing, etc, I love it all but most importantly, God, Family, The United States Constitution and Freedom...

    God Bless our Troops, Veterans and First Responders!

    Diligentia, Vis, Celeritas
    Accuracy, Power & Speed

  20. #20
    Boolit Grand Master

    Wayne Smith's Avatar
    Join Date
    Mar 2005
    Location
    Hampton Roads, Virginia
    Posts
    13,642
    Yes, you will need vent holes in the top. You are heating lead and air and the air expands, gotta go somewhere.
    Wayne the Shrink

    There is no 'right' that requires me to work for you or you to work for me!

Page 1 of 2 12 LastLast

Posting Permissions

  • You may not post new threads
  • You may not post replies
  • You may not post attachments
  • You may not edit your posts
  •  
Abbreviations used in Reloading

BP Bronze Point IMR Improved Military Rifle PTD Pointed
BR Bench Rest M Magnum RN Round Nose
BT Boat Tail PL Power-Lokt SP Soft Point
C Compressed Charge PR Primer SPCL Soft Point "Core-Lokt"
HP Hollow Point PSPCL Pointed Soft Point "Core Lokt" C.O.L. Cartridge Overall Length
PSP Pointed Soft Point Spz Spitzer Point SBT Spitzer Boat Tail
LRN Lead Round Nose LWC Lead Wad Cutter LSWC Lead Semi Wad Cutter
GC Gas Check