

swage .510" bullets in a reloading press. (The following narrative is a few years old, but I think it 'works' here for those interested in swaging their own bullets with their reloading press OR using a tree burr to make one's own custom mold.)
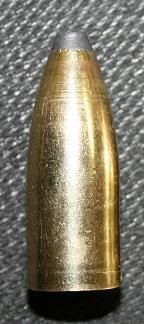
This is the first bullet I made from the swaging die I cut. I am pleased with it. It's a bit heavy at 550, but that's easily remedied. Dave Corbin, and others, have repeatedly told me that it is not possible to swage bullets larger than about .30 caliber on 'regular' reloading presses. When I pressed for reasons, the 'weather' suddenly got hazy. Continued pressing on my part lead to reasons like, "It takes too much pressure" and "The strokes are too short on reloading presses".
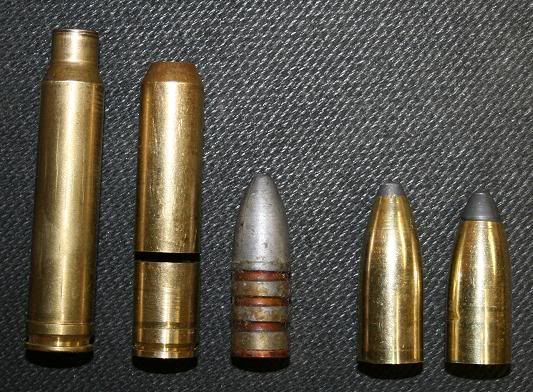
Both those justifications may be true for some kinds of swaging operations, but I was very clear - repeatedly - that my needs were simple. Of course "simple" often doesn't sell hardware. I need neither great force, nor a long stroke to make these bullets. The jacket - the forward part of a 'magnum' cartridge case - is nearly pre-formed, and the core is too, as it is simply the Lee 458 Postell 3R cast bullet. Here's a picture of the starting components.
On the left is a .338 Win Mag case. Next is the case with the head parted (I use the rear of the case as a jacket too after turning the belt off), and the neck turned off the shoulder. The forward part is what is used for the jacket in these bullets. In the middle is the Lee .458 3R Postell (507-grains from my mould). I simply insert the Postell into the front of the Mag case, and press into the swaging die.
Of course, I haven't shot them yet, but my previous experiments using the case heads as jackets was very promising. I expect these to do at least as well. Consistency will be necessary for good precision shooting, but I think I can get all the consistency I need in final weight by weighing each 'jacket' and core prior to swaging.
I also like the long nose on these bullets. That turns out to be purely serendipity (blind good fortune) as it is the profile of the "reamer" I used. That reamer cost me $21.99 (13.90 for the reamer, 6.10 for shipping, and 1.99 for "handling") off EBay. Custom reamer-making shops either said they couldn't make one, or quoted a price of at least $140 (some MUCH higher). The "reamer" is actually a 1/2" "tree burr". Here's a picture of one exactly like what I got. http://www.ebay.com/itm/SG-5-Tree-Sh...item3cdf961baf
While the reamer is only 0.500" in maximum diameter, it occurred to me that I could mount it in my tool-holder and offset it the necessary 0.010" to ream the ID I wanted. (Actually I reamed it to 0.515" so I could run it through my .510" Lee bullet sizer for an exact final diameter.) Worked like I knew what I was doin'.
Reaming the die is tedious, as the whole surface of the burr is cutting. In order to make the cavity as smooth as possible, I was only able to take 0.020" cut between clearing chips from the cavity and the burr. Since the cavity is 1.5" deep (deep enough to make a 600-grain bullet), that was 75 cuts (1.500"/0.020" = 75).
It wasn't 'easy' to get to this point of actually making bullets, but it wasn't 'hard' either. It just required a hard head. Once the burr was found, the process went like this:
1) Thread a 3" piece of 1" diameter steel rod to 7/8-14 to fit a standard reloading die.
2) Drill a 3/16" pilot hole (later to become the hole through which the bullet is removed from the swage) through the threaded billet.
3) Ream to 1" depth with the burr mounted in the tail-stock.
4) Ream (with 1/2" drill) "shank" to 0.5" deep.
5) Install burr in tool-holder - off-set desired amount for exact diameter.
6) "Cut" (as opposed to "ream", as now the burr is only cutting on one side) into full depth of 1.5".
7) Polish.
8) Make a 'ram' that fits in the reloading die ram, for pressing the unswaged components into the swage.
Making the core should be obvious - it's just a cast bullet. Making the jacket is a bit more complicated, but not too big a deal.
1) Chuck the magnum case (.338, 7mm, .300, etc., any 'standard' magnum case) in the lathe with the head out.
2) Turn off belt.
3) Remove and chuck case in lathe with mouth out.
4) Turn off neck.
5) Part case at predetermined length for specific bullet weight.
At that point, it's just a matter of inserting the nose of the core into the 'jacket', applying a little lube, and pressing into the swage. A tap on the nose through the top hole drops the bullet out of the swage. It pops out at about 0.5145" in diameter. I then run it through the Leee sizing die, and it is 0.5103". Voila'.
And it didn't cost me $2000 dollars, which is what it would have cost me (including shipping) to get Corbin's complete set-up. Of course his equipment might very likely make 'better' bullets. However, if these shoot as straight as the seriously clunky ones I made "by hand" before shot, I'll be happy as a clam.
Paul
PS - Calculated BC for this bullet is .454 -
Paul
PPS - I should point out that it takes more than one stroke of the press to form the bullet. What I do is unscrew the die to a point where I can 'cam over' the handle of the press but just form the bullet a "little bit". I screw the die in 1/4 turn and do it again. It takes me about 8 strokes to finish the bullet. I appreciate that such a process does not lend itself to 'production', but that doesn't matter to me. BEING ABLE TO MAKE MY OWN BULLETS IS ALL THAT MATTERS TO ME.
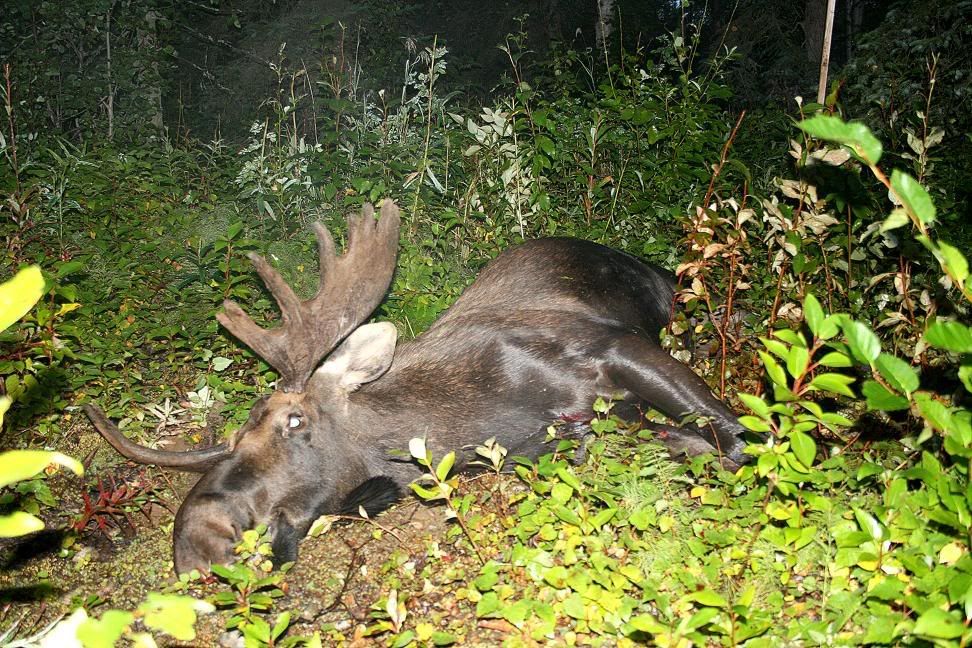
PPPS - Here is the result of using the actual bullet I posted above (the one on the left) - he went about 7 body lengths...
Paul

|
   
   
|


|


 Reply With Quote


