Awesome idea. The zinc will burn off nicely

|
   
   
|


|


Awesome idea. The zinc will burn off nicely
Using Tapatalk
What type of bolts is it that you need specifically?
Using Tapatalk


Originally Posted by jeepvet

Ahhhhh! another great idea! The more that is out of the way the better. Yes I would like to see some pics of how you done that, if you don't mind.
A friend of mine was telling me the other day of a way to make a pot with a heat shield on it. It would be more expensive to build but it is a neat idea. What he said was to take the pot, cut a ring that will fit over it, make it 1 inch wide and then put the pot with the ring welded on it down in a sleeve so that the the ring would mate up with the sleeve and weld it all together. You then have the heat from the burner going up the side of the pot and captured inside the heat shield. No heat loss from a breezy day or just simple convection loss means less energy wasted keeping the melt hot. I sounds like a real good design but a lot of extra work and expense. He does work in a foundry and probably knows what he is talking about but I think all of that would be a little overboard. We melt lead, he melts cast iron for the auto industry. Just passing that along, he drew a sketch of how to do it. I will try to get it posted just for grins and giggles.
What if..... you woke up today with only the things you thanked God for yesterday?
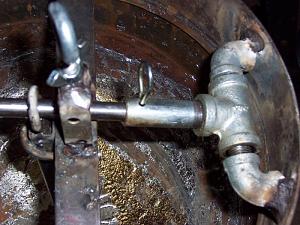
2 - 3/8 elbows welded to pot. 3/8 nipple between elbows inside 1/2 tee makes the hinge. Short 1/2 pipe nipple with only one threaded end (cut from longer nipple) threaded into tee. 5/8 cold roll rod handle inserted into nipple, drilled and held in place with clip pin
Cold roll handle passes through a chain link welded on top of valve shaft and through an upright with an eye bolt with a wing nut lock to act as an adjustable over travel stop.
Pull pin and remove handle.
Spring handle with 1/2 carriage bolt and nut to hold in place. 1/2 nut welded to cold roll. Carriage bolt screws into nut on cold roll. This allows handle to be removed and taken apart to store inside pot where it will hopefully be when it is time to smelt again.
Hopefully this is clear enough that you can glean some help from it. I'm not really sure I could get anything out of it but maybe the pictures will help.
"Nothing is more uncommon than common sense." Benjamin Franklin


Very very nice. Thanks for sharing.
This past weekend I finished smelting 400# of wheel weights in my bottom pour pot. Everything went very well although not perfect. I am VERY pleased with my pot. It didn't heat up as fast as I would have liked, but better than the dutch oven. I had a few problems with drips, but nothing too big to handle easily. The hardest part was waiting long enough for the ingots to cool before trying to dump them. All in all, I am very glad I built the pot. Now I just need more lead to feed it.
I only weighed a few ingots but figure they should average about 2# or a little more. Going with 2# ingots and the scrap yards scale at 400# of weights I got a little over 61% lead. I don't know how others come out, but I am pleased with that.
Is that about what you expect from wheel weights?
"Nothing is more uncommon than common sense." Benjamin Franklin

Attachment 146055Attachment 146056Attachment 146057Attachment 146058Attachment 146059
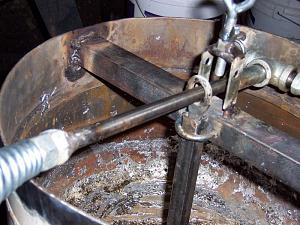
As promised, attached are the photos of my smelting pot. when I first decided to do this I decided to locate my bottom pour on the side so I had better access for filling and removing the slag, since I am processing range lead there is a lot of jackets, sand, etc. that is in the mix. I also wanted a bottom pour so as to have clean metal ingots. I didn't need the tank valve hole so I used the bottom of the tank. I also had to put a skirt around the pot to make it more efficient as well as super stable because it will melt down more than 200 pounds of ingots with the level below the lap joint.
For the spout I had an old brass fitting about 2" long with 1/4" hole through the center, which is plenty of lead coming out and can fill an ingot mold faster than you can process them. I tapered the inside of the brass fitting using a harbor Freight taper bit, the smaller one in the set. I drilled a hole in the tank and then welded the brass fitting to the tank using a silicon bronze rod. For the tapered plug I used a Harbor Fright round punch, which was cheap and the taper matched the taper in the plug well enough to seal water. I welded a length of salvaged round rod out of an old lift support from my SUV rear window.
I used a bolt with a welded strap for a thumbscrew to limit the rod’s up and down travel, so you can fine tune the pour.
My pot is not pretty, but it works. I do have to remove the down rod after a couple of uses as a certain amount of contaminates will start to build up on the end of the down rod and limit the seal creating an annoying very slow drip.
If you have any more questions call or email.

Dragonheart - Super!
Regards
John
Great work Dragonheart. I really like the use of the taper bit and punch. I tried the same thing with a regular drill bit but I think it is just too flat.
I am also pretty stingy so I wanted to be able to drain every drop of lead out of the pot easily, so I used the top half of the tank with the valve hole in the center. The trade off is more junk in the way when removing trash from the melt. I have found that a stainless ladle with several holes drilled in it works much better than a spoon.
I am going to see if I can find some type of taper bit and give that a try.
Thanks
Jim
"Nothing is more uncommon than common sense." Benjamin Franklin
You can get what I used at Harbor Freight. it was a Titanium Nitride coated straight taper set of two bits, about $10. The bit had an easy time tapering the inside of brass fitting leaving a smooth taper and I had several cheap HF punches so I just found one that had a taper close enough to seal the hole. I knew I would leave some lead in the pot with a hole on the side, but actually it helps on the next cycle as the left over lead liquefies quickly and tends to speed up the melting of the new batch. if I really want the lead out I can just turn the pot upside down when it's cool and the big plate just drops out.
Richard
 Posting Permissions


| BP | Bronze Point | IMR | Improved Military Rifle | PTD | Pointed |
| BR | Bench Rest | M | Magnum | RN | Round Nose |
| BT | Boat Tail | PL | Power-Lokt | SP | Soft Point |
| C | Compressed Charge | PR | Primer | SPCL | Soft Point "Core-Lokt" |
| HP | Hollow Point | PSPCL | Pointed Soft Point "Core Lokt" | C.O.L. | Cartridge Overall Length |
| PSP | Pointed Soft Point | Spz | Spitzer Point | SBT | Spitzer Boat Tail |
| LRN | Lead Round Nose | LWC | Lead Wad Cutter | LSWC | Lead Semi Wad Cutter |
| GC | Gas Check |

 Reply With Quote