WidenersMidSouth Shooters SupplyReloading EverythingSnyders Jerky
RotoMetals2RepackboxInline FabricationLoad Data
Titan Reloading Lee Precision
Page 1 of 2 12 LastLast
Results 1 to 20 of 23

Thread: Very first smelt

  1. #1
    Boolit Man
    Join Date
    Jul 2012
    Location
    West Central AL
    Posts
    90

    Very first smelt

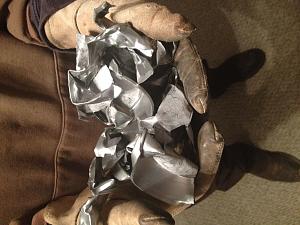
    Been lurking and reading here for a while learning what I could about casting. Today I finally got my WWs separated, had a good ratio of lead to Zn and Fe weights too. From 3 five gallon buckets I had 2.5 buckets of useable lead weights. Time for a smelt. Got the burner going, lead melted and fluxed with beeswax about three times. things are going great. Life is good. Even had a wonderful Christmas with the wife and boys. Time to load the ingot mold. I got me a cheap muffin tin for a mold. A 16 holer. Got all 16 cups filled and let them solidify for a minute. Need to dump 'em and reload. Enough lead in the pot for 10 or 12 more ingots. Turned the tin over and 3, yes 3 fell out. I know I'll slap in down gently on the concrete slab. That'll jar 'em loose. Well maybe if I do it a little harder. Yep they all fell out. Hold on here. The cups popped out of the frame. I bet I can pry 'em out with a screwdriver. Nope. Somebody put super glue in those 13 cups when I wasn't looking. Where are my tin snips. That got all of the tin off of my pretty lead ingots. This bullet casting is gonna be harder than I thought. Well I'm headed to WallyWorld to get a case of muffin tins so I can try again tomorrom. Ya'll know anything I might do different?
    Click image for larger version. 

Name:	IMG_0186.JPG.jpg 
Views:	106 
Size:	63.6 KB 
ID:	125401
    A bumble bee is considerable faster than a John Deere tractor

  2. #2
    Moderator Emeritus


    MrWolf's Avatar
    Join Date
    Apr 2013
    Location
    NE West Virginia
    Posts
    4,912
    I use cast iron corn bread molds and the RCBS ingit moulds. I know others mess with those muffins, but I have not had a problem in over 1,000lbs smelted.

  3. #3
    Boolit Master
    JWFilips's Avatar
    Join Date
    Feb 2012
    Location
    Northeastern part of Penn's Woods near Slocum Hollow.
    Posts
    1,920
    lolbell,
    When smelting you want to clean your alloy with real "Flux" Pine saw dust is best...........Bee's wax is only a reducer And again I'm sure it will start! Ha! Ha!

    No really; When smelting lead alloy you really need to clean it before you make in to ingots. wax will do a good job of "reducing" the tin back into to melt but Carbon is the best "flux" for removing impurities and junk in the mix.
    I'm sure the old ones will pipe in to help!
    " Associate with men of good quality, if you esteem your own reputation: for it is better to be alone than in bad company. " George Washington

  4. #4
    Boolit Man
    Join Date
    Jul 2012
    Location
    West Central AL
    Posts
    90
    I was going to use some saw dust from my fire cutting session but we got rain and was worried about a visit from the tensile fairy if I used damp saw dust. I got some in the shop drying so I'll try that tomorrow. Will hard wood work? I have oak, poplar and sweetgum, but no pine.
    A bumble bee is considerable faster than a John Deere tractor

  5. #5
    Boolit Master
    JWFilips's Avatar
    Join Date
    Feb 2012
    Location
    Northeastern part of Penn's Woods near Slocum Hollow.
    Posts
    1,920
    The resins in pine are a plus but when it comes down to it It is "Carbon" filtration :

    This May Help: & I quote!

    Boolit casters typically use dirty, contaminated scrap from whatever source we can scrounge up, and that sort of stuff needs special attention to make the best boolits. Clean alloy like nuclear medicine shields or foundry alloy doesn't require as much cleaning.

    We need to do three things to our alloy: Clean, reduce oxides, and flux.

    Cleaning is accomplished by mechanical action, stirring and skimming dirt, sand, steel clips, rust flakes, copper jackets, whatever. A slotted spoon is adequate.

    Oxide reduction is next. We need to deal with the oxide dross formation on top of the metal, whether in smelting pot, or a freshly-melted casting pot full of clean ingots. Boolit alloy dross is very rich in valuable tin, so we need to turn it back into useable metal rather than skim and toss it. The opposite of oxidation is a chemical process called "reduction", so if we induce a reduction/oxidation reaction on top of the metal, we can save the scum. Combustion is a redox reaction. Anything that will burn will trade electrons with the oxidized metal, sort of "stealing" the oxygen and freeing the tin and other metals from the scum so they go back into the alloy. Grease, wax, oil, sawdust, anything like that will work to reduce oxides, and if your alloy is clean of other contaminating metals waxes work fine for this job.

    Now, about Fluxing. This is the part that seems to confuse everyone. If your alloy came from wheel weights or other dirty scrap, it likely contains a bunch of other metals that don't cast very well and mess up the flow, or FLUX, of the alloy. This makes it tough to cast good boolits. Things we want to get rid of are zinc, aluminum, iron, calcium, and a few others. Since what we want to get rid of is all pretty much more difficult to reduce than lead, tin, and antimony, we can remove it through adsorption. With a "d". Things that work really well at removing the oxides of contaminating metals are molten borate glass and the carbohydrates in wood. Wax won't do it. The problem with borates (such as Marvellux) is that they don't reduce any of the oxides at all, including tin, they just adsorb them and remove them from the alloy. If you want to save your tin/antimony/bismuth/lead oxides, use sawdust because it saves the good stuff and adsorbs the bad stuff so it can be skimmed and thrown away with the ash when it has finished burning.

    So again, sawdust, being a hydrocarbon, will also reduce tin/lead/antimony oxides we want to save while adsorbing the remainder of the junk we want to remove and capturing it in the ash. Two for one, so to speak. Resiny, pine sawdust, particularly sappy yellow pine, is one of the best reducant/fluxes I have ever used because the resin is such a fine and quick sacrificial reducant, quickly reducing the good stuff so it won't get adsorbed, but leaving the oxidized trash metals for the carbon to soak up as the wood chars.

    Sawdust and ash cannot get below the surface of the melt and cause problems unless you drag it down there physically so that it gets trapped below the surface tension of the alloy at the bottom of the pot. Carrying ash down there on the end of a fresh ingot, a handful of sprues, or by scratching around on the bottom of the pot with a wooden stick are the principle ways of getting ash junk on the bottom where it will migrate to the spout and cause inclusions in the boolits. Use common sense and it won't happen. A wood stick is the bee's knees for scraping all the stuck, baked dross off the sides of the casting pot, it reduces oxides on contact.

    Gear

    Also I quote:

    "Here goes..... I am VERY fussy with my ingots. From the sounds of it, I would NOT WANT some of the ingots that some of you produce. Not clean enough for my guns.

    Here's the basis for how I do it: I want as close to PURE alloy as I can get. NO GRIT remaining. NONE. Every bit of grit that you allow to enter an ingot becomes abrasive that wears out your barrel. At a commercial lead processing plant, they use very expensive ceramic filters that get all grit out. We hobby smelters can't afford the expensive ceramic filters, so we have to FLUX like crazy to get the lead as clean as possible.

    So, here's my system:

    1) I always leave the last inch of molten lead in the pot from the previous smelt. I allow that to cool, and mark what it is, with a Sharpie. Next time I smelt that alloy, I put that disk back in the pot, which maintains 100% contact with the smelting pot, and therefore melts fast, giving me a good lead puddle for the boolits/range lead to melt into. If you skip that step, the edges of the range lead have little contact with the smelting pot, and will take longer to start melting.

    2) I add a couple of inches of range lead into the pot, and allow that to come up to temperature and melt. I DO NOT fill up the smelting pot........ To do so would introduce too much copper jackets and other debris that needs to get skimmed off. I do my adding in layers, and that goes very fast. Add/Skim/Add/Skim, etc. Continue adding and skimming the big stuff off the top until you have a pot pretty full. The previous comment about the strength of the stand is worth paying attention to. One summer day a couple of year ago, I was smelting 200 pound batches and was horrified when I noticed that the stand leg had started to sink into the hot top, and the stand was dangerously leaning. I had to be very careful to not knock it over while fluxing. Once you have a safe pot full of molten lead, with only the BIG STUFF skimmed off, it's time to start fluxing.

    3) The fluxing is the process or technique for separating the grit and other small debris from the metal. You want to end up with as clean a metal as you can, for the sake of the longer life of your guns. The lead is not only heavy, but very dense. The larger stuff that you skimmed off had enough flotation ability to float itself to the surface. The smaller grit does NOT have enough flotation to push itself easily through the dense metal. That's what the fluxing techniques does........ it opens pathways through the dense metal for the small grit to make it's way to the surface.

    4) Stirring and the addition of fluxing agents assists with making pathways. It also, and this is an important aspect of fluxing........... it also provides "bonding agents" for the small grit particles to stick and adhere to, clumping them into bigger pieces, for easier removal. So, stirring with anything, a metal spoon, a wooden stick.... when done correctly, will open eddy currents (think whirlpool action) that will allow the grit to make it's way to the top for skimming. And, agents like sappy pine, motor oil, pine sticks (dual purpose), old candle wax, parrafin wax, etc act as perfect fluxing agents for the other part of the fluxing action. Pine saw dust is just about one of the best fluxing agents you could use. It's sappy enough to provide the sap agent that allows the grit to stick to it. And, the small particle size assists with creating nice pathways to the surface, when stirred into whirlpools through the lead. Hard wood saw dust isn't as good, but better than nothing. Get bales of pine sawdust at your local feed and grain store. They use it as horse bedding. You could also use pine shavings, but it's not quite as good as pine sawdust.

    5) I grab a handful of pine sawdust, and toss it onto the surface of the molten lead. I use a stainless steel slotted spoon with a long handle (bbq type spoon) and start stirring right away. I stir right to the bottom of the pot, pulling up all the grit I can from the bottom. Keep stirring.... The sawdust will eventually become charcoal, and will soon burn into ash. You want to skim the charcoal and all the grey powder grit that floats to the top off the lead with the edge of your spoon, before it turns to ash. Go slow with moving the edge of the spoon through the lead, and you will see that it's easy to pick up the skimmed material. Pull it slowly towards the edge of the pot, and turn your wrist, and you'll see the grit (grey powder) in the spoon. When you are done with the initial sawdust flux, the top surface of the lead should be somewhat shiny. However, the lower portions of the lead are still nasty! I do this sawdust flux about 4-5 times, or until I start to see dramatic reductions in the amount of grit I am picking off the surface. For some really sandy range lead, I have been known to flux with the pine sawdust as many as 10 times before moving to the next step. Be as fussy as you want to be. It's your lead! And, your guns!

    6) Once I have achieved some level of cleanness with the pine saw dust fluxing, I switch over to paraffin wax, which is finer agent, and will get more of the smaller particles out. Old candles are always plentiful. Yard sales are a great place to get them for almost free. I cut them into peanut sized pieces, and toss a piece onto the top of the molten lead. The candle wax will start to melt, and then, because of it's lower flame point, will burst into flame. Be aware it will happen, and don't get startled. The paraffin will consume itself almost completely (no ash), so be sure to stir whirlpools aggressively as soon as you can. Skim off whatever grit that develops, and repeat as many times as you feel that you need to to get to as clean as you'd like. I like to flux with paraffin wax 4-5 times. By then, the metal is pretty darn clean by my fussy standards. (including the pot surfaces, which I have been scraping the whole time)......

    7) When using your ladle to remove the lead from the smelting pot, push the ladle through the surface of the lead, and allow the ladle to "back fill" with only shiny metal. Even though you have done this immense amount of fluxing, you will always see some additional crud floating to the surface as you ladle, and you want to avoid introducing that into the ingots you are making. The back filling technique with the ladle is the best way to keep the grit out of the ingots you are making. When you get to a point where the grit really starts to be a nuisance, and it will...... do some more paraffin fluxing.........

    8) Continue making ingots until you get down to that 1" or so of lead left in the pot, and stop. Or, if you have more to smelt, stop making ingots when you have a couple of inches of lead still in the pot. That will give you the good lead puddle for melting.

    Notes: Some folks have used motor oil as a fluxing agent. I have used it in tests and find it smelly and full of carcinogens. It works OK, but I still prefer to use the candle or store bought paraffin wax. The store bought version is usually sold in the jam making supplies area of the store. Comes in a one pound package of four blocks, and is very pure, and translucent clear. It's more expensive than cheap used candles. I'm already saving money making my own boolits, and I feel no compulsion to go extra cheap on fluxing agents. I want/demand very highly clean lead to run through my guns. Don't be in a hurry when smelting. It's hard on the back, and hot on a summers day. I find that by pacing myself in a slower pace, I get better alloy because I am taking care to flux well. You cannot flux alloy too much.......... You just can't. The more, the better/cleaner the alloy will be. By constantly stirring, you will keep any tin and antimony in the mix. You can't really skim out those metals, nor do you want to. However, if you stop stirring aggressively, and perhaps have the heat too high, you will allow the tin and antimony to come out of solution with the lead, where it will float to the surface in it's typical yellow/gold and purple hues. Don't skim off the yellow/golds or the purples. Turn the heat down a bit, and stir those back into the lead.

    My advice has been primarily relating to range lead because that's what you asked about. The same process is used when I smelt clip on wheel weights. However, it's especially important to add weights slowly to the molten puddle to avoid accidentally melting in any zinc to the pot. Zinc will float, but only if you have added a thin enough layer to allow them to float. If you bury zinc weights under 60 pounds of lead weights, and have the pot too hot, you will get zinc contamination. So, my advice for adding new material to the pot slowly and in thin layers holds true whether for range lead or for wheel weights.

    I've touched on many of the points that others have made, but I don't think anyone else has covered it as completely, in one place as I have. My system isn't perfect, but it works really well for me. I get good clean alloy. And, I know my bores (barrels) will have longer lives from the extra trouble I take getting the clean alloy.

    Perhaps this post/thread might make a good sticky. I'd be happy to amend my post should anyone think of anything additional idea that would improve my system even more. We have many great casters here. And their system works for them. I take no exception to any of that. However, in my quest for CLEAN alloy, my system gets me there.
    DukeInMaine"


    The above are probably the best explanations ever!!!
    (A smart person will copy and paste these to his notes!!! You can not do better! Words of wisdom from our Forum Mentors!)
    Last edited by JWFilips; 12-26-2014 at 09:30 PM.
    " Associate with men of good quality, if you esteem your own reputation: for it is better to be alone than in bad company. " George Washington

  6. #6
    Boolit Man
    Join Date
    Jul 2012
    Location
    West Central AL
    Posts
    90
    A very good read. Thank you
    A bumble bee is considerable faster than a John Deere tractor

  7. #7
    Boolit Master
    JWFilips's Avatar
    Join Date
    Feb 2012
    Location
    Northeastern part of Penn's Woods near Slocum Hollow.
    Posts
    1,920
    Seriously: Every time I set up to "smelt" I read these as a mantra! Keeps you humble and on the right track! It takes work to clean alloy in the smelt. Work hard there &
    Then once all those "very clean" ingots are stored away ...then you fire up your casting pot.... You only need to "reduce" the oxidized tin with wax since the alloy is clean!
    " Associate with men of good quality, if you esteem your own reputation: for it is better to be alone than in bad company. " George Washington

  8. #8
    Boolit Master


    Join Date
    Jan 2009
    Location
    Lenore, WV
    Posts
    2,841
    Wal-mart sells condiment cups, stainless steel 4 for $.96. They will hold about a pound of lead. Or Dollar Store sells a solid 6 muffin pan for a buck. If you let the pan rust the lead will not stick in the pan.

  9. #9
    Boolit Grand Master
    bangerjim's Avatar
    Join Date
    Apr 2013
    Location
    out of here, wandering somewhere in the SW.
    Posts
    10,163
    Start out right and buy some REAL 1# ingot molds from LYMAN, LEE, or RCBS. You will not be sorry. Forget the kitchenware.

    banger

  10. #10
    Boolit Master


    Join Date
    Oct 2011
    Location
    Atlanta, NY 14808
    Posts
    2,169
    With regard to muffin tins-avoid the "tin" muffin tins with stamped cups pressed into a flat sheet in favor of aluminum muffin tins. Lead will not stick to aluminum, thus these work better until the cups become dented when the ingots will tend to resist falling out. DAMHIKT. Advise to use cast ingot molds is good advise.
    Micah 6:8
    He hath shewed thee, O man, what is good; and what doth the LORD require of thee, but to do justly, and to love mercy, and to walk humbly with thy God?

    "I don't have hobbies - I'm developing a robust post-apocalyptic skill set"
    I may be discharged and retired but I'm sure I did not renounce the oath that I solemnly swore!

  11. #11
    Boolit Man
    Join Date
    Jul 2012
    Location
    West Central AL
    Posts
    90
    Looks like I'm in the market for some cast molds cause I know Miss Jane ain't going to let me have her cast iron corn bread pan.
    A bumble bee is considerable faster than a John Deere tractor

  12. #12
    Boolit Master


    Bzcraig's Avatar
    Join Date
    Dec 2012
    Location
    Nampa, ID
    Posts
    3,747
    As is always the case, different strokes for different folks. I have and use the molds Bangerjim mentioned, but I prefer cast iron. Which ever you choose remember it needs to stack well. Everything JWFilips posted is good stuff as well as using saw dust to flux.
    "Freedom is never more than one generation away from extinction. We didn't pass it to our children in the bloodstream. It must be fought for, protected, and handed on for them to do the same......." - Ronald Reagan

    "It is foolish and wrong to mourn the men who died. Rather, we should thank God that such men lived." - George Patton

    The second amendment is a nail on which hangs a picture of freedom - member Alex 4x4 Tver, Russia

  13. #13
    Boolit Buddy

    Join Date
    Dec 2013
    Location
    A State of Confusion
    Posts
    258
    Have a Bass Pro nearby? They sell both cast iron muffin pans and corncob cornbread molds that work well. I picked up a corncob cornbread mold when Xmas shopping and smelted my first batch of COWW this weekend and the ingots drop out of the cast iron like butter from a hot spoon. Just flip it over on a small piece of plywood (I was outside in the yard as it was nice and warm) and they drop right out like a champ and well worth the investment. I do have a proper ingot mold or two on the way, but it seems to be lost in the Holiday limbo somewhere, so this was a great alternative.
    Last edited by Sticky; 01-13-2015 at 12:36 PM. Reason: edited

  14. #14
    Boolit Man
    Join Date
    Jul 2012
    Location
    West Central AL
    Posts
    90
    Yesterday I used more cheap muffin tins again. They worked fairly well if you dumped them while still pretty hot. I think I will be investing in some sort of cast iron after the holidays though.
    A bumble bee is considerable faster than a John Deere tractor

  15. #15
    Boolit Buddy
    Join Date
    Jun 2011
    Location
    Northwest Montana
    Posts
    487
    Quote Originally Posted by lolbell View Post
    Yesterday I used more cheap muffin tins again. They worked fairly well if you dumped them while still pretty hot. I think I will be investing in some sort of cast iron after the holidays though.
    Regular muffin tins are a pain.. Not my idea of a good time. I'll chime in with the others on using cast iron, they fall out every time with no muss, no fuss.

    Shad
    I believe in gold, silver, & lead, and the rights of free honest men... You can keep the "CHANGE"!

    Shad

  16. #16
    Boolit Master
    JSnover's Avatar
    Join Date
    Dec 2007
    Location
    Sicklerville NJ
    Posts
    4,383
    I guess I missed out on the whole muffin/corn bread experience. I bought a Lee ingot mold. I know a lot of guys use alternatives bought it sounds like I avoided a lot of headaches.
    Warning: I know Judo. If you force me to prove it I'll shoot you.

  17. #17
    Boolit Grand Master

    dragon813gt's Avatar
    Join Date
    Feb 2012
    Location
    Somewhere in SE PA
    Posts
    9,989

    Very first smelt

    There is NOTHING wrong w/ kitchenware if you buy the right pans. The problem is tin coated or cheap ones. The tin coated ones solder themselves to the lead. The cheap ones are presses together and fall apart due to the weight.

    Buy Wilton MiniLoaf pans. You can burn the Teflon coating off in advance or deal w/ some ugly ingots the first few pours. Let them rust a little and you're good to go.


    All of the ingot molds available are to small for my needs. I would need a lot of them to process the batches I do. That costs to much money.

    Each ingot is 3.5#s so you do the math. This batch took about two hours. I can't imagine how long it would take if I had to do it one pound at a time.


    If you stack them one up/one down they lock into place. Condiment cups, corn cob and odd shapes waste a lot of space. Hard to tell from this pic but there is over 800#s stacked neatly and I have a lot of space left in the box.

  18. #18
    Boolit Buddy
    Join Date
    Jun 2011
    Location
    Northwest Montana
    Posts
    487
    If you stack them one up/one down they lock into place. Condiment cups, corn cob and odd shapes waste a lot of space.
    Cast iron Corn wedge pans stack the same.. 1 in then 1 out, and come in at just over 2 pounds each.

    Shad
    I believe in gold, silver, & lead, and the rights of free honest men... You can keep the "CHANGE"!

    Shad

  19. #19
    Boolit Grand Master

    Join Date
    Mar 2013
    Location
    Northwest Ohio
    Posts
    14,593
    You can also make your own ingot molds with 1/4" x 2" x 2" angle saw and welder. cut ends of angle at 10*-15* so the ends release easily also. Cut at the length you want ingots. My ingots wiegh around 3 lbs each and are around 8" long. A peice of the angle cut for ends long enough to close off each angle mold. Set on flat surface open end of angle iron down with end set in place if you put the flat down also it makes a good "handle for pliers also. weld joints on the out side only Keep in mind that if each ingot wieghs 3 lbs as mine do that 4 cavities when filled will be close to 15LBS, mold wieght and ingots. Make 2 or 3 of these with 3 or 4 cavites and your ready to cast some serious ingots. These also stack very solidly by up and down together. Fit well in most pots and can be set over the top of most pots to pre heat.

  20. #20

Posting Permissions

  • You may not post new threads
  • You may not post replies
  • You may not post attachments
  • You may not edit your posts
  •  
Abbreviations used in Reloading

BP Bronze Point IMR Improved Military Rifle PTD Pointed
BR Bench Rest M Magnum RN Round Nose
BT Boat Tail PL Power-Lokt SP Soft Point
C Compressed Charge PR Primer SPCL Soft Point "Core-Lokt"
HP Hollow Point PSPCL Pointed Soft Point "Core Lokt" C.O.L. Cartridge Overall Length
PSP Pointed Soft Point Spz Spitzer Point SBT Spitzer Boat Tail
LRN Lead Round Nose LWC Lead Wad Cutter LSWC Lead Semi Wad Cutter
GC Gas Check