HATCH
HATCH


Gonna get a rapidair kit and get it all fixed tomorrow night

|
   
   
|


|

Gonna get a rapidair kit and get it all fixed tomorrow night
Don't like being hammered by the Cast Boolits Staff, then don't be a nail.
The rules are simple to follow.


Hatch - Have you made any other additions to the tappers? or is striking the left side of the mold working out to be enough?
I'm going to give it a go to try and find a few minutes tomorrow to see what i can setup to do a proof of concept for my machine. I'd like to hit both sides of the mold, but i have to see what i can come up with to mount and hit these areas.
If i don't get to it tomorrow, i will next week. The wife is back at work on Monday, so i can use my remaining holiday time to do what I want to do
Haven't had time to mess with them any more.
I finally got the machine back together. I cast about 1k 22 txm boolits. Started doing 38/40 boolits. They drop out of the mold like its coated in Teflon.
Don't like being hammered by the Cast Boolits Staff, then don't be a nail.
The rules are simple to follow.
That's a shame, but i guess that is how life goes.
I wish my 158gr swc would drop like that, i have a mate that shoots a lot of revolver and requested some to try. Easier said than done as they stick a fair bit without the impact that it had without the restrictors.
I may need to spend some more time with polish to see if i can get it nice and smooth to drop like that.
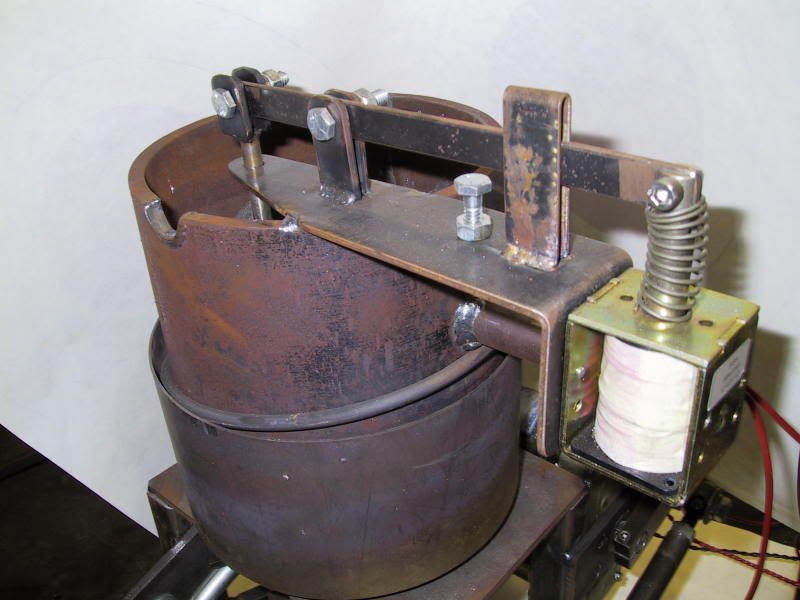
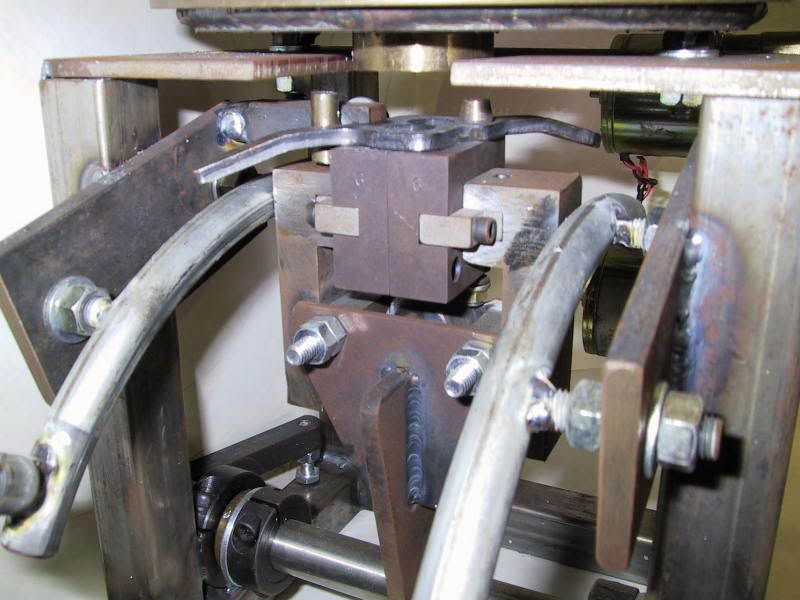
I made some dodgy mounts for the cylinders and clamped them in place to test functionality. I made some brass "hammers" for the end of the rods to soften the blow of the cylinder.
I just need to talk to my brother to modify the code to make it all work.

If you think they will hit too hard brass might not be the best idea, maybe aluminum or a plastic would be a better idea. I used brass to increase the mass so they had more inertia when they hit the mold carriers than the little cylinder alone would have.I made some brass "hammers" for the end of the rods to soften the blow of the cylinder.
By softening the blow, i was really just aiming for something softer than the metal rod end. Having steel on steel strikes, something is going to give over time, it may just be a small mark, but i'd rather reduce the chance of it causing damage is all.
I was thinking aluminium too, the bit of brass on my bench at the time was made for the job, minimal work to make it fit. I can always change it out later if it appears the brass is too hard.
Time will tell after i get the code changed and hooked up to a solenoid.
I see, the brass will work fine.


Yea I know it's a older thread but some of this can take awhile,Hatch any updates on the tappers?
After reading your thread I jumped on the first Master Caster I came across,guess I'll just operate in manually to start then look at automating it.
I started out with nothing and I still have most of it left.
Paralyzed Veterans of America
Looking for a Hensly &Gibbs #258 any thing from a two cavity to a 10cavityI found a new one from a member here
You won't regret automating it, not for a second
I'd like to know if he has had time to mess with it too, i know work was piling up on him last time we spoke.
I haven't messed with mine for a few months either, it's just been far too hot to cast and I have quite a stock pile already, so no need to cast more just yet. I have my tappers mounted for a test, but i have not yet hooked them up to see if they will work as planned.
I don't work in the colder months.
Yeah I am a baby and when it gets below 50 as a high Work stops.
This has to do that when I run my propane heater it causes too much condensation on my ammo cans. I need to get a dehumidifier.
Also Right now my master caster is apart. It is being cloned. Yep you heard it right. Duplicated. 50%+ larger pot. 3400 watts vs 1400
All steel construction.
Also it will be tapper ready
And lastly....... I switched my setup over to a touch screen right before winter and I need to get it 100% bug free before I start back on the tappers
The plan this weekend it to trouble shoot the code. I have a simple mistake then it will be back 100%.
Next will be to reassemble the master caster and hook it back up to automation.
Then I will work on the tappers
I have access to a full CNC machine shop now so it should be easier to make any parts needed for the tapper project.
.
Don't like being hammered by the Cast Boolits Staff, then don't be a nail.
The rules are simple to follow.
*raises eyebrow* I so wish you lived up the street, I'd be requesting CNC work all the time
I was thinking of making a MC from flat steel plate and cutting it out, i just never got that motivated.
Well I located replacement heating elements also
Original magma are $126 USD. 5.5 in id x 2.5 wide 1400 watts at 240vac
New replacement is $65 USD 5.5 x 3.
1750 watts at 240vac !!!!
The replacement is 240vac only while the original magma was 110/240
The plan is to stack two on the new pot as its taller
It would pull about 15 amps at 240.
Lucky for me the panel I built for the new machine is rated for 30 amps.
Don't like being hammered by the Cast Boolits Staff, then don't be a nail.
The rules are simple to follow.
I assume both elements will go in a thick steel base of the pot?
No. Magma uses heating bands that wrap around the pot
The outside diameter of the pot is 5.5 inches
The original band is 2.5 inches wide wrapped around the pot starting about a 3/4 of a inch from the base.
The replacement is 3 inches wide.
Example

Don't like being hammered by the Cast Boolits Staff, then don't be a nail.
The rules are simple to follow.
Oh, mine has the cartridge style that are pressed into the thick metal base. Two 110/120V elements that i run in series to suit my 240v power.
In a way, bands i can see would be better as you have more surface area than just the base. Yet the band would be most effective if you have a constant amount of lead above the level of the band.
That is interesting. I guess older machines have cartridge style.
I know mine and my brother's have heating bands.
His is about 7 or 8 years old at least. Mine is about four easy
I would think that you could add the additional heating band to your current setup and it would increase heating capacity and help with recovery when you add more lead
Don't like being hammered by the Cast Boolits Staff, then don't be a nail.
The rules are simple to follow.
I don't know exactly how old mine is, but i bought it not long after the buyback that took my .45 in 2003, so that's about 12 years. It was quite used when i bought it, so just how old it is, is a mystery. It is all cast iron, i thought the new ones were aluminium?
I had ideas of making a clone complete with automation to sell over here, but i thought it would have been far too much effort. Make it my own style like Jmorris did.
At least now i know if the elements cause me issues, i can go for a band heater, never knew that style existed
Hatch your project sounds about like the one I built.
The pot will hold more than 60lbs of lead and I used a 3500 watt oven element. The first one was $12 or so when 8 first built it had to replace it a while back and they had gone up to $16.
The pot is 3/8" wall pipe
With a bottom welded to it.
 Posting Permissions


| BP | Bronze Point | IMR | Improved Military Rifle | PTD | Pointed |
| BR | Bench Rest | M | Magnum | RN | Round Nose |
| BT | Boat Tail | PL | Power-Lokt | SP | Soft Point |
| C | Compressed Charge | PR | Primer | SPCL | Soft Point "Core-Lokt" |
| HP | Hollow Point | PSPCL | Pointed Soft Point "Core Lokt" | C.O.L. | Cartridge Overall Length |
| PSP | Pointed Soft Point | Spz | Spitzer Point | SBT | Spitzer Boat Tail |
| LRN | Lead Round Nose | LWC | Lead Wad Cutter | LSWC | Lead Semi Wad Cutter |
| GC | Gas Check |

 Reply With Quote