Whoops dirty word freechexOriginally Posted by cdngunner


|
   
   
|


|


Whoops dirty word freechex


Well it's not the Freechex that's dirty, it's those thugs that hang around it... Hahhhahaaa
Early this year I made a set of dies following plans I found on this website. Because of the shank dimension on my mold (NOE 269 145 FN), I had to use material no thicker than .008". I happened to have lots of .008" aluminum printing plates available. The checks I made with these first dies had severe "bottle cap" syndrome. I then made another set of dies (similar to the early Freechex dies), but incorporating a tapered bushing to allow the checks to gradually take their final shape. For me, it solved the bottle cap "problem."
.008" aluminum checks.
Disk shearing punch in place.
Check forming punch in place.
Die body and tapered bushing.
Red = check forming punch
Blue = check
Black = tapered bushing
Last edited by Fritz D; 08-24-2014 at 11:15 PM. Reason: Additional photo
Nice set up Fritz
Where abouts in On are you?
PM sent.
Fritz I like the set up and the write up. How much machining was involved in this production?
The only thing we are afraid of is our own abilities once you get to the point where you don't care about your abilities they become limitless
Hi fellas.
This is my simple setup. I looked at what I already had in the workshop and found a 10mm wad punch, that cut the .011" Alum flashing easily. The discs come out at .386", so I bored a piece of rifle barrel to .390", with a .333" hole at the bottom, to form the check. The forming punch, is .310" at the end and .386" on the shank. The shank keeps the forming punch centralised and the little arbour press pops the finished check out the bottom of the die.
I made the arbour press, when I was doing night school back in '78 and this is the first time I've found a good use for it.
These checks are for a 32-40, that I have built on a Martini Cadet action and barrel. The cadet barrel slugged at .320", so was a good candidate for this cartridge. I got a .320" sizer, from our own mould maker, Cast Bullet Engineering and these bullets come together really well.
I keep the burr up, when they are formed, so the burr is on the inner lip of the check and when they are applied to the boolit, they can't be picked off with a fingernail.
They are cast with a Lee 8mm ( .324" ) 170g DC mould, in 30:1 Lead : Tin alloy.
Except for the colour, they look no different to bought ones.
Last edited by Afro408; 08-29-2014 at 04:50 AM.
Very nice
Hunting season is upon us so I will delay my project till winter time.
Thanks Jr. I'm just a hobby machinist . . . I can't give you an exact figure re time, but quite a few hours over several evenings (not counting the first dies I made). I had to make several versions of the "bushing" before I got it just right. I made all clearances as tight as possible which involved lots of careful (slow) work with abrasive cloth. The clearance between the bushing and check forming punch is exactly the thickness of my gas check material (.008"). You can't begin to force .010" material through (ask me how I know)!
Those are nice looking checks, Fritz.
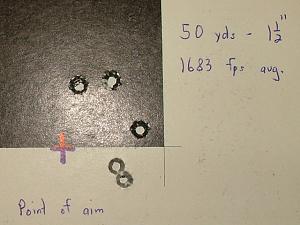
What's the story with the target? Open sights? Was the accuracy worse than this, before you used the alum checks? Better? That's a pretty big group
Here is a Youtube link of me making some checks with these tools.
http://youtu.be/fab6JeE-FNs
I have since fixed the problem, of the sides being chopped out, by just polishing the inside of the die a bit more. They come out slick as, now.
That small piece of flashing, that I cut the discs from, was 4-3/4" x 6" and cost 15c. I got 139 discs from it, so that makes them just over a 1/10th of a cent each. Expensive, eh
Last edited by Afro408; 08-30-2014 at 06:08 PM. Reason: wrong link
The target was fired with an 1896 Swedish Mauser, with original issue sights. WLR primer, 19grs IMR 3031, Linotype alloy, sized to .270", (my barrel slugs .267"), LBT Blue lube. Velocity was just shy of 1700 fps. I have not done much shooting with this rifle (yet) . . . with open sights I probably can't do much better. I've made a few checks with these dies using .008" copper, but I have not tested them yet. My first attempts with this rifle were with the plain base version of this bullet (NOE 269 145 FN) using 2400 powder and were much worse than the pictured target (5-1/2" at 50 yards).
I would suggest using a much softer alloy than Linotype. You may get a pleasant surprise. Also, if you're like me and can't focus on open sights anymore, when I have to shoot with irons, I wear an old pair of reading glasses, that have a longer focal length. These let me see the sights clearly, but the target is blurry. I find I get better grouping this way than with a clear target and blurry sights. If there is some way, that you can fit a rear peep sight to this old Swedish Mauser, then this would give you a better idea of it's potential.
Thanks for the suggestions. Softer alloy is on my list of "things to try some day." I've tried using various glasses to sharpen the sights, but for me it makes the target way too blurry. I've also tried the Merit Optical Attachment without much luck. Peeps would be nice, but my Swede is all original and I don't want to drill/tap any holes.
Just use jb weld for those sights that way you won't have to drill any holes
The only thing we are afraid of is our own abilities once you get to the point where you don't care about your abilities they become limitless
Yes, or Super Glue the peep on, just for the trial run.
 Posting Permissions


| BP | Bronze Point | IMR | Improved Military Rifle | PTD | Pointed |
| BR | Bench Rest | M | Magnum | RN | Round Nose |
| BT | Boat Tail | PL | Power-Lokt | SP | Soft Point |
| C | Compressed Charge | PR | Primer | SPCL | Soft Point "Core-Lokt" |
| HP | Hollow Point | PSPCL | Pointed Soft Point "Core Lokt" | C.O.L. | Cartridge Overall Length |
| PSP | Pointed Soft Point | Spz | Spitzer Point | SBT | Spitzer Boat Tail |
| LRN | Lead Round Nose | LWC | Lead Wad Cutter | LSWC | Lead Semi Wad Cutter |
| GC | Gas Check |

 Reply With Quote
