Titan ReloadingWidenersSnyders JerkyRotoMetals2
Reloading EverythingLoad DataMidSouth Shooters SupplyLee Precision
Inline Fabrication Repackbox
Page 3 of 4 FirstFirst 1234 LastLast
Results 41 to 60 of 64

Thread: Sights for Mosin-Nagants

  1. #41
    Boolit Master at Heavens Range

    Junior1942's Avatar
    Join Date
    Mar 2005
    Location
    Tullos, Louisiana
    Posts
    2,886
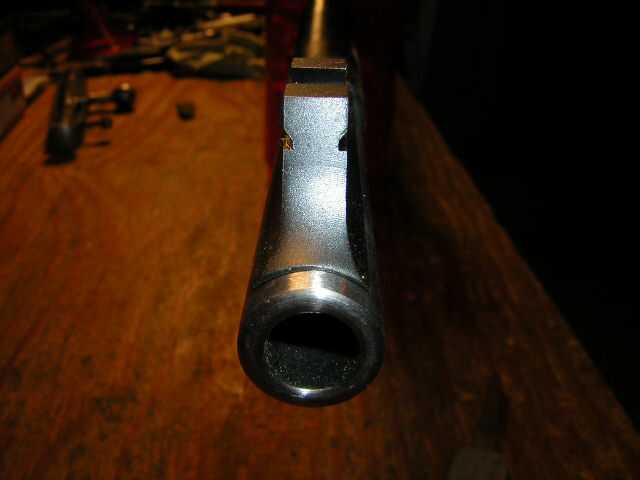
    Thinkin': Looks to me like a fellow could install an Uncle Mike's barrel band swivel stud upside down out on the end of a Mosin-Nagant barrel. Then he could drill & tap a 3-56 or 6-48 hole in the tip of the stud and screw in a shotgun front sight. Problem is, I want a fiber optic. Shotgun fiber optics are 1/8" in diameter vs 3/32" diameter for a rifle fiber optic. Plus they have a wing on each side which would tend to hide ol' Mossyhorns. Thoughts. . . . .

  2. #42
    Boolit Master 35 Whelen's Avatar
    Join Date
    Feb 2006
    Location
    North Central Texas
    Posts
    1,556
    I've of late been also been pondering ways to improve the Mosin. I have a couple of 91/30's with REALLY nice bores that shoot cast bullets well, and I may see what I can do on the latest. But, I thought I'd start with a $69.95 special M-44 from J&G Sales. Here are some of my thoughts for the M-44:

    1. Remove the front sight/bayonet assembly and replace it with something of the Patridge variety. I've been doing some measuring and I believe the front sight assembly off of an Ishapore 2A or possible an Enfield No.4 Mk.1 would be very close. A sight such as this would allow easy change of sight blades as well as windage adjustments. Even a Finnish M39 sight could probably be made to work and of course their windage is easily adjusted with a screwdriver.

    2. Add a receiver mounted peep or aperture sight. I think a base that would accept the flat sided type Williams ot Lyman sights (such as those for slab sided lever action rifles) could be made to work if a man fashioned a base on which to bolt it. I own a Russian micrometer peep sight that is mounted on a base that appears to have been very nicely made from a section of a pipe nipple cut longways from the nipple. The radius of the base at the front roughly fits the round side of a Mosin reciever and the rear of the base had been peened flat, thus accepting the flat sided type sights. It works somewhat like the Redfield target bases in that the mounting holes are forward of the sight.

    3. Install a low...VERY low bolt handle. This would be accomplished by first draw filing the top of the reciever behind where the bolt handle locks. It wouldn't take much metal removal. I figure 1/4"-5/16" off the highest point. Just enough so that this portion of the reciever was no higher than the round portion of the bolt body. Then a really low bolt handle could be welded to the ridge or shoulder of the bolt in such a way that it protruded no higher than the ridge or shoulder from which the original handle protrudes. Except of course it'd be at a 90º from this ridge/shoulder. With such a setup, the bolt handle should slide under the reciever sight.

    I envision this rifle as a knock-about rifle used primarily for small game with a light cast bullet, but that could also be used on game such as deer, if needed, out to 100 yds. or so with a heavier load.

    Thoughts?
    35W
    The biggest waste of time is arguing with the fool and fanatic who doesn't care about truth or reality, but only the victory of his beliefs and illusions.
    There are people who, for all the evidence presented to them, do not have the ability to understand.

    NRA Life Member

  3. #43
    Boolit Master at Heavens Range

    Junior1942's Avatar
    Join Date
    Mar 2005
    Location
    Tullos, Louisiana
    Posts
    2,886
    I think your "VERY low bolt handle" idea would be tricky to do. Other than having windage adjustment, would it really be any better than my easy swivel stud idea?

    But I like the idea of a windage adjustable front sight. Is there one out there which would fit in a 3/8" dovetail?

  4. #44
    Boolit Master 35 Whelen's Avatar
    Join Date
    Feb 2006
    Location
    North Central Texas
    Posts
    1,556
    Quote Originally Posted by Junior1942 View Post
    I think your "VERY low bolt handle" idea would be tricky to do. Other than having windage adjustment, would it really be any better than my easy swivel stud idea?

    But I like the idea of a windage adjustable front sight. Is there one out there which would fit in a 3/8" dovetail?
    I don't think it'd be too tricky. The worst part would be draw filing the top of the receiver, and only because I think it'll be time consuming. The rest would be no more difficult than welding a bolt handle on a Mauser which I've done a few times. In fact given that ridge on the Mosin bolt handle, it'd probably be quite a bit easier to weld to. Check out the modification to this bolt on a Finn M28:


    I like the swivel stud idea except for the limited range of elevation adjustment. If a fella were only using, say cast loads, or typical jacketed loads, it wouldn't be a big deal; just match your front sight height to the load. But I shoot lots of both, and I know from experience that when the sights are regulated (I modify all my Mosin front sights to be elevation adjustable) so that the typical jacketed load shoots point of aim at 100 yds., most of my cast loads require use of the 600-650 yd. setting of the rear sight. I like the convenience of being able to quickly make sight adjustments. I mounted a Lyman receiver sight to one of my K-31's and the luxury of the micrometer rear sight is awesome.

    Regarding the front sight.... The M44 barrel, according to the Mosin website, is .568" at the muzzle. This is quite a bit smaller than most front sight barrel bands I've checked, but I've yet to check a Springfield 03 and other American militart rifles which should have the 3/8" dovetail. Also, when I get to work, I'm going to chekc my Gun Parts Corp. catalog as they have misc. sights like this.

    Regards,
    35W
    Last edited by 35 Whelen; 02-08-2008 at 09:13 AM.
    The biggest waste of time is arguing with the fool and fanatic who doesn't care about truth or reality, but only the victory of his beliefs and illusions.
    There are people who, for all the evidence presented to them, do not have the ability to understand.

    NRA Life Member

  5. #45
    Boolit Master at Heavens Range

    Junior1942's Avatar
    Join Date
    Mar 2005
    Location
    Tullos, Louisiana
    Posts
    2,886
    My M44 barrel at the muzzle measures .570" including a layer of paint. Uncle Mike's # 10522 barrel band for .585"-.635" would work with a little file action.

  6. #46
    Boolit Master at Heavens Range

    Junior1942's Avatar
    Join Date
    Mar 2005
    Location
    Tullos, Louisiana
    Posts
    2,886
    The snailmail lady just brought my Brownells order. The Williams Streamlined ramp fits the .570" barrel end of my M44 like a charm. Now, to work to work. . . .

  7. #47
    Boolit Master at Heavens Range

    Junior1942's Avatar
    Join Date
    Mar 2005
    Location
    Tullos, Louisiana
    Posts
    2,886
    Guys, here's an update showing how well the contour of the Williams Streamlined ramp fits the contour of the M44 barrel. I had to hacksaw off the rear 3/4" of the ramp so it would butt up against the step in the barrel. The soldering starts in the morning. This is my first ramp soldering job. I'm using Brownells Hi-Force 44 solder.


  8. #48
    Boolit Master 35 Whelen's Avatar
    Join Date
    Feb 2006
    Location
    North Central Texas
    Posts
    1,556
    Quote Originally Posted by Junior1942 View Post
    Guys, here's an update showing how well the contour of the Williams Streamlined ramp fits the contour of the M44 barrel. I had to hacksaw off the rear 3/4" of the ramp so it would butt up against the step in the barrel. The soldering starts in the morning. This is my first ramp soldering job. I'm using Brownells Hi-Force 44 solder.

    Please keep us posted. I'm very interested in the soldering job. I've never done one either, but if it's no big deal, I'll tackle it.
    35W
    The biggest waste of time is arguing with the fool and fanatic who doesn't care about truth or reality, but only the victory of his beliefs and illusions.
    There are people who, for all the evidence presented to them, do not have the ability to understand.

    NRA Life Member

  9. #49
    Boolit Master at Heavens Range

    Junior1942's Avatar
    Join Date
    Mar 2005
    Location
    Tullos, Louisiana
    Posts
    2,886
    I'm finished except for touch up paint. I'll post a couple of more pictures later this afternoon. The solder job came out fine. I didn't get a spread out "tinned' thin layer all over the barrel or the ramp, but it's attached just fine. I did quite a lot of beating on the ramp trying to get the Fire Sight in place, and the ramp didn't budge. If it ever does come off, I'll re-solder, and I'll drill and tap for the attachment screw which came with the ramp. I can drill & tap all the way through the barrel as the hole will come through well inside the counterbore. I'll just keep shortening the screw 'til it doesn't poke through. The rifle is even zeroed. It's about 1" high @ 50 yards inside a 5 1/2" bull.

    1st shot was 2" left & 14" low @ 50. I'd whacked off the swivel stud screw too short. Made a longer one and shot again. 2nd shot was 2 1/2" left and ~1" high and in the 9 ring. Hammered right on the Fire sight. 3rd shot was 1" right and ~1" high in the 10 ring. I hammered a tad left on the Fire Sight and split the difference. There'll she'll stay until just before next deer season!
    Last edited by Junior1942; 02-09-2008 at 05:10 PM.

  10. #50
    Boolit Master at Heavens Range

    Junior1942's Avatar
    Join Date
    Mar 2005
    Location
    Tullos, Louisiana
    Posts
    2,886
    No flat black spray paint. I'll have to return to this project next week. Sorry.

  11. #51
    Boolit Grand Master
    Mk42gunner's Avatar
    Join Date
    Aug 2005
    Location
    Butler, MO
    Posts
    9,061
    Junior and 35 Whelen,

    I have an idea for using the swivel stud and having more vertical adjustment. What about soldering a 10-32 coupler nut onto the cocking piece? I seem to remember they are about 1/2" long, that would give a lot more range than just the threads thru the cocking piece.


    Robert

  12. #52
    Boolit Master 35 Whelen's Avatar
    Join Date
    Feb 2006
    Location
    North Central Texas
    Posts
    1,556
    Went to the Ft. Worth gun show today and picked up an M-1 carbine front band/sight. It fits almost perfectly over the muzzle of an M44. Junior, would you mind a crash course on the soldering? Also, how's the rifle shooting?
    35W
    The biggest waste of time is arguing with the fool and fanatic who doesn't care about truth or reality, but only the victory of his beliefs and illusions.
    There are people who, for all the evidence presented to them, do not have the ability to understand.

    NRA Life Member

  13. #53
    Boolit Master at Heavens Range

    Junior1942's Avatar
    Join Date
    Mar 2005
    Location
    Tullos, Louisiana
    Posts
    2,886
    Mk44, with 3/8" to 1/2" vertical adjustment as the stud/peep is now, I will never need more. 3/8" = 25" of POI change @ 50 yards with a 26" sight radius.

    35W, I'll post in the morning and go into detail about what I did. As far as how it's shooting, the big ol' Fire Sight hid the 5 1/2" bull @ 50 yards, but if a rifle will go from 14" low and 2" to the left to zero in three shots. . . . well . . . it's shooting fine.

  14. #54
    Boolit Master at Heavens Range

    Junior1942's Avatar
    Join Date
    Mar 2005
    Location
    Tullos, Louisiana
    Posts
    2,886
    Details:

    I used a Wal-Mart/Ace Hardware propane torch.

    I used Brownells Hi-Force 44 solder # 080-649-250 .

    I used Brownells Comet Flux # 478-100-004 .

    I took the barrel down to bare metal with a belt sander. On the bottom of the ramp, I tried files and tried stones in a Dremel tool. Nothing worked well until I tried a plain ol' sanding wheel in the Dremel tool. It perfectly fit the concave base of the ramp, and it took it down to bare metal in a flash.

    I then dripped Comet Flux on a q-tip and applied it to the barrel and the bottom of the ramp.

    I clamped the ramp upsidedown in a pair of vice grip pliers. As the Brownells solder instructions said, I heated the ramp until it, not the torch flame, melted the solder. Some of the surface "tinned." However, mostly the solder formed beads.

    I installed the bolt into the UNLOADED barreled action and left the bolt cocked. Then I clamped the barrel, about mid-barrel, in my bench vise. I positioned the barrel/vise so that (1) I had room to work on the end of the barrel; and (2) I could scoot my chair backward several feet and could eyeball down the UNLOADED barrel and see the alignment between the top of the ramp, the barrel, and the rear sight stud/peep at the other end of the barreled action.

    I spent time thinking about how to get good alignment between the front sight, the barrel, and the rear peep. By trial and error, I decided eyeball alignment was the best method for me. If the rifle zeroed with the Fire Sight halfway out of the ramp groove to one side or the other, I'd just heat the barrel/ramp area, melt the solder, then turn the ramp in the direction needed.

    So, plan in hand, I eyeball-aligned the rear stud/peep into a verticle position. Then I tinned/beaded solder onto the top of the barrel.

    Next, I placed the tinned/beaded ramp onto the barrel. Then I started heating them both, moving the torch flame from one side, underneath, to the other side, back again, etc., etc.

    The beads melted ok, but when the eyeball alignment instrument showed the ramp turned in one direction or the other, i.e, out of alignment with the barrel and the peep, I had trouble getting it straight. In trying to move it ever so slightly, I knocked it off the barrel several times. In frustration, I wished for the clamp the Brownells instructions said I should use.

    So I turned off the propane torch and found a piece of wire to use as a clamp. While wrapping the wire around the ramp/barrel, I noticed that the solder had solidified and the ramp was firmly attached to the barrel. After scooting back my chair to position the ol' eyeball measuring device, danged if it didn't show the top of the ramp, the barrel, and the rear stud/peep in what looked like perfect alignment.

    When the rifle zeroed, the Fire Sight stuck out to the left of the ramp exactly .030". That's where she'll stay!

    All that's left of the project is some flat black paint and some pictures. This will soon be an in-depth article on my web site.

    One important point: the Rain Rifle/Hell or High Water Rifle is now the only rifle I own where the sights or scope alignments were positioned to the pupil position of MY right eye, not the pupil position of the AVERAGE right eye. Speaking from experience in an archaeology lab, I can tell you that human skulls come in many shapes and sizes. When I quickly bring this rifle to my shoulder and drop my cheek on the stock, my right eye is looking through the peep aperture and the front sight is centered in that aperture.

    That perfect alignment of MY right eye to rear aperture to front bead came with the sight heights between 1 1/16" and 1 1/8" above the centerline of the rifle bore. For YOUR right eye, you could probably add or subtract as much as 1/2" to or from that distance.

  15. #55
    Boolit Master at Heavens Range

    Junior1942's Avatar
    Join Date
    Mar 2005
    Location
    Tullos, Louisiana
    Posts
    2,886

    Finished

    It's finished. It couldn't have turned out better. It's hard to tell from the photo but the Fire Sight is sticking out only .030" from the ramp on this side. That's pretty good eyeball alignment if you ask me! Notice how well the whacked-off rear end of the Streamlined ramp matches the step in the barrel. With the addition of a Fire Sight hood, the Rain Rifle / Hell or High Water Rifle is ready to hit the deer thickets.


  16. #56
    Boolit Master 35 Whelen's Avatar
    Join Date
    Feb 2006
    Location
    North Central Texas
    Posts
    1,556
    Very nice Junior...very nice!!
    35W
    The biggest waste of time is arguing with the fool and fanatic who doesn't care about truth or reality, but only the victory of his beliefs and illusions.
    There are people who, for all the evidence presented to them, do not have the ability to understand.

    NRA Life Member

  17. #57
    Boolit Master at Heavens Range

    Junior1942's Avatar
    Join Date
    Mar 2005
    Location
    Tullos, Louisiana
    Posts
    2,886
    35W, I forgot a step. The Comet Flux is highly corrosive according to the bottle. It says to use warm water as a rinse. I decided I ought to remove the acid from the sight/barrel junction or someday rust might start oozing out. Before I installed the Fire Sight, I stuck the muzzle down in a coffee can filled with hot tap water. I let it soak for 30 minutes. When I dumped the water, it was a light brown color like very weak tea.

    I dried the muzzle and the ramp and ran a couple of dry patches through the bore. Then to remove ALL the water, I held the muzzle and ramp over a burner on my gas kitchen stove. I moved it back and forth over the flame until it was too hot to touch comfortably. Then I let it cool naturally in a muzzle up, chimney position. Then I oiled the surface and ran an oiled patch through the bore. (That's a trick to remember next time you need to clean your muzzleloader.)

  18. #58
    Boolit Mold Hobie's Avatar
    Join Date
    Mar 2005
    Location
    Staunton, VA, USA
    Posts
    15
    Junior,

    Dennis posted about this at his blog. This is really a neat solution. I've forwarded this to some friends with similar "aims" in mind.
    Sincerely,

    Hobie

    "We are all travelers in the wilderness of this world, and the best that we find in our travels is an honest friend." Robert Louis Stevenson

  19. #59
    Boolit Master at Heavens Range

    Junior1942's Avatar
    Join Date
    Mar 2005
    Location
    Tullos, Louisiana
    Posts
    2,886
    Thanks for the kind words, Hobie. They're meaningful coming from you. I really, really like the way it turned out. It's very cool to quickly bring this rifle to my shoulder and have the sights in perfect alignment with the pupil of my aiming eye. I'll probably find myself picking this rifle even when rain isn't forecast! I'll have a detailed article about the entire process posted in a few days.

  20. #60
    Boolit Master
    Join Date
    Feb 2007
    Location
    Communism running rampant!
    Posts
    4,763
    Junior,

    What a professional job on that M44 front sight!!!!!

    Outstanding!

    Three 44s

Page 3 of 4 FirstFirst 1234 LastLast

Posting Permissions

  • You may not post new threads
  • You may not post replies
  • You may not post attachments
  • You may not edit your posts
  •  
Abbreviations used in Reloading

BP Bronze Point IMR Improved Military Rifle PTD Pointed
BR Bench Rest M Magnum RN Round Nose
BT Boat Tail PL Power-Lokt SP Soft Point
C Compressed Charge PR Primer SPCL Soft Point "Core-Lokt"
HP Hollow Point PSPCL Pointed Soft Point "Core Lokt" C.O.L. Cartridge Overall Length
PSP Pointed Soft Point Spz Spitzer Point SBT Spitzer Boat Tail
LRN Lead Round Nose LWC Lead Wad Cutter LSWC Lead Semi Wad Cutter
GC Gas Check