WidenersTitan ReloadingInline FabricationLee Precision
RotoMetals2MidSouth Shooters SupplyLoad DataRepackbox
Reloading Everything Snyders Jerky
Results 1 to 13 of 13

Thread: Help with Mold Repair:

  1. #1
    Boolit Buddy M71's Avatar
    Join Date
    Feb 2010
    Location
    West of Ft. Collins, CO
    Posts
    102

    Help with Mold Repair:

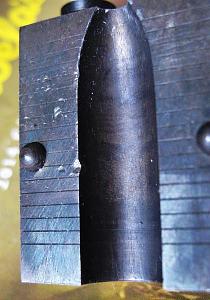
    Today I received my new to me custom Tom Ballard .450 adjustable Paper Patch mold. The mold is damaged and I would really appreciate it if someone here would please fix it. I won't return it because it's too difficult to replace and I purchased it from a friend for a reasonable price. He purchased it second hand also. The mold was disrespected either by dropping it or something fell on it, or improperly packaged for shipment. All pure speculation on my part. The leading edge has a divot that protrudes into the cavity. So here are the photos and I'm willing to be more than fair to have this mold repaired. Your expertise is a wonderful resource. I know in theory how to use a bullet to spin with a polishing compound but I won't risk screwing it up. I have many bullets cast with this mold to send with the mold that were likely cast before the damage occurred. Thank you.
    Click image for larger version. 

Name:	IMG_0008.jpg 
Views:	36 
Size:	52.9 KB 
ID:	104706Click image for larger version. 

Name:	IMG_0009.jpg 
Views:	41 
Size:	38.4 KB 
ID:	104707
    Last edited by M71; 05-12-2014 at 10:10 PM.

  2. #2
    Boolit Grand Master

    Join Date
    Mar 2013
    Location
    Northwest Ohio
    Posts
    14,528
    Lapping with a bullet risks making the ding a ring around the bullet. A fine round stone with kerosene or very light oil and work just the dinged edge slow and easy till the raised spot in the metal "blends" back into the original. A very smooth punch and light hammer could be used to first push the ding back close to form also. Lightly ink the surface with layout ink or a magic marker will show progress much easier. Work slow and gently alot of patience is required. A 4 ounce ball peen hammer and a punch with a slightly radioused face will do wonders starting out here. You can get it very close then just stone to finish. Also be sure the ding is raised on the face anywhere keeping the blocks from closing.

  3. #3
    Boolit Buddy M71's Avatar
    Join Date
    Feb 2010
    Location
    West of Ft. Collins, CO
    Posts
    102
    Excellent plan of action, I just don't trust myself enough to do the job.

  4. #4
    Boolit Grand Master

    Join Date
    Mar 2013
    Location
    Northwest Ohio
    Posts
    14,528
    A friend of mine has that same adjustable Ballard mold. Ive used it in the past and those bullets really performned in my sharps. A shame to leave it in that shape. Shipping charges and risk of it being lost in shipment would make me really consider giving it a go. Its fairly straight forward and simple just has to be done right.

  5. #5
    In Remembrance


    DLCTEX's Avatar
    Join Date
    Oct 2005
    Location
    Eastern panhandle,Tx
    Posts
    6,255
    I agree that the displaced metal should be pushed back into place as much as possible, then smooth up the cavity.

  6. #6
    Boolit Master
    Doc Highwall's Avatar
    Join Date
    May 2007
    Location
    Ct
    Posts
    4,615
    Quote Originally Posted by DLCTEX View Post
    I agree that the displaced metal should be pushed back into place as much as possible, then smooth up the cavity.
    I agree also that the metal has to be hammered back into place with a punch that has a conforming shape so as to not cause any more damage and then stoned followed up by a lapping of the cavity.

    If you were to just stone the mould cavity you will end up with a bullet that has a bulge where the dent is.
    Maybe Eric at Hollow Point Moulds can do this for you.

  7. #7
    Boolit Master
    Bullshop's Avatar
    Join Date
    Mar 2005
    Location
    Montana
    Posts
    6,172
    I would turn a pin the diameter of the cavity and about half the length and slowly and gently squeeze it between the blocks in a vice.

  8. #8
    Boolit Buddy M71's Avatar
    Join Date
    Feb 2010
    Location
    West of Ft. Collins, CO
    Posts
    102
    "I would turn a pin the diameter of the cavity and about half the length and slowly and gently squeeze it between the blocks in a vice."
    Bullshop, I appreciate your idea, I need to keep the mold at .450. I'd be concerned that the cavity would be expanded. And if the cavity was inadvertently expanded the adjustable bolt/plug would leak. Just my opinion, don't want to make it worse. I could try casting with it the way it is and test the bullets. They would just have a little teeny dent, but perfect bullets make me very happy.

  9. #9
    In Remembrance


    DLCTEX's Avatar
    Join Date
    Oct 2005
    Location
    Eastern panhandle,Tx
    Posts
    6,255
    That ding would stick the boolit tighter than a tick on a dog.

  10. #10
    Boolit Master


    RedHawk357Mag's Avatar
    Join Date
    Feb 2010
    Location
    Duncan, Oklahoma, United States
    Posts
    525
    I would consider what Mr. Holiday suggested apparently this guy is an artist with mold repair. Read many good things concerning is work and ethic. And you say you have bullets casted prior to the party foul, I believe Accurate Molds could make you a mold from your casted round. And I know that he is indeed an artist in my book. Good luck.
    Ruger RedHawk 357 Mag 44 Mag GP100 Davidson Exclusive 5" Security Six 2 3/4", Speed Six 4"
    Smith Wesson 629 PP and 686 PP, 617

  11. #11
    Boolit Master
    Join Date
    Mar 2010
    Location
    Michigan
    Posts
    1,200
    I had a ding in base band of vintage Ideal .32 wadcutter mould. Used plug gage..with edges honed round & carefully closed blocks over this. A little polishing with old style typwriter erasure & casted slugs drop right out & show no marks. Can't overstress the need for no sharp edges anywhere on hardened pin.

  12. #12
    Boolit Buddy M71's Avatar
    Join Date
    Feb 2010
    Location
    West of Ft. Collins, CO
    Posts
    102
    I'm sending this mold off to Ohio today. A gracious member has agreed to refurbish the mold for the cost of shipping. I am grateful for all of your assistance. Our online community has some very skilled and knowledgeable people. When the repair is completed I'll post a photo of the mold and some freshly cast bullets. Once again, thank you so much.

  13. #13
    Boolit Grand Master

    Join Date
    Mar 2013
    Location
    Northwest Ohio
    Posts
    14,528
    I just cast 100 bullets with thwe above ballard mold after working over 3 small dings with a polished faced punch. Before bullets were sticking do to the one edge dings raised metal. 2 others on fave were causing slight flash when mold fully heated up. worked mold over with the punch and 4 ounce ball peen slowy pushing metal back into place. Cast 100 bullets or so today with it to check and no flash parting lines are clean with only a very light deformation showing on a very few bullets you can see it but not feel it. Bullets are round with in .0005-.001 even over the repaired spot. I believe the old ballard mold has been saved for future generations. Going to ship it back with a few specimins in the box monday or tuesday. A great casting mold, bullets dropped with out issue now, to size and true. A great mold from a great maker

Posting Permissions

  • You may not post new threads
  • You may not post replies
  • You may not post attachments
  • You may not edit your posts
  •  
Abbreviations used in Reloading

BP Bronze Point IMR Improved Military Rifle PTD Pointed
BR Bench Rest M Magnum RN Round Nose
BT Boat Tail PL Power-Lokt SP Soft Point
C Compressed Charge PR Primer SPCL Soft Point "Core-Lokt"
HP Hollow Point PSPCL Pointed Soft Point "Core Lokt" C.O.L. Cartridge Overall Length
PSP Pointed Soft Point Spz Spitzer Point SBT Spitzer Boat Tail
LRN Lead Round Nose LWC Lead Wad Cutter LSWC Lead Semi Wad Cutter
GC Gas Check