RepackboxTitan ReloadingMidSouth Shooters SupplyLoad Data
Inline FabricationWidenersLee PrecisionRotoMetals2
Reloading Everything Snyders Jerky
Page 1 of 2 12 LastLast
Results 1 to 20 of 24

Thread: My Custom Case Trimmer

  1. #1
    Boolit Buddy Bo1's Avatar
    Join Date
    Jan 2013
    Location
    Tioga, LA
    Posts
    384

    My Custom Case Trimmer

    Click image for larger version. 

Name:	Trimmer.JPG 
Views:	409 
Size:	105.5 KB 
ID:	102262

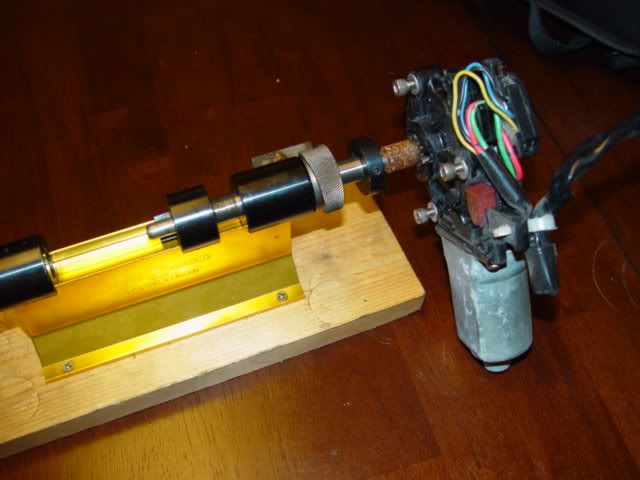
    This started out as a regular manual RCBS case trimmer, and a good friend of mine on this site customized it for me. It is now a powered trimmer with a sewing machine motor, with a foot controll. I think I see alot easier case trimming in my future.
    I would like to thank Harley6699 for the GREAT and profesional job he did on customizing this for me.

    Bo
    "Those who hammer their guns into plows, will plow for those who do not"
    Thomas Jefferson

  2. #2
    Boolit Buddy butch2570's Avatar
    Join Date
    Feb 2014
    Location
    west virginia
    Posts
    363
    Wow, so much talent on this site , it is almost ridiculous, that's a fine looking piece...

  3. #3
    Banned
    Join Date
    Feb 2014
    Location
    Inverness, Florida
    Posts
    22
    You should sell these? Lol

  4. #4
    Boolit Master slim1836's Avatar
    Join Date
    Mar 2010
    Location
    Burleson, TX
    Posts
    2,124
    Looks like I need to keep my eyes out for one of these motors now. I used a power window motor from my van for an annealing set up. Wonder how a Dremmel tool would work?

    Slim
    JUST GOTTA LOVE THIS JOINT.

  5. #5
    Boolit Grand Master jmorris's Avatar
    Join Date
    Aug 2007
    Posts
    5,286
    Yours looks better than my 12v power window motor conversion.


  6. #6
    Boolit Master
    Join Date
    Apr 2009
    Location
    northern Minn. in the boonies
    Posts
    2,178
    Bo a couple questions please. From looking at your setup
    A. I assume the motor is bolted solidly to the U shaped holder. On the bottom of the holder are there 4 male studs that ride in the 2 channels that are bolted to the base frame.
    B. How much of the motor support system is of the shelf items? And how much is milled?
    C. What was used to marry the motor shaft to the trimmer shaft? Kevin
    Harley 6699 sure did a professional job there! Kevin

  7. #7
    Boolit Master Cmm_3940's Avatar
    Join Date
    Jul 2013
    Location
    Central Ohio
    Posts
    766
    Way purtier than when I use my cordless drill. I just took the little crank off and put the shaft in the chuck.

  8. #8
    Boolit Buddy Bo1's Avatar
    Join Date
    Jan 2013
    Location
    Tioga, LA
    Posts
    384
    Quote Originally Posted by kbstenberg View Post
    Bo a couple questions please. From looking at your setup
    A. I assume the motor is bolted solidly to the U shaped holder. On the bottom of the holder are there 4 male studs that ride in the 2 channels that are bolted to the base frame.
    B. How much of the motor support system is of the shelf items? And how much is milled?
    C. What was used to marry the motor shaft to the trimmer shaft? Kevin
    Harley 6699 sure did a professional job there! Kevin
    Kevin,
    Harley6699 can answer any technical questions on the unit, he did ALL of the work on it.
    I can post some more pictures of the front of the unit as well, and maybe you can tell more by them.
    Thanks,
    Bo
    "Those who hammer their guns into plows, will plow for those who do not"
    Thomas Jefferson

  9. #9
    Boolit Bub harley6699's Avatar
    Join Date
    May 2013
    Location
    Ft Myers, FL
    Posts
    38
    Bo.. Thanks for the comment.. it was a lot of fun working on this for you..
    I will try and answer the questions that are here.. The motor is a new sewing machine that I found on Ebay for $27.00.
    Kevin I will try and answer your questions:
    A. I assume the motor is bolted solidly to the U shaped holder. On the bottom of the holder are there 4 male studs that ride in the 2 channels that are bolted to the base frame.
    The motor is sitting inside a three piece motor mount. The motor mount is screwed to two inserts of the glides that have been screwed to the leveling table.. I use two 6” drawer glides I found on the web for $27.00. I use a little grease for lubing the glide and the inserts that the motor slides on.

    B. How much of the motor support system is of the shelf items? And how much is milled?
    Nothing is milled.. The mount I cut out of sheet metal and drilled the hole with a hole saw for the motor to fit in.. I bent the base so I could blot the ends to the base so you can insert and remove the motor..

    C. What was used to marry the motor shaft to the trimmer shaft?
    This one had me stumped for a few weeks when I started thinking about this for my trimmer.. I search the web for something that would work and found nothing.. Then I remembered my days when I built and raced RC Boats. I remembered the U-joints that I used to join the motor to the prop. I found them on Ebay for about $10.00.
    The level table was not hard to figure out just the height that I needed to line everything up.. I will add a few pictures of Bo’s and the one I built a few years ago for me.. I updated a few things on Bo’s like the handle is on the front and bend at an angle for ease of use and the other is a return spring to return the motor to the far right position which disengages the cutting blades..
    If you guys have any questions drop me a line and I can help.. I have drawings for this project but some things have to be changed once you get the motor..

  10. #10
    Boolit Bub harley6699's Avatar
    Join Date
    May 2013
    Location
    Ft Myers, FL
    Posts
    38
    Click image for larger version. 

Name:	2014-04-04 14.10.36.jpg 
Views:	118 
Size:	63.3 KB 
ID:	102482

  11. #11
    Boolit Bub harley6699's Avatar
    Join Date
    May 2013
    Location
    Ft Myers, FL
    Posts
    38
    Click image for larger version. 

Name:	IMAG0016.jpg 
Views:	122 
Size:	45.1 KB 
ID:	102483

  12. #12
    Boolit Bub harley6699's Avatar
    Join Date
    May 2013
    Location
    Ft Myers, FL
    Posts
    38
    Click image for larger version. 

Name:	trimmer-082913.jpg 
Views:	112 
Size:	24.8 KB 
ID:	102484

  13. #13
    Love Life
    Guest
    It is magnificent!!!

    What are the RPM's for the motor? I have been perusing motors and one is listed as having 7,000 RPM!! I am firm believer that high RPM are needed for fast and good case trimming. The downfall of the stock RCBS, Hornady, and Lyman is the slow trim rate (plus the wine of the motor). Faster trim rates lead to cleaner cuts. Even the Gracey is under powered. The Giraud runs 4,000 RPM which is fantastic, but it indexes off the shoulder and you need individual inserts for different case families.

    Back on track here...

    High RPM (3,000 plus) coupled with the versatility of the Lyman, RCBS, or Hornady case holding system is about perfect. Throw in a 3 way cutter and you are on you way to case trimming Nirvana. I

    Harley6699 I sent you a PM IRT the case trimmer.

  14. #14
    Boolit Grand Master


    cbrick's Avatar
    Join Date
    Dec 2005
    Location
    Kalifornia Escapee
    Posts
    8,034
    LL, your really incorrect in thinking high RPM. With the high RPM motor comes less torque, the motor in mine is an 1800 RPM industrial fan motor from Granger. It is geared down and chain driven for the Forster trimmer shaft which runs at 600 RPM and torque is increased significantly. At 600 RPM case necks are turned baby hieny smooth. High RPM is simply not needed but a fair amount of torque is. In mine the cutter shaft is held captive and the Forster unit slides. Not visible in the photo on the left side of the machine is the output shaft for a second motor, a 12v gear motor that runs at 60 RPM and has a tool holder for cutting/uniforming inside flash holes with a lot of torque. On the right side of the machine also run off of the gears is chamfering/deburring cutters and also at 600 RPM with the same gain in torque.

    When this picture was taken it was making short order of turning 414 Super Mag brass into 41 Mag for proper length in the FA cylinder.

    Bottom line is don't think high RPM, think torque. Cutting brass without the gear reduction would easily bog down the motor and probably work it to death in short order.

    Rick

    Click image for larger version. 

Name:	DSCN1486-1.JPG 
Views:	113 
Size:	119.1 KB 
ID:	102490
    "The people never give up their freedom . . . Except under some delusion." Edmund Burke

    "Let us remember that if we suffer tamely a lawless attack on our liberty, we encourage it." Samuel Adams

    NRA Benefactor Life Member
    CRPA Life Member

  15. #15
    Boolit Buddy Bo1's Avatar
    Join Date
    Jan 2013
    Location
    Tioga, LA
    Posts
    384
    Thank you Harley6699 for the additional pictures, and diagram. This might help explain the technical side of things for a few.
    Thanks again for the build.
    Bo
    "Those who hammer their guns into plows, will plow for those who do not"
    Thomas Jefferson

  16. #16
    Boolit Buddy danomano's Avatar
    Join Date
    Aug 2013
    Location
    Oregun
    Posts
    150
    These are great! another project for the list!

  17. #17
    Boolit Grand Master jmorris's Avatar
    Join Date
    Aug 2007
    Posts
    5,286
    LL, your really incorrect in thinking high RPM. With the high RPM motor comes less torque
    If there is enough inertia it might not matter much or a powerfull enough highspeed motor.

    Here is a video of a case I trimmed with a 9000 rpm cutter, 1/3 hp motor under almost no load.


  18. #18
    Boolit Grand Master


    cbrick's Avatar
    Join Date
    Dec 2005
    Location
    Kalifornia Escapee
    Posts
    8,034
    Nice trim but I don't think there will be one of them in my future.

    Rick
    "The people never give up their freedom . . . Except under some delusion." Edmund Burke

    "Let us remember that if we suffer tamely a lawless attack on our liberty, we encourage it." Samuel Adams

    NRA Benefactor Life Member
    CRPA Life Member

  19. #19
    Boolit Grand Master
    btroj's Avatar
    Join Date
    May 2006
    Location
    Nebraska's oldest city
    Posts
    12,418
    Looks pretty expensive to me. I can keep using my cordless drill and Wilson trimmer for much less money.
    You will learn far more at the casting, loading, and shooting bench than you ever will at a computer bench.

  20. #20
    Boolit Master freebullet's Avatar
    Join Date
    Mar 2013
    Location
    Nebraska
    Posts
    1,473
    That looks like a heck of a trimmer, well put together too.

    I use the wft and I ain't switchin. Very fast and accurate.
    If you think your a hammer everything looks like a nail.

Page 1 of 2 12 LastLast

Posting Permissions

  • You may not post new threads
  • You may not post replies
  • You may not post attachments
  • You may not edit your posts
  •  
Abbreviations used in Reloading

BP Bronze Point IMR Improved Military Rifle PTD Pointed
BR Bench Rest M Magnum RN Round Nose
BT Boat Tail PL Power-Lokt SP Soft Point
C Compressed Charge PR Primer SPCL Soft Point "Core-Lokt"
HP Hollow Point PSPCL Pointed Soft Point "Core Lokt" C.O.L. Cartridge Overall Length
PSP Pointed Soft Point Spz Spitzer Point SBT Spitzer Boat Tail
LRN Lead Round Nose LWC Lead Wad Cutter LSWC Lead Semi Wad Cutter
GC Gas Check