Load DataMidSouth Shooters SupplyRotoMetals2Repackbox
Reloading EverythingInline FabricationSnyders JerkyWideners
Lee Precision Titan Reloading
Page 5 of 32 FirstFirst 123456789101112131415 ... LastLast
Results 81 to 100 of 625

Thread: Automated Master Caster

  1. #81
    Boolit Master
    Join Date
    Oct 2013
    Location
    Brisbane, Australia
    Posts
    1,775
    jmorris - I remember seeing your setup and noticed you used timers, that's one of the reasons i believe that i can get it to work with timers alone The ones I'm going to try are off ebay, item number: 200973308585. They have multiple modes of operation, hopefully they will be suitable.

  2. #82
    ADMIN


    HATCH's Avatar
    Join Date
    Sep 2008
    Location
    Lexington, SC
    Posts
    6,706
    Those should work. Will take like 7 of them. Might as well get a plc

  3. #83
    Boolit Master
    Join Date
    Oct 2013
    Location
    Brisbane, Australia
    Posts
    1,775
    Hatch - How do you feel that it will need 7 of them? From the description i have read on the controller modes that they do, i should just need one to control the main ram, one to control the lead pour and one for the tapper and possibly one to use as a delay to allow the lead to cool after the pour. As the ram is single acting with a spring return like wyman used, that saves one solenoid and controller.

    The theory was lead pour for set time, pause then start after specified time to allow lead to cool which will cut the sprue and dump projectiles, tapper, release air ram. Repeat.

    I guess it is just one of those things that i will know for sure after it's actually hooked up and tested to see if the relays will open and close when i want them to.

  4. #84
    Boolit Buddy

    Join Date
    Jun 2013
    Posts
    363

  5. #85
    Cast Boolits Owner


    No_1's Avatar
    Join Date
    Mar 2005
    Location
    N.E. Florida
    Posts
    12,607
    Quote Originally Posted by HATCH View Post
    Those should work. Will take like 7 of them. Might as well get a plc
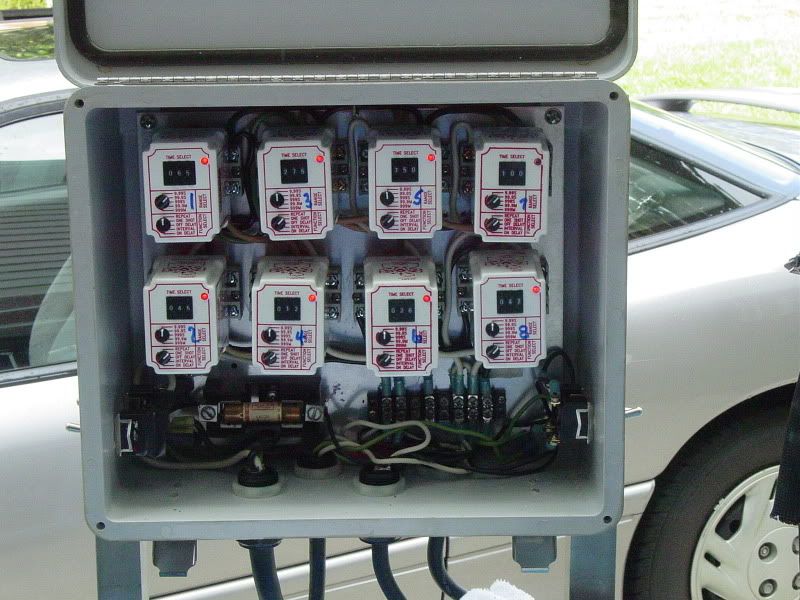
    I use 8 with mine. I considered swapping up to a PLC but found my timer setup much easier to adjust on the fly. These were from a couple of years ago. I have added a PID controller and will try to get some photos of the updated setup when I go home for Thankgiving.


    Here is a couple of vids. Click the pictures below to play them.

    Last edited by No_1; 10-28-2013 at 07:40 PM. Reason: Added vids
    "The only way to deal with an unfree world is to become so absolutely free that your very existence is an act of rebellion."
    - Albert Camus -

  6. #86
    Boolit Master
    Join Date
    Oct 2013
    Location
    Brisbane, Australia
    Posts
    1,775
    Kayak1 - i was actually thinking of a USB controller like that, but then it would tie up a laptop/pc to keep controlling it. I assume that board has no CPU as such, so it needs a laptop to do all the thinking.

    No1 - I like your setup, very smooth operation. I'd have most of the parts to go hydraulic too, but I'd be worried that i may size something wrong and bend or break something, there is a lot of potential force that you can apply with a hydraulic cylinder unless you lower it with a relief. How do you go with the heat generated by the power pack? i didn't think that they were rated to run for extended periods of time. I'm with you on the fact that you can easily change setting son the fly.

    That's the thing i have wondered about too, do you need to change the cycle times depending on the time of year? Cooler months means that the mold may not over heat as easily as the hotter months of the year. Does that even come into play? I'd have thought it may if you were running the fastest possible cycle times to churn out as many projectiles every hour as possible. I'd like to think that I'd be happy letting it clunk away, even if it's not doing quite as many as it could, it saves me sitting there manually doing it. I can save that job for my re-sizing stage....

  7. #87
    Boolit Buddy

    Join Date
    Jun 2013
    Posts
    363
    An arduio is a little 8bit micro http://www.arduino.cc/ you just use the USB to program it. Many of them are based on a ATmega328. I currently have one controlling my star (I just built last weekend, but I am having issues with having the boolits dropping from the feeder).

    I noticed that your Master Caster is run with hydraulics instead of pneumatics. Did you write up the build it looks interesting.

  8. #88
    ADMIN


    HATCH's Avatar
    Join Date
    Sep 2008
    Location
    Lexington, SC
    Posts
    6,706
    Quote Originally Posted by Tazza View Post
    Hatch - How do you feel that it will need 7 of them? From the description i have read on the controller modes that they do, i should just need one to control the main ram, one to control the lead pour and one for the tapper and possibly one to use as a delay to allow the lead to cool after the pour. As the ram is single acting with a spring return like wyman used, that saves one solenoid and controller.

    I haven't laid it out but based on No_1's
    You use one as a overall timer. Basically all the other relays are timed off this master relay. Setup on delay on break
    One relay delay on make - movement timer/lead harden timer
    One relay delay on break - lead pour

    Ok looking more like 3 or 4 relays

  9. #89
    Boolit Grand Master jmorris's Avatar
    Join Date
    Aug 2007
    Posts
    5,277
    The second pic below is of my timer/relay board. One of the DPDT relays is controlled by a 10 turn POT that adjusts from 0-10 seconds of pour time. When it triggers, the drive motor stops and it powers the pour solenoid at the same time.

    The second is for a cool down/ knocker cycle. I robbed the knockers for another project a while back though.

    The first photo shows the next mod I am going to preform. I am not sure about a real MC as I have never messed with one but my mold is pretty darn tight in the radius rods. I am going to mill a slot in outside of the arms that hold the mold so I can install bearings (pretty much a mirror of the mold slot/pin setup). Will keep me from making such a mess keeping everything dripping wet with lube.
    Attached Thumbnails Attached Thumbnails IMG_20131006_213633_463.jpg   IMG_20131028_203729_731.jpg  

  10. #90
    Boolit Grand Master jmorris's Avatar
    Join Date
    Aug 2007
    Posts
    5,277
    This photo may give you a better idea of what I am talking about. Except I will move the bearing as far as I can out board and pull the guide rails towards the outside, not sure how much adjustment there is on a real MC though.
    Attached Thumbnails Attached Thumbnails IMG_20131028_205543_884.jpg  

  11. #91
    Boolit Master
    Join Date
    Oct 2013
    Location
    Brisbane, Australia
    Posts
    1,775
    Kayak1 - Interesting, i do like the idea of that micro controller. It may be used in the next round of automation

    Hatch - Thank you for pointing that out, that's just about how i was thinking of setting it up too. It all seems like they will work in theory, hopefully it will in practice. I just need to find the time to actually get into it. Need to find materials for the main ram mount, extend the rod on the ram as it only has about 1/2" hanging out the end of the cylinder, machine the end to take a clevis. Make a new arm for the lead pour to work with the electric solenoid.

  12. #92
    Boolit Grand Master jmorris's Avatar
    Join Date
    Aug 2007
    Posts
    5,277
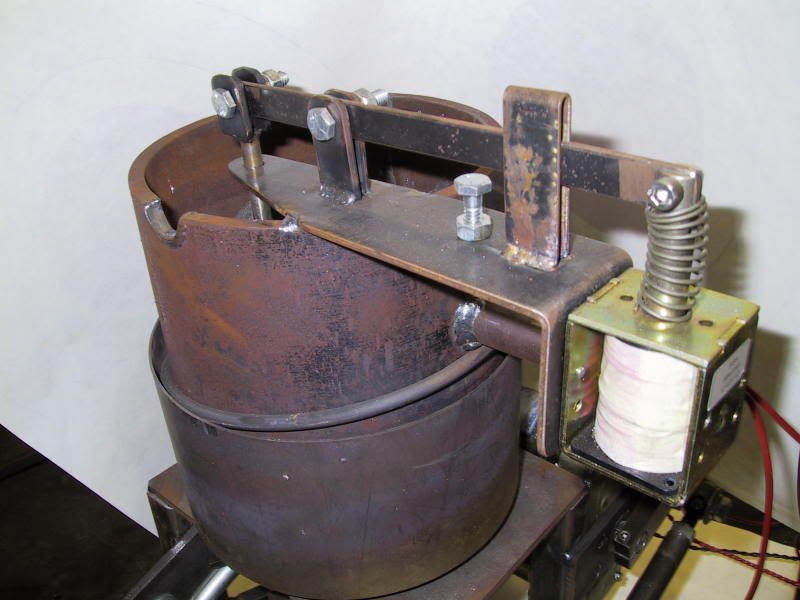
    This is the pour setup I built.


  13. #93
    Boolit Master
    Join Date
    Oct 2013
    Location
    Brisbane, Australia
    Posts
    1,775
    Jmorris - That's the basic idea i was going to use. Mine may use a cable and spring as i'm not sure how the solenoids i have will like not being fully seated when power is applied. This will allow me to be able to adjust lead pour rates with the bolt on the pot and not needing to move the entire solenoid.

    Let's see if i can make any progress on the weekend, Sunday i have IPSC so i will only have a few hours on Saturday to play.

  14. #94
    Cast Boolits Owner


    No_1's Avatar
    Join Date
    Mar 2005
    Location
    N.E. Florida
    Posts
    12,607
    Quote Originally Posted by Tazza View Post
    No1 - I like your setup, very smooth operation. I'd have most of the parts to go hydraulic too, but I'd be worried that i may size something wrong and bend or break something, there is a lot of potential force that you can apply with a hydraulic cylinder unless you lower it with a relief. How do you go with the heat generated by the power pack? i didn't think that they were rated to run for extended periods of time. I'm with you on the fact that you can easily change setting son the fly.

    That's the thing i have wondered about too, do you need to change the cycle times depending on the time of year? Cooler months means that the mold may not over heat as easily as the hotter months of the year. Does that even come into play? I'd have thought it may if you were running the fastest possible cycle times to churn out as many projectiles every hour as possible. I'd like to think that I'd be happy letting it clunk away, even if it's not doing quite as many as it could, it saves me sitting there manually doing it. I can save that job for my re-sizing stage....
    The power unit runs all day without issues. I considered adding a fan cooled fluid cooler but the fluid temp does not get hot enough to be a concern. I do change the cycle times depending on outside temp and bullet weight. When it is really cool outside I don't stop it under the fan and have had it cycling at 1100 bullets per hour but conditions have to be just right for that.
    "The only way to deal with an unfree world is to become so absolutely free that your very existence is an act of rebellion."
    - Albert Camus -

  15. #95
    Cast Boolits Owner


    No_1's Avatar
    Join Date
    Mar 2005
    Location
    N.E. Florida
    Posts
    12,607
    Quote Originally Posted by kayak1 View Post
    I noticed that your Master Caster is run with hydraulics instead of pneumatics. Did you write up the build it looks interesting.
    The write up is located ---> here <----. I did not take pictures during the fabrication process. I have modified the unit since the initial build to include a proximity switch at the top of the stroke so it will not drop lead unless the mould is under the spout, a cable linkage to activate the lead pour, a cut-out switch to turn the lead pour off while the unit is cycling and a PID controller for lead temperature control.
    "The only way to deal with an unfree world is to become so absolutely free that your very existence is an act of rebellion."
    - Albert Camus -

  16. #96
    Boolit Master
    Join Date
    Oct 2013
    Location
    Brisbane, Australia
    Posts
    1,775
    No1 - 1100/hour is quite impressive, but i understand that the conditions must be just rite or else the mold gets too hot. I found that with my MC if i try and go too fast i get lead build up under the sprue.

    I'm a bit surprised the oil doesn't get hotter, but i guess the ram isn't really loading the system down much. I'm used to working on things like Bobcats that need an oil cooler.

  17. #97
    Boolit Buddy hagel's Avatar
    Join Date
    Aug 2013
    Location
    Athens Ohio - pretty rural area
    Posts
    230
    No1, when you pour 1100/hour what is it that you are pouring? 110 grain 30 cals? 124 grain 9mms? 1100/hour is a lot of bullets. I'm thoroughly impressed. Also, do you do this when it is cold outside?

    I really want to know how you pull that off. I could sure use that kind of production. It would really help to pay the bills.

  18. #98
    Cast Boolits Owner


    No_1's Avatar
    Join Date
    Mar 2005
    Location
    N.E. Florida
    Posts
    12,607
    When it is cooler outside I can cast anything 200 grains and under at 1100 per hour which is no big feat considering 2 boolits per cast means only 550 cycles. I coat the top of the mould, sprue plate and outside of the mould with synthetic 2 stroke oil, run the pot at 725, set the cycle at 7 seconds then let it rip.
    Last edited by No_1; 10-30-2013 at 05:10 AM. Reason: typo
    "The only way to deal with an unfree world is to become so absolutely free that your very existence is an act of rebellion."
    - Albert Camus -

  19. #99
    ADMIN


    HATCH's Avatar
    Join Date
    Sep 2008
    Location
    Lexington, SC
    Posts
    6,706
    The best I have done is 6 sec cycle time
    It was 110 grain 38 WC.
    When you speed it up you also risk the chance of increased wear and tear.
    Ten sec cycle time is about where you should be. That's 720 boolits an hour.
    Considering that magma recommends 15 sec cycle times by hand.

    Remember it's not about how fast you can turn out the boolits, it's about it being automated.
    If you want higher production then buy a bullet master.

  20. #100
    Boolit Buddy hagel's Avatar
    Join Date
    Aug 2013
    Location
    Athens Ohio - pretty rural area
    Posts
    230
    Quote Originally Posted by HATCH View Post
    The best I have done is 6 sec cycle time
    It was 110 grain 38 WC.
    When you speed it up you also risk the chance of increased wear and tear.
    Ten sec cycle time is about where you should be. That's 720 boolits an hour.
    Considering that magma recommends 15 sec cycle times by hand.

    Remember it's not about how fast you can turn out the boolits, it's about it being automated.
    If you want higher production then buy a bullet master.
    OK, you're right. Running flat out and then falling apart after a week or two doesn't really equal production. Still, it would be cool every now and then to just watch her rip.

    720/hr/machine, that works out to 2160 bullets/hr. To be honest with you I'd have to have a bullet collimator to feed the sizer if I run that fast. I still might have a hard time shoveling in the lead fast enough. Might have to preheat the ingots just to make that rate workable. That way I wouldn't drop the pot temp too much if I didn't feed it as soon as I should.

Page 5 of 32 FirstFirst 123456789101112131415 ... LastLast

Posting Permissions

  • You may not post new threads
  • You may not post replies
  • You may not post attachments
  • You may not edit your posts
  •  
Abbreviations used in Reloading

BP Bronze Point IMR Improved Military Rifle PTD Pointed
BR Bench Rest M Magnum RN Round Nose
BT Boat Tail PL Power-Lokt SP Soft Point
C Compressed Charge PR Primer SPCL Soft Point "Core-Lokt"
HP Hollow Point PSPCL Pointed Soft Point "Core Lokt" C.O.L. Cartridge Overall Length
PSP Pointed Soft Point Spz Spitzer Point SBT Spitzer Boat Tail
LRN Lead Round Nose LWC Lead Wad Cutter LSWC Lead Semi Wad Cutter
GC Gas Check