MidSouth Shooters SupplyReloading EverythingTitan ReloadingRotoMetals2
Lee PrecisionWidenersSnyders JerkyRepackbox
Load Data Inline Fabrication
Page 17 of 42 FirstFirst ... 789101112131415161718192021222324252627 ... LastLast
Results 321 to 340 of 832

Thread: Powder Coating 101 - Electrostatic Method

  1. #321
    Boolit Grand Master
    bangerjim's Avatar
    Join Date
    Apr 2013
    Location
    out of here, wandering somewhere in the SW.
    Posts
    10,163
    Quote Originally Posted by Maximumbob54 View Post
    First stumble in the learning process... The sheet metal is plenty strong and hardly bows when picked up with the weight of the bullets on it. But it does slightly bow and bullets balancing on hex nuts glide right across non stick foil. Go figure. I need to do something to brace the sheet metal so it is solid enough to not bend at all. And the rack of freshly sprayed bullets needs to be right next to the oven or as close as possible to not risk bullets falling over or sliding. I need to find a way of mounting small handles on each side to pick it up careful enough to not tilt it at all. And then it needs to be easy enough to slide into the oven. Enough about the stupid rack...

    Second stumble in the learning process... The spray gun is rated at 10 - 30 PSI and with the regulator set at 25# I had some intermittent flow issues. One second it was coating too thick and then not at all. This first batch isn't going to be perfect but once again this is the learning phase. It may just be the pressure being lost from the tank to the gun and the gun isn't really getting 25# to work with. I will dial up the pressure to 30# next time. But enough talking, we want pictures of results, right???

    This is them freshly sprayed:


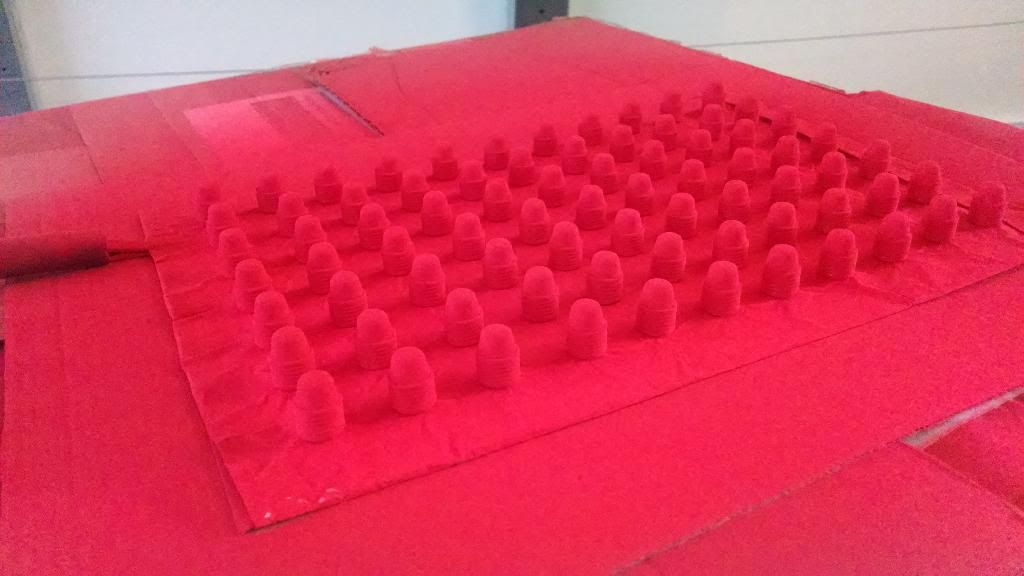
    I wore a dust mask and that isn't going to cut it. I need to open the garage door and buy a real mask before I do this again. This stuff really hangs in the air. Once I get the powder flow just right there will be less waste but this time there was a red cloud. Yuck.

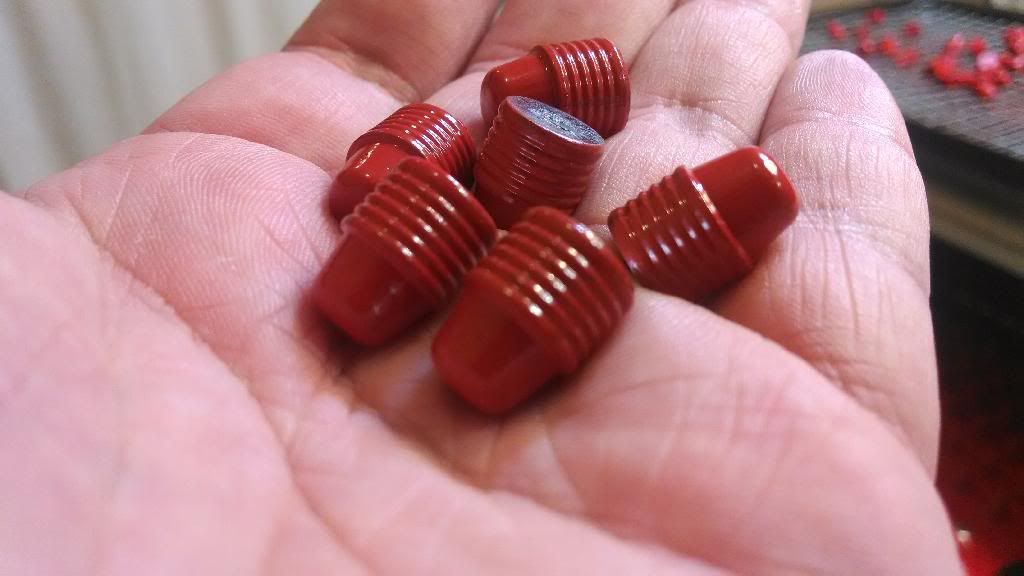
    This is them fresh from the oven:


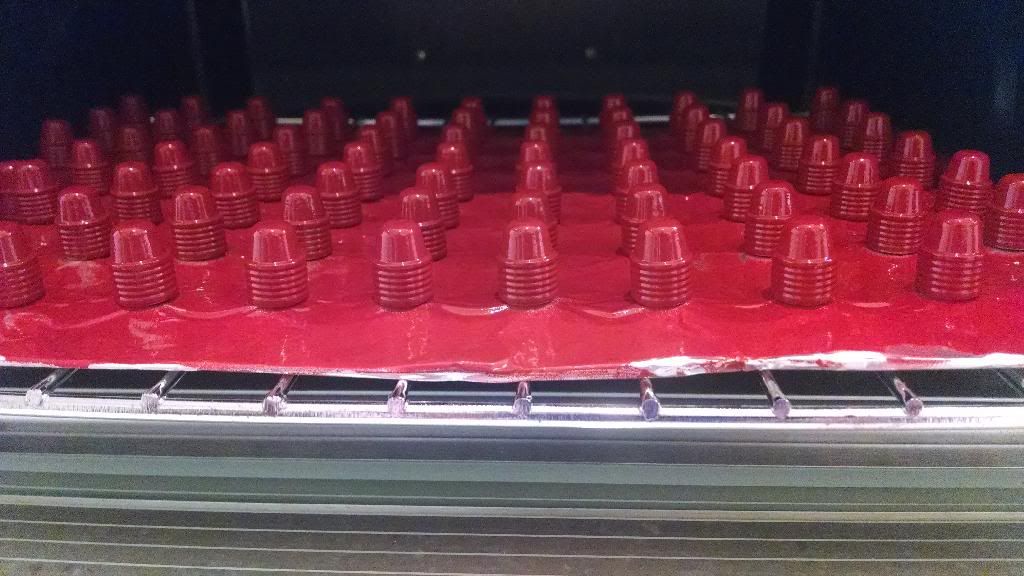
    It's already a night and day difference in the quality of coating. They lose the dull sheen and it's finally a glossy coating. They feel so much more slick to the touch. With this method the bases aren't coated or at least not with this tray but I'm not worried about that. I'm just in this to avoid bullet lube and bullet lube smoke. The cleaner bore is just an added bonus. The low cost of the HF powder is what drew me back to this and the much better results with the ES spray gun is what made me break down and try this method. I know with this first trial run I used way more powder than I should have but I know I will get better at it and use less. That's the only way I will really be able to tell about cost effectiveness of this method for sure. I also need to try this method with rifle bullets since the finish is so much more even than any other method including the epoxy paint tumble. But for this being the very first trial run I still think these look awesome enough that I will continue to work at this.

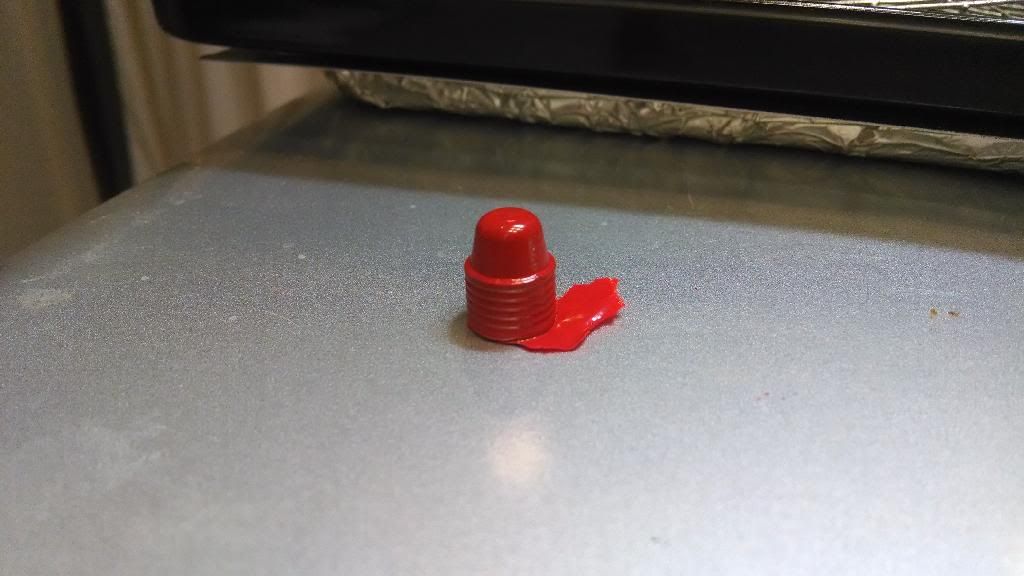
    This would be the reason for the hex nuts. This one fell off the nut and sat on the tray with the excess powder:


    This is a dry tumble vs. ES comparison with the ES in front:


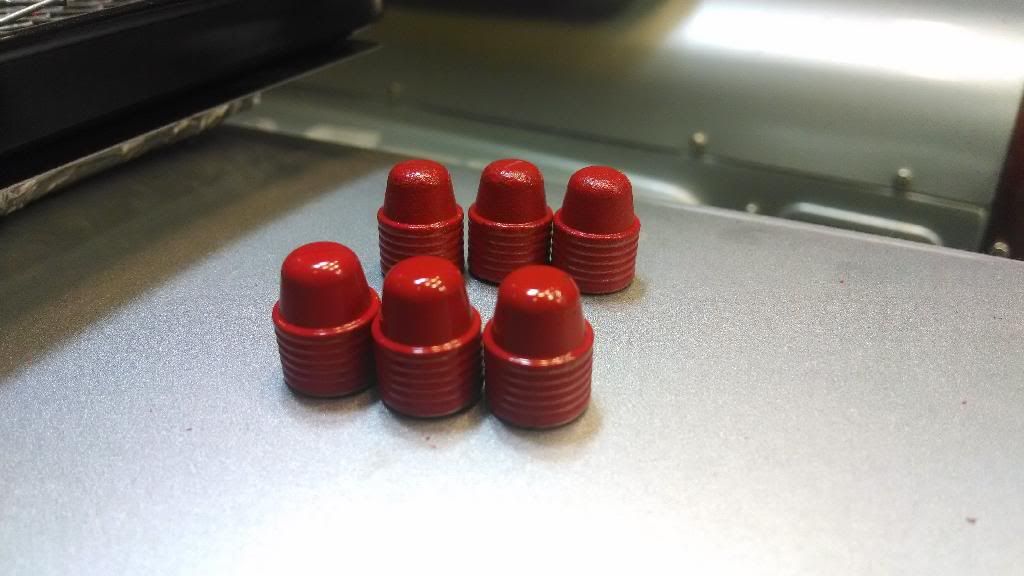
    I cannot express enough how good these look and feel compared to anything else I've tried so far. The finish comes out so perfect!!!


    You are getting a LOT of overspray in that picture above. I get hardly any. Mabe a light coat (<1/8 tsp) on the Workmate after spraying 6-7 batches.

    A trick to keep the flow going:

    1. do NOT use a full bottle on the gun. Pour ONLY about 2 inches of powder in the bottle that came with the gun.
    2. As you are spraying keep tapping/bumping the bottle against your palm to keep the powder in there stirred up. Remember you are crating a fluidized bed in the bottle, so you need to keep it "liquid" at all times.
    3. The powder flow out the gun should be a light mist, not a heavy dense flow! Control that by reg pressure and the brass FLOW control knob on the gun. The tapping above will allow you to run lower pressures.

    Your coats look just like mine do every time ......PEFECT! I have not had any luck with the dry fumble method. Thin coats, multiple coat/bake process, lumps and flat spots where the slugs lay on the oven rack lead me Everytime to the ES gun method. It only takes me a couple minutes or less to get the rig out and be coating boolits! About the time it takes the little HF compressor to charge up to 125#.

    I have been using lately the fender washer method as shared with another member. The GC shanks fit perfectly in the holes in the correct washer and the NS foil prevents the powder from getting to the washers. You do NOT need to glue the washers down. At ~$11/100.....not a bad method for 223 and 30 cal GC's

    Keep up the good work!!!!!!!!!!

    banger

  2. #322
    Boolit Master

    sparky45's Avatar
    Join Date
    Apr 2010
    Location
    SE, KS
    Posts
    2,405
    Fantastic first try with the ES Gun Bob.

  3. #323
    Boolit Grand Master

    Beagle333's Avatar
    Join Date
    Mar 2012
    Location
    Back in the woods a piece, just outside Auburn, AL.
    Posts
    5,499
    Excellent coating Bob! I keep about 1-1/2" of powder in the gun, I definitely agree no more than 2", it has to fly around in there and make it up to the hooked tube. Like Banger, I also use the tapping or a quick flip occasionally from one side to the other to keep the powder fluffed up. You might also try varying the tip, or not even using it. I find a better flow with no dispersion tip on the electrode. You should not see a "fogging up" of the area, I can barely see the paint coming out, if at all. I just notice the boolits turning color as I move slowly down the row, like weedeating a fence line. If they stop turning from lead-colored to paint color as I pass, I'll tap or flip the jar to get it stirred up again.

    Again, great looking boolits!!!!
    KE4GWE - - - - - - Colt 1860, it just feels right.

  4. #324
    Boolit Master slim1836's Avatar
    Join Date
    Mar 2010
    Location
    Burleson, TX
    Posts
    2,125
    Bangerjim,

    Where did you get those "fender washers"? I drilled 19/64 holes in a homemade tray, covered w/non stick foil, and ok with the results. May want to try your washers out. Click image for larger version. 

Name:	IMG_0308.jpg 
Views:	200 
Size:	59.3 KB 
ID:	92715

    Slim
    JUST GOTTA LOVE THIS JOINT.

  5. #325
    Boolit Master

    Join Date
    Oct 2010
    Posts
    1,207
    The over spray and fog cloud came from the powder not flowing and then flooding out. I only put an inch in the cup and I think the pressure may have been too low. Next time I will both add more powder and slightly increase the pressure. But I'm still glad I joined this club. I forget who it was that was saying they look like candy bullets but they were right.

  6. #326
    Boolit Master el34's Avatar
    Join Date
    May 2013
    Location
    N Texas
    Posts
    1,190
    Bob, I'll bet you're right on schedule with the short learning curve thing.

    +1 on 1.5 - 2" powder.
    +1 on tapping and reduced pressure.

    Just after spraying I set my tray on the grate that slides into the oven to minimize the distance traveled while bowed. Haven't done it yet but I plan to add stiffeners someday.

    Them's are great lookin' boolits! Good job! Kinda fun eh?
    "The urge to save humanity is almost always a false front for the urge to rule." --H. L. Menchen

  7. #327
    Boolit Grand Master
    bangerjim's Avatar
    Join Date
    Apr 2013
    Location
    out of here, wandering somewhere in the SW.
    Posts
    10,163
    Quote Originally Posted by slim1836 View Post
    Bangerjim,

    Where did you get those "fender washers"? I drilled 19/64 holes in a homemade tray, covered w/non stick foil, and ok with the results. May want to try your washers out. Click image for larger version. 

Name:	IMG_0308.jpg 
Views:	200 
Size:	59.3 KB 
ID:	92715

    Slim
    Home Despot or Lowe's has them in 100 count boxes. MUCH cheaper than buying them in those stupid little plastic bags! Big Ace stores should have them also, but probably at a higher $$.

    My HD has them for ~$11 a box.

    You can also use standard washers but will have to glue them down as they are much smaller OD and will be much too close to allow to get the boolits in there! I just put the fenders back-to-back and cover the Al sheet then press NS foil over the whole mess to hold them in place.

    banger

  8. #328
    Boolit Grand Master

    Beagle333's Avatar
    Join Date
    Mar 2012
    Location
    Back in the woods a piece, just outside Auburn, AL.
    Posts
    5,499
    The fender washer method.... illustrated:
    http://castboolits.gunloads.com/show...fically-30-cal
    KE4GWE - - - - - - Colt 1860, it just feels right.

  9. #329
    Boolit Master slim1836's Avatar
    Join Date
    Mar 2010
    Location
    Burleson, TX
    Posts
    2,125
    Bangerjim,

    I got Lowes 1.5 miles from me, will pick some up.

    Thanks,

    Slim
    JUST GOTTA LOVE THIS JOINT.

  10. #330
    Boolit Master

    Join Date
    Oct 2010
    Posts
    1,207
    Think I will try that trick as well.

  11. #331
    Boolit Bub Tech2's Avatar
    Join Date
    May 2012
    Posts
    60
    Maxbob I suspect that your high voltage isn't working very well.
    I used my dads gun and it made a mess like you have there. I bought my own and it worked drastically better.
    Same techniques you describe.
    Differences were mostly temperature teens vs 40's on mine.
    Same red jar of HF powder. Same foil, same tray.
    My gun sparks with ease and the yellow box has a hum.
    His didn't hum and it never sparked but I didn't try to make it either.
    Mine draws everything to the tinfoil and boolits. almost nothing hits the table.

    Some form of standoff washer/nut is probably a good idea. My 308's fall over with ease and some of my 9's get a ring around the bottom that makes them difficult to start in the shell.
    I just put powder under my first batch.

  12. #332
    Boolit Master el34's Avatar
    Join Date
    May 2013
    Location
    N Texas
    Posts
    1,190
    Tech2 might be onto something. Bob, any chance you didn't hook up the ground clip or forgot the foot pedal? It can happen, I speaketh from experience. I see the cloud, I know what I forgot.

    My gun sparks about an inch, inch and a half, maybe a good test of the HV generator.
    "The urge to save humanity is almost always a false front for the urge to rule." --H. L. Menchen

  13. #333
    Boolit Grand Master

    Beagle333's Avatar
    Join Date
    Mar 2012
    Location
    Back in the woods a piece, just outside Auburn, AL.
    Posts
    5,499
    +1 on an inch and a half. 'Scares the heck out of me every time I get too close. I'm all bent over it close and focused on getting a nice even coat, but not too thick, and BZZTTT!
    KE4GWE - - - - - - Colt 1860, it just feels right.

  14. #334
    Boolit Bub Tech2's Avatar
    Join Date
    May 2012
    Posts
    60
    He has the ground clamp on you can see it in the picture.
    The foot pedal now that is a different question.
    Click image for larger version. 

Name:	clip.jpg 
Views:	52 
Size:	73.1 KB 
ID:	92809

  15. #335
    Boolit Master

    Join Date
    Oct 2010
    Posts
    1,207
    I'm stepping on the foot pedal only while I'm spraying but I'm mindful to step on it a second before I spray and stop spraying before I step off. However, now that it has been said, my box does not hum. The red light turns green when I step on the pedal. A second issue may be that I have it plugged into an extension cord. I didn't figure that it would need much current and it's not that long of a cord. I'm out of outlets at the end of the garage but I guess I can unplug the freezer for the few minutes I need to spray. That might change things if I'm direct in the wall. I will try that later.

  16. #336
    Boolit Buddy Faret's Avatar
    Join Date
    Jan 2009
    Location
    South Central Wisconsin
    Posts
    472
    Maybe check the fuse?

  17. #337
    Boolit Grand Master

    Beagle333's Avatar
    Join Date
    Mar 2012
    Location
    Back in the woods a piece, just outside Auburn, AL.
    Posts
    5,499
    Quote Originally Posted by Maximumbob54 View Post
    A second issue may be that I have it plugged into an extension cord. I didn't figure that it would need much current and it's not that long of a cord.
    I doubt that's it. I use mine on a 100' cord and it's fine.
    You might not have any problem with it.... does it arc about an inch+ from the electrode to a boolit when you get too close? If so... all is well.
    KE4GWE - - - - - - Colt 1860, it just feels right.

  18. #338
    Boolit Master el34's Avatar
    Join Date
    May 2013
    Location
    N Texas
    Posts
    1,190
    I'd go for the spark test, that's the bottom line indicator.
    Maybe to the foil so you don't electrocute boolits.
    "The urge to save humanity is almost always a false front for the urge to rule." --H. L. Menchen

  19. #339
    Boolit Master

    Join Date
    Oct 2010
    Posts
    1,207
    Sparky spark spark. Bigger zap than I was expecting. Made me jump.

  20. #340
    Boolit Grand Master
    bangerjim's Avatar
    Join Date
    Apr 2013
    Location
    out of here, wandering somewhere in the SW.
    Posts
    10,163
    Quote Originally Posted by Beagle333 View Post
    The fender washer method.... illustrated:
    http://castboolits.gunloads.com/show...fically-30-cal

    Kudos to you, sir! I just could not remember who posted the idea or where but I, for one, like it!

    Thanks for posting it!

    banger

Posting Permissions

  • You may not post new threads
  • You may not post replies
  • You may not post attachments
  • You may not edit your posts
  •  
Abbreviations used in Reloading

BP Bronze Point IMR Improved Military Rifle PTD Pointed
BR Bench Rest M Magnum RN Round Nose
BT Boat Tail PL Power-Lokt SP Soft Point
C Compressed Charge PR Primer SPCL Soft Point "Core-Lokt"
HP Hollow Point PSPCL Pointed Soft Point "Core Lokt" C.O.L. Cartridge Overall Length
PSP Pointed Soft Point Spz Spitzer Point SBT Spitzer Boat Tail
LRN Lead Round Nose LWC Lead Wad Cutter LSWC Lead Semi Wad Cutter
GC Gas Check