Got my new PID today - 9 days from Hong Kong, not bad (half of that was probably within Australia). Nice set of instructions, minor problem, it's all in Chinese
. Just as well I like a challenge!

|
   
   
|


|


Got my new PID today - 9 days from Hong Kong, not bad (half of that was probably within Australia

Turn over the instructions and maybe the other side is in english.
You will have it running in 5-10 minutes.
Enjoy I love using mine.


Might be a trans on website or google the brand/model number to see if that works.
You will love it!
NRA Life
USPSA L1314
SASS Life 48747
RVN/Cambodia War Games, 2nd Place


If It's a REX100 you can use the Auber instructions.
They sell a rebadged copy of that device.
Same with their single line display models, those are rebadged XLMs out of china.
Thanks guys. 6bg, the other side is also Chinese! There are a few English words scattered through it, and I reckon that once I find a set of instructions for another brand I should be able to work out the menus/operation. I suspect the basic operation is pretty much the same, regardless of make.
Besides, everyone knows that technicians don't read manuals!!
At the moment we're having our kitchen rebuilt, so that is the #1 priority, everything else is on the backburner for now. PID will have to wait a few more days.
I was being sarcastic lol. As for reading the manual us technicians don't have time. We simply unbox an item play with it a few minutes to get it running and program it and leave.Originally Posted by dikman

Actually the Auber unit is probably on of the easiest units to program. I have a copy of my Auber instructions if you want them or I can direct you to an Auber site for a manual.
Remember...it needs at least one vacuum tube to make it run right.
dikman real men don't read instructions till you have ruined the first two....... Even then you blame it on poor craftsmanship.
Try this
http://auberins.com/images/Manual/SY...tion%201.0.pdf
dikman
Send me a PM
rex100 manual in English: http://www.mpja.com/download/rex-c100.pdf
Thanks guys, it all helps.
I hope yours is a copy of the Auber. The Auber is much more user friendly than some of the cheap PIDs out there. I keep a Mypin on hand as a backup for the unit on my Mark IV because I have already had one failure of the PID on that machine.
dikman...be carefull if it is a Rex C100, the relay contacts is not where they say it is, also the rated output current is only 3 amps, if I recall correctly. I had to modify mine to make it work with a SSR, depending on what your use for the PID is going to be of course.
If you need any assistance with that just give me a shout!
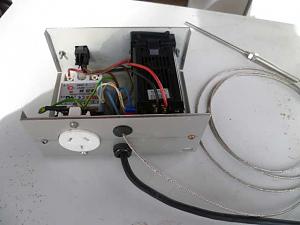
No, it's not a Rex, it's an XMT800. I'm still waiting for the K probe and the SSR, but I powered up the PID itself today to see what would happen. While the words in the instructions are in Chinese, all the numbers are in English format. With the help of instructions for three other brands of PID, I managed to work out what some of the tables mean (as I thought, the basic operations and settings are all pretty similar). To access the setup tables a code must be entered for each table, fortunately these numbers are in English. I've left all the settings at their default values for now (K probe is the default).
It's proving to be an interesting little project.
dikman, I have seen two types of XMT's on eBay, 801 and 803. They sure look the part, do you know if your one can do the readings/settings in degrees Fahrnheit?
Hi hermans, looks like it's Centigrade only on this model (which is fine by me). They make several models, some of them bigger with a larger display. This appears to be the "base" model, as in Centigrade/SSR only, which is all I need. They also sent me a $5 voucher, maybe I should buy another one
My $5.60 probe just arrived, I reckon I'll hook it up and stick it in some water and see what happens.
Hour or so later - sensor works ok (so far), sticking it into just boiled water indicates 97*C. Alarm 2 comes on as soon as it's powered up, alarm 1 comes on at around 80*C. Looks like a bit of fiddling with settings is in order.
Last edited by dikman; 02-04-2014 at 09:04 PM.
My SSR finally arrived and I've put it all together (at last!). The case is one of those switch boxes used for printers (remember those? Big switch on the front and a couple of RS232 connectors on the back). I fitted new front and rear panels to cover the existing holes and it made for a very compact assembly (in other words, a tight fit!). The only problem I can see is that because the sensor is hard-wired to the PID I will have to remove the probe from the pot at the end of each session so that I can pack things away. (I don't have a permanent setup).
I've set the two alarm points, one at the melting point of lead and the other at 700*F (no particular reason why, just because I could). The final part of the puzzle was figuring out how to get it into "auto" mode so that it would auto-calibrate. Not being able to read Chinese is a definite handicap, but I eventually got it sorted (I was feeling quite pleased with myself at this point).
Now I just have to wait until I'm ready to cast a few more nice round balls.
Its amazing what we can do when we DIY something. Mine has a computer power supply as a case.
I ran into the same thing as you and I purchased a connector so that I could simply disconnect it the probe and leave it with the pot or the sizer. Have several of them.
My solution was to buy several of the same model number /type probes.
If you don't want to install a connector how about a simple terminal strip on the back side of the box. This will allow a good electrical very low resistance connection
and allow you to remove the probe,

The pid should autotune itself in about 15 minutes of use. I have built 4 of these so far and have a couple more to build. The box I use is vented so I have had no problems with the SSR without a heatsink.
They do make a model of the REX 100 that is for a relay as noted on the output type on the sticker. It will not work with an SSR as I found out when the vendor sent me the wrong one.
Sure makes my ovens and pots work so much better. The weight of the boolits cast is much more consistent.
 Posting Permissions


| BP | Bronze Point | IMR | Improved Military Rifle | PTD | Pointed |
| BR | Bench Rest | M | Magnum | RN | Round Nose |
| BT | Boat Tail | PL | Power-Lokt | SP | Soft Point |
| C | Compressed Charge | PR | Primer | SPCL | Soft Point "Core-Lokt" |
| HP | Hollow Point | PSPCL | Pointed Soft Point "Core Lokt" | C.O.L. | Cartridge Overall Length |
| PSP | Pointed Soft Point | Spz | Spitzer Point | SBT | Spitzer Boat Tail |
| LRN | Lead Round Nose | LWC | Lead Wad Cutter | LSWC | Lead Semi Wad Cutter |
| GC | Gas Check |

 Reply With Quote