Do you see lead shavings when you size bullets?Originally Posted by Vettepilot

The lead compresses and the bullet lengthens. It's pretty simple.

|
   
   
|


|


Do you see lead shavings when you size bullets?
The lead compresses and the bullet lengthens. It's pretty simple.
NRA Benefactor.
I never see shavings, the die is tapered, so it just squeezes the projectile down it's not meant to cut anything to give shavings. Even when squeezing down a lot in one step, you can get lead extruding out the base, but no loose shavings should be obvious.

First batch was done according to instructions 1ml/lb. 2nd was 4ml/5.5lbs. 3rd batch was 1.25ml/2lbs. I used the ovens thermostat but used a digital thermometer to check and set oven temp on the 1st and 2nd batch. 3rd batch was completely controlled by my PID and convection fan plugged into the outlet. Bake time wasn't started until oven temp hit 375degF on the 1st and 2nd batches. 3rd wasn't started till temp recovered to 390degF and settled at 400 for the 12 minutes it baked.
I mixed the solution at the rate of 20g/309gr with 100ml of acetone purchased at Lowe's just like the instructions say.


Please watch this
https://www.youtube.com/watch?v=TbYOG5xKTr0
The Hi-Tek coating stays on the alloy during severe deformation.
Sizing down 2 or 3 thou is no problem.
Bullets are cast over sized, coated with two or 3 coats, and then after 2nd or third coats are finished, sized to required diameter.
Baked and bonded coating self lubricate when sizing, does not melt or flow or come off.
Sharp cutting type tools/edges, will shave off coating and alloy that is bonded together.
Correctly prepared coating stays put on alloy whilst sizing and shooting.
NO magic at all. It just works.
Last edited by HI-TEK; 03-26-2019 at 08:16 AM.
So jsizemore, did that coating method you described worked OK or not?
I constantly see a great deal of attention being paid to oven temperatures. It must be remembered, that temperature in oven, is measuring air temperatures in a specific area.
What is important is, that that hot air that is being measured inside the oven, that contained heat is in fact transfers into load of coated cast, and that the load reaches 180C, and stay there or higher for about another 3 minutes.
Depending on load, air circulation, (with or without fan) and ovens ability to cope with adequate energy, will determine just how long it takes a specific load to get to correct temperatures for adequate curing.
In short, keeping an eye on load temperature is more important. Oven is a heat source. Time in oven will depends on load, and how long that load takes to get to 180C, plus 3 minutes.

I made these yesterday,watching a thermometer because I tried 6 kg:s (15 lbs) at once.
It took 12 minutes with this load, instead of my usual 8 minutes with half the load. The meter read 185-192�C for the last four minutes. I know that an IR meter (shooting at the bullets) would have read 10�C more because of the radiant heat.
All tests good. Probe was right under the bullet tray.

Petander, they are beautiful balls lol lol
Ok, I understand now. Thank you very much to all who replied!
Vettepilot
"Those who sacrifice freedom for security, have neither."
Benjamin Franklin. (A very wise man!)
Still flakes with the hammer test. The tip of the thermocouple is located in the center of the oven between the 2 trays less then an inch from the boolits. Without actually drilling a hole and inserting the thermocouple in the boolit, I feel like it's as close as I can get it to real oven/load temp. Do you actually have your sensing device in contact with the boolits? I do pull them out and check the boolit temp with a IR meter at the end of the 12 minute cook time at 188-195degC. I think I'm getting the "load" to better then the 180degC requirement for the 3 minutes necessary.

My friend tried my balls,he fired them through an old,totally hard and dry 6" pine log @ 1375 fps from ten meters. He recovered some:

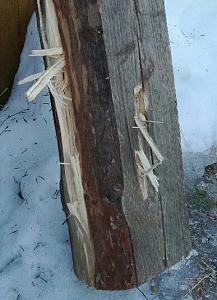
He is a machinist / long time competition shooter, he has seen a bullet and two, couldn't believe how the coating holds up.
I don't think you have a heating issue, as your projectiles are passing the wipe tests, it means it's being cured correctly, it's possible your coating is not fully dried before the initial cook. The outside could be hard and dry, but the inside may be slightly wet, causing bonding issues. Also, the metal might be contaminated with something like oil from your hands or sprue plate lube?
Something is stopping it bonding, as you are getting hard flakes that do not wipe off with solvent, you are baking it long enough.
I think your right about the drying. I just coated 1.5lbs of Lyman #2 cast boolits with 1.25ml of 309gr/100ml solution. It's chilly here so I swirled and tossed for 20 seconds. I rigged a dryer with a 15gal steel drum and 60watt incandescent bulb. I'm gonna let them dry for a day and do the bake tomorrow.
Before coating I cleaned my coating bowl twice with acetone. Since casting these boolits over the weekend they haven't been touch with bare or gloved hand. The past 2 casting sessions I have not put sprue plate lube on this mold, an H&G #309 4 cavity mold that casts at .358 and still doesn't fill the throat on my SA 1911 9mm Luger. The reason I'm pursuing this process.
I'll let ya'll know what's what.
Hopefully that will do the trick *fingers crossed*

jsizemore
how much did the HiTek coating add to the original diameter of the boolit after 2 coats?
IF the coating is to thick it will take much longer to dry.
Last edited by Conditor22; 03-26-2019 at 09:15 PM.
2 coats added about .0015-.002. I actually sized all the boolits I coated so can't say exactly.
Just get an Elcheapo fanheater and sit the tray of coated bullets in front of it for 10 minutes.
The bullets need to be warmer than your hand when you touch them. Easy.
Or....place a few 1" high spacers on top of your oven and sit the tray of bullets on the top while the oven is getting up to temp. Even that is enough to warm the bullets and stop the flaking.
Hooroo.
Regards, Trevor.
Australia
I set the trays boolits on top of the oven each time it came to initial temp. Wind, no wind all resulted in failures.
OK... but are they warm to the touch???If they are, and you still get flaking, you are using too much per coat. thin it down.
Hooroo.
Regards, Trevor.
Australia
jsizemore
Can I direct matters back to the start.
Flaking failures, aside from contaminants/lubes being on cast, for failures, 99% plus, is directly due to inadequate drying which also can result from using far too much coating on the first coat.
I am not including complications from possibility of coated cast not getting up to correct cure temperatures.
Explanation of what I am trying to get to as set out below.
These details are specifically applicable for the first coat, and I have to assume that coated alloy gets to 180C or above during baking.
Oven air temperature quoted, does not tell me, the temperature of coated cast load inside oven.
Evaporation of solvent, chills cast by up to 5C below ambient. This chilling, attracts moisture to the coating.
During drying, a skin forms on surface of coating which is already colder than ambient temperatures.
If too much coating is used, these are main things that happen:-
1. More solvent evaporation, and more chilling of alloy which attracts more moisture and forms thick coating.
2. Drying, results of a formation of a skin on coating surface, and traps moisture that is absorbed from ambient air.
3. Inadequate drying, can be simply exposed, the instant you put coated product into the oven.
Trapped moisture can expand over a thousand times original volume, sooooo, the steam produced, (below dry skin of coating) simply lifts coating off alloy allowing coating to cure, but coating is not bonded to alloy.
A simple test can be done to determine if coating is dry enough or not.
When you think that coating is dry, take only a few, place it into the oven, bake for say 10-12 minutes at 200C.
Don't worry about colour at this stage.
Remove the few from oven, cool and examine.
If surface is irregular and looks like orange peel with fine blisters, you had moisture in the coating and was definitely not dry.
These few will fail tests.
Rubbing with solvent will remove non bonded flaky coating, and smash test will shred coating off as flakes.
Continue drying the bulk, with warmed forced air circulation.
Re test with a few, after longer drying.
Continue drying of the bulk. . Keep testing with a few each time, at exactly same conditions, until you get a pass with tests. ONLY then, bake the bulk lot.
I hope these steps resolve the problems.
My drying procedure is to bring the first coat up to 120 deg F to 140 deg F for 15 min to 30 min, you can place them out in full sunshine or a fan heater or wood stove any thing to reach the target temp. 140 deg F is about to hot to hold in you hand.
If you don't get the first coat dry then all else fails.
The way I clean my coating bowl's is to place the new cast bullets in the bowl and add some Acetone and shake until the bullets pick up enough coating for the first coat.
This coating is a really great product as very little goes to waste.
 Posting Permissions


| BP | Bronze Point | IMR | Improved Military Rifle | PTD | Pointed |
| BR | Bench Rest | M | Magnum | RN | Round Nose |
| BT | Boat Tail | PL | Power-Lokt | SP | Soft Point |
| C | Compressed Charge | PR | Primer | SPCL | Soft Point "Core-Lokt" |
| HP | Hollow Point | PSPCL | Pointed Soft Point "Core Lokt" | C.O.L. | Cartridge Overall Length |
| PSP | Pointed Soft Point | Spz | Spitzer Point | SBT | Spitzer Boat Tail |
| LRN | Lead Round Nose | LWC | Lead Wad Cutter | LSWC | Lead Semi Wad Cutter |
| GC | Gas Check |

 Reply With Quote