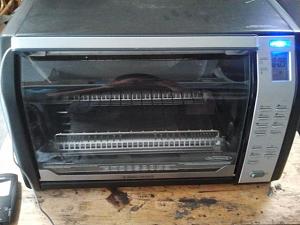
I just scored this for $40 on Craigslist today.

|
   
   
|


|


I just scored this for $40 on Craigslist today.
Got my coating in today. It will be on like donkey kong in the near future.


Sweet pickup.Originally Posted by Jumbopanda

Does it have fan forced circulation and top and bottom heating elements?
Love Life: You will now become a casting hermit.
My missus only sees me of a morning before going to work and late of a night when I come down from the shed to sleep.
Good thing my shed has a toilet, fridge and a hot plate in it.
Hooroo.
Regards, Trevor.
Australia
Lucky!!
My casting kingdom is in my non temp controlled garage. Stifling in the summer (thank God for no humidity) and blistering cold in the winter.
Didn't get much casting and reloading done in December/January when we had 30 days where it never got above freezing and was in the negatives every night. Nothing like being coyote hunting, going to make a scope adjustment, and your glove freezes to the dial (had a bit of snow on the glove). -11 degrees at noon is great hunting weather!!
Has anyone tried boiling their conventional lubed boolits (to remove the wax lube), then coat them with HI-TEK? A few weeks ago I tried that with Piglet Coat and got leading in my barrel. I'm not positive, but I'm thinking some lube must have remained on the boolits, preventing good adhesion of the paint. Has anyone else tried this and been either successful, or, can confirm my suspicion that good adhesion is prevented?


Skeeered,&lazy of that notion,, I just throw-em back in hot pot and start over.
Ha! Sometimes I just re-melt and re-cast them just because I want to cast, and really don't need the pills!
I like to cast and reload my own boolits, as much as (or maybe more than) I like shooting them!
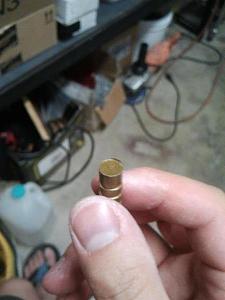
How much of a problem do I have if the coating is fairly flaky (I.e. reaching into a box of bullets and having the equivalent of paint chips on my hands)? Won't have a chance to shoot them for a while, but will these likely cause leading/coating to come off to a large degree?
Yes and yes. I was actually tempted to use it for food instead of bullets because it's pretty fancy and has a rotisserie function, but I need my bullets!
The coating should not be flaky at all. I'd imagine that the coating would be pointless it if can't properly adhere to the bullets.
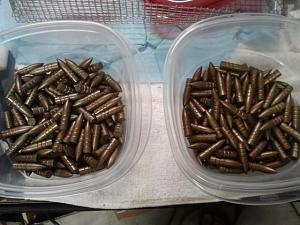
I just did my first couple of batches, and have had no problems with curing. I baked 200 .30 cal 200gr bullets at a time at 375F for 15 minutes. I've found that 10 minutes doesn't cut it, and acetone will still be able to take a bit of the coating off. I have found that some bullets end up slightly darker (either uneven distribution of the coating or uneven heat) than others, so perhaps next time I'll try 5-1-10 instead of 5-1-7. I put three coats of 10mL on each batch. I started with 6.25mL, but found that wasn't enough and many of the bullets ended up half-coated. 10mL seems about right and leaves no excess at the bottom of the container, and the bullets are dry within a minute or so after being poured out. I might even try 12.5mL and reduce it to two coats.
Has anyone had problems sizing their coated bullets? I've found that mine can be extremely difficult to size, and at one point one of the lag screws that hold my press to my workbench actually started stripping out. The most difficult ones tend to leave a "fin" along the base of the bullet after sizing.
The bullets are 0.3125" as-cast, and 0.315" after coating. I'm sizing them down to 0.310"
JR.
The flaking will lead like buggery. If you put the first coat on too thick, It will flake when smashed.
JP.
Get some Hornady oneshot case lube (pump bottle) give the bullets a spray and wait for a few minutes for it to dry. then size. HI-TEK makes a PTFE sizing lube that mixes with Metho and the bullets literally fall through the sizer die.
I have sized a .360 down to .356 with 2 fingers on the ram handle.
Hooroo.
Regards, Trevor.
Australia
I use lanolin oil mixed with 99.9% isopropyl alcohol in spray bottles for case sizing, might that also work for the bullets? I don't know if you've seen the Youtube video of the German guy talking about his polymer paint coating, but he puts a dab of paste wax in the container with the bullets and swirls them around a bit afterwards, giving them a nice shine. Perhaps I'll also try that and see if it makes sizing easier.
EDIT: I just went and tried the lanolin. Worked like a charm, thanks for the idea.
Last edited by Jumbopanda; 07-23-2013 at 04:35 AM.


Hi,
Can you please advise what alloy you are using?
Have you done a diameter test before and after coatings?
What calibre is your cast product?
Generally, thicker coats make sizing harder, and, the skirt at end is a typical effect due to hydraulic deformation.
I note, that despite skirt formation, the coating is still stuck.
You have done well with your coating process.
My first suggestion is to try to end up with a much thinner overall coating when finished, this should reduce sizing problems.
If you are sizing harder alloys, it may be more useful to use a product that Donnie has called 5000/IPA. This material applied as a spray will give you a dry film that will allow sizing the most difficult alloys and is clean and dry.
Alternatively, use the Extreme catalyst instead of normal catalyst.
This will make an extra slick coating that reduces sizing loads greatly.
I believe that Ausglock and Redrockant, has tested and tried these systems. May be you can ask them for their findings to see what was found as best way they used these materials.
I hope that I have answered your questions.
Yeah the coating cured pretty well. 10 min in the oven didn't pass the acetone test, but 15 min did. I also did the smash test and they passed as well. I'm using an approximate hardball alloy, nothing too terribly hard.
A second ago I just went in the garage and tried Trevor's case lube suggestion on my remaining 158 bullets. I laid them out on a pan and gave them a few sprays, then went to size them. They sized extremely easily! I guess it wasn't much of a problem after all. :P
Trevor, do you remove the case lube from the bullets afterwards or does it not matter?
Last edited by Jumbopanda; 07-23-2013 at 04:46 AM.
No. I leave it on. The "oneshot" drys and doesn't effect accuracy or preformance.
The same with the HI-Tek ptfe lube. It drys and is no longer a problem.
I use 10 BHN alloy for my 45 bullets. The lee 230gr FP BB is a joy to size. as is the lee 230gr TL RN.
I machined the bevel base off the 200gr SWC and it does give a very small sizing skirt.
Hooroo.
Regards, Trevor.
Australia
They look great.
You have done well.
They are a very long wall profile projectiles compared to what I have seen many times before.
You would greatly benefit with the dry 5000/IPA lube.
Just by spraying just enough to form a ghostly film over you coated projectiles, your sizing load could halve and produce a very slick polished dry finished product.
Any way it seems that you are onto it and doing well.
Maybe tomorrow I'll try baking for 12-13 minutes and see how that does. As you can see the bullets are sort of a tan color instead of gold. I'm guessing it doesn't matter much, but gold bullets would be cool.
The Gold and other colours will go darker with baking.
The resin has strange property and goes from clear, to yellowish to tan, and to tan/brownish.
This will affect all chosen colours as you are looking through a tanned film and see a "composite" colour.
With all metallics, Gold, Red Copper, Bronze and others, it is very important to mix original container well before decanting small volumes, so you get a representative colour lot for coating.
Donnie had place a couple of projectiles in cans to help with mixing and shaking mixtures.
(Just like in aerosol paints there is a ball inside can so you can mix contents well)
Once the stuff is heat cured, any longer cooking times will tend to darken coating.
It would be interesting to see how you go with your extended times of cooking, and comparing current products..

Yep,that resin is a strange beast! I coated some projectiles and they turned out BLUE...... Lol Sorry Joe, just couldn't resist!
 Posting Permissions


| BP | Bronze Point | IMR | Improved Military Rifle | PTD | Pointed |
| BR | Bench Rest | M | Magnum | RN | Round Nose |
| BT | Boat Tail | PL | Power-Lokt | SP | Soft Point |
| C | Compressed Charge | PR | Primer | SPCL | Soft Point "Core-Lokt" |
| HP | Hollow Point | PSPCL | Pointed Soft Point "Core Lokt" | C.O.L. | Cartridge Overall Length |
| PSP | Pointed Soft Point | Spz | Spitzer Point | SBT | Spitzer Boat Tail |
| LRN | Lead Round Nose | LWC | Lead Wad Cutter | LSWC | Lead Semi Wad Cutter |
| GC | Gas Check |

 Reply With Quote