Titan ReloadingRotoMetals2RepackboxLoad Data
Snyders JerkyMidSouth Shooters SupplyReloading EverythingWideners
Inline Fabrication Lee Precision
Page 5 of 7 FirstFirst 1234567 LastLast
Results 81 to 100 of 125

Thread: Ogive cutting on a lathe

  1. #81
    Boolit Master
    Join Date
    Mar 2013
    Location
    seated with Him in the heavenly places in Christ Jesus (Eph 2:6)
    Posts
    1,192
    ^^^ emailed kmac and they will only sell in 12' lengths... group buy?

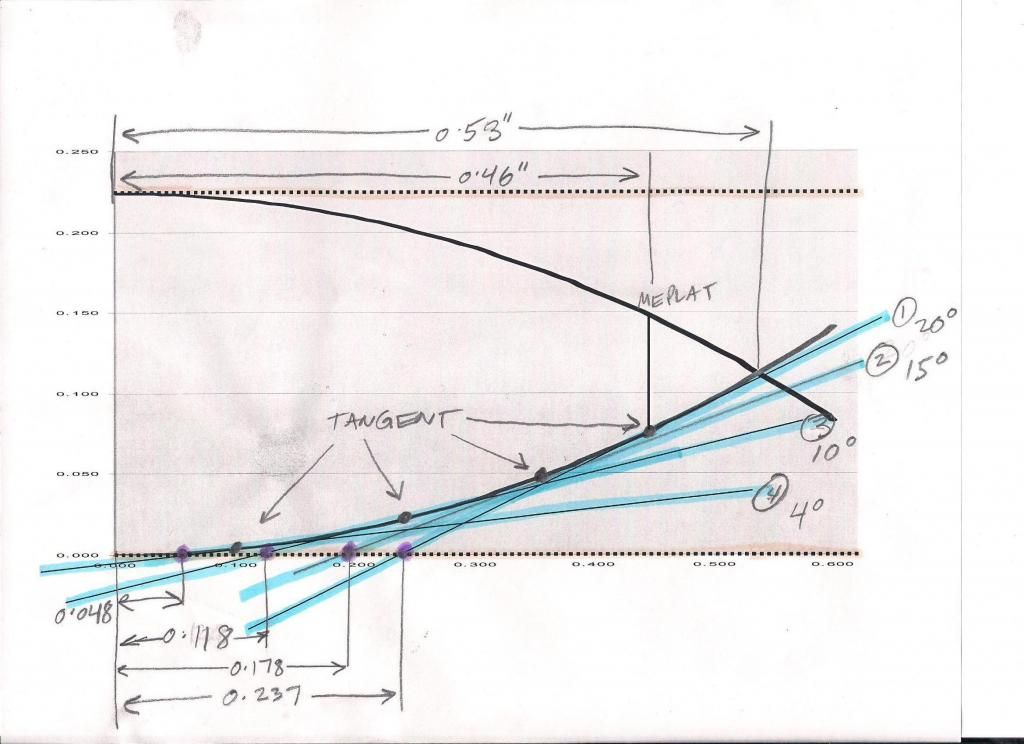
    i made a few more attempts at the point forming die with little success... i am updating here only to give one success and that is how to shape the ogive on the mini lathe if you are not going to make, or can't make or attach, a radial cutting/grinding attachment... i have used this new method now for 3 D reamers and am very happy with the result, here is a sketch of what you will do:


    note: drawing is not to scale but noted measurements are correct

    looks complicated but isn't... all you are doing is making angled cuts with the cross slide, starting from the point, and you continue cutting until the angled line hits a specified point from where the ogive and shank meet... as you can it is pretty darn close, and it looks smaller because it is to allow for lapping of the die... this method is repeatable and easy to do

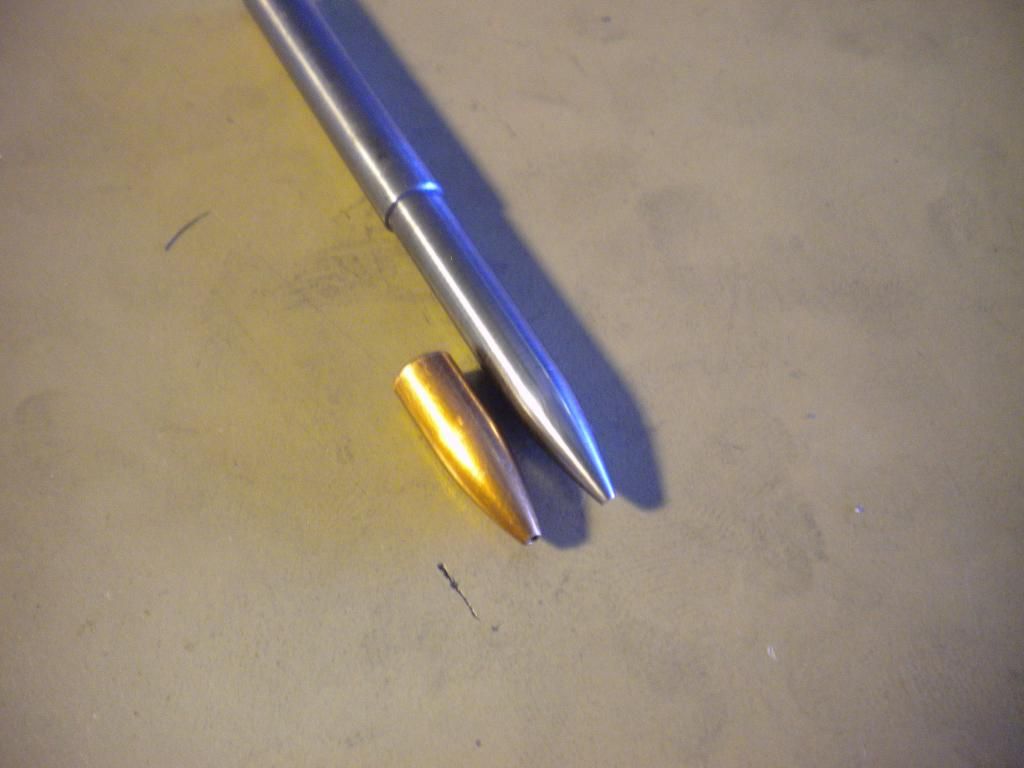
    for example, on cut #1 it is at 20 degrees, and you keep advancing the cut until it intersects the drill rod blank at 0.237 from where the ogive/shank meet... you do this for 4 cuts and then you smooth it out with some sandpaper and cutting oil and it looks like this:


    from there you make your fluted reamer or spoon and have at it... i can explain the math if you want, but you probably dont care but all you are doing is figuring out the angle of the tangent line, then figuring out at what point it intersects the drill rod, not very hard to do in excel... hope that made sense, if not ask questions...

    back to the lathe, hope to have a good point forming die at the end of the weekend... lapping that dang die takes a looooooong time!

  2. #82
    Boolit Buddy
    Join Date
    Apr 2013
    Location
    West Central Fl
    Posts
    451
    Cane,
    That's a good looking point. What are you lappin with now? Last I remember you were using a leather point? Are you lapping before or after heat treating?

    Started on the ball turner on Sat. Got the base adapter made except for the 1" hole for the pivot point. I finished turning the piece that sits on the base and rotates. Now I have to mill a slot in it and make a tool holder to hold the cutter. Still working on figuring how to "measure" the ogive offset. Haven't decided yet whether to use a replaceable carbide insert, or mill a slot for a HSS insert in the tool holder. I leaning toward the replaceable carbide insert. I've been taking a few pics, I'll try to get them posted in a new thread in a few days.

    CC

  3. #83
    Boolit Master
    Join Date
    Mar 2013
    Location
    seated with Him in the heavenly places in Christ Jesus (Eph 2:6)
    Posts
    1,192
    i have been lapping with sandpaper/oil, and polishing with a bullet shaped leather lap... since these points are so easy to turn i am thinking about making some ogive brass laps in a few different sizes and use them with lapping compound... i lap after reaming, then heat treat, then lap the final 0.002 or so... my lapping technique is poor, but i think the ogive shaped brass laps will be a big improvement...

    seems like carbide inserts would be a better way to go...

    ps: hope you are not close to that Zimmerman trial... when he is acquitted Team Tray-Tray will be out for a new flat screen and air jordans...
    Last edited by Cane_man; 07-09-2013 at 10:22 AM.

  4. #84
    Boolit Buddy
    Join Date
    Apr 2013
    Location
    West Central Fl
    Posts
    451
    The trial is in the central part of the state. I'm closer to the west coast. Unfortunately, I think we will see problems across the entire nation. I just hope that the Feds don't use it as an excuse to impose martial law. Who knows where that could end. It sounds like it should have never gone to trial, but got politicized and now anything is possible.

  5. #85
    Boolit Master
    Join Date
    Mar 2013
    Location
    seated with Him in the heavenly places in Christ Jesus (Eph 2:6)
    Posts
    1,192
    these guys will give you a quote for O-6 in whatever length you want:

    http://www.diehlsteel.com/

    they quoted me $43 for a 3' round bar of 9/16" i was looking for which includes shipping, so about $15 per foot delivered... a little pricey but 3' would make about 30 dies, and i would only really want to use it for the point forming die so it might be worth it since it is so hard to find in small quantities...

    edit: cc, i think the way to go now might be to bulk ream with a D-reamer then finish ream with a fluted reamer... the D reamer is good at hogging out material but it will only go so far
    Last edited by Cane_man; 07-10-2013 at 09:56 PM.

  6. #86
    Boolit Buddy
    Join Date
    Apr 2013
    Location
    West Central Fl
    Posts
    451
    Started on the ogive/radius cutter again this AM. Machined the upright post to height for the carbide insert and drilled and tapped it. Put everything together and slipped it onto the lathe. One slight problem, while I moved the pivot point probably 1-1.5", it still isn't far enough to include the offset for the ogive. It liked about 1/8". So I'll get the 4 jaw remounted, and bore another hole in the bottom plate about 2" farther in. Also last time I bored the hole I got a slight taper some how. It is allowing the upper part of the fixture to "rock" slightly, not good. I also need to take a couple thousandths off the height of the cutter post, it looks good compared to the center drill height, but doesn't want to cut unless I rock it forward in the tapered pivot hole for the post. I'll rebore the base first and see if that solves the problem, if not I'll take it down a .001" at a time till it cuts properly.

  7. #87
    Boolit Buddy
    Join Date
    Apr 2013
    Location
    West Central Fl
    Posts
    451
    Got back in the shop between thunder storms. Got the 4 jaw mounted but was unable to get the base aligned to drill/bore the new pivot hole. Finally realized I could turn the cutter to the back side and run the spindle in reverse. Shaved .005 off of the height of the post. Also found the reason for the rocking, I had used a fly cutter on the mill to face one side of the base. Apparently the mill spindle wasn't indicated properly to the table and it didn't make a flat cut. A few strokes across some 150 grit on the surface plate trued everything up. Still a slight "rock", but much better than before. So I chucked up a piece of 1/4 brass just to see how it worked. Way to much deflection even with only about 2" protruding from the chuck.

    Looks like I'll be persuing Teddyblu's method and trying to set up some type of grinder. The radius cutter would possibly work with larger calibers for cutting ogives, but I think that .224 is beyond it's limits. At least I can replace all those plastic knobs on my lathe and mills.

  8. #88
    Boolit Master
    Join Date
    Mar 2013
    Location
    seated with Him in the heavenly places in Christ Jesus (Eph 2:6)
    Posts
    1,192
    Quote Originally Posted by customcutter View Post
    Got back in the shop between thunder storms. Got the 4 jaw mounted but was unable to get the base aligned to drill/bore the new pivot hole. Finally realized I could turn the cutter to the back side and run the spindle in reverse. Shaved .005 off of the height of the post. Also found the reason for the rocking, I had used a fly cutter on the mill to face one side of the base. Apparently the mill spindle wasn't indicated properly to the table and it didn't make a flat cut. A few strokes across some 150 grit on the surface plate trued everything up. Still a slight "rock", but much better than before. So I chucked up a piece of 1/4 brass just to see how it worked. Way to much deflection even with only about 2" protruding from the chuck.

    Looks like I'll be persuing Teddyblu's method and trying to set up some type of grinder. The radius cutter would possibly work with larger calibers for cutting ogives, but I think that .224 is beyond it's limits. At least I can replace all those plastic knobs on my lathe and mills.
    brass isn't quite as "stiff" as tool steel and i when i make my angled cuts i don't need a live center... can you maybe use a center drill to just "dimple" the end and use a live center?

    i agree that if you are going to make some type of radius grinder that teddy's design is the way to go... i have one of those Rotozip tools and if need be i could pursue that method...

    man, my house feels like it is listing right now as i need to get my land legs back after being on a ship for 8 days!

  9. #89
    Boolit Man
    Honorstick's Avatar
    Join Date
    May 2013
    Location
    Northwest Michigan
    Posts
    77
    Just thought I would post up a pic of the fixture I built for cutting D reamers, this is just a proof of concept fixture but it works pretty darn good. The spitzer shape in the lathe is no real size or ogive, just a test cut, the 9mm is the one I turned up this morning now I just have to make up some reamers and see what I can do from there.Click image for larger version. 

Name:	100_0708.jpg 
Views:	1585 
Size:	66.3 KB 
ID:	78442Click image for larger version. 

Name:	100_0709.jpg 
Views:	118 
Size:	62.9 KB 
ID:	78443Click image for larger version. 

Name:	100_0711.jpg 
Views:	101 
Size:	32.4 KB 
ID:	78444

  10. #90
    Boolit Master
    Join Date
    Mar 2013
    Location
    seated with Him in the heavenly places in Christ Jesus (Eph 2:6)
    Posts
    1,192
    looking good honor

  11. #91
    Boolit Man
    Honorstick's Avatar
    Join Date
    May 2013
    Location
    Northwest Michigan
    Posts
    77
    Thanks Cane

    I wanted something that would allow me to swap out the compound and allow me to use the QCTP. I just used some scrap I had laying around along with a piec of unistrut that just happened to fit the T-nut on my tool post and believe it or not it's a pretty solid set up. Eventually I'll build something a little more professional looking but for testing it'll work fine.

  12. #92
    Boolit Buddy
    Join Date
    Apr 2013
    Location
    West Central Fl
    Posts
    451
    Honor,
    Good looking setup. I think the pivot point being on the upper left side of your compound helps with the amount of material you have sticking out of the chuck. In my case the base is 4" wide, so I have to have at least 2"+ protruding from the chuck to avoid hitting the jaws on the compound and base. I'm thinking I'll just put another piece of plate in the base and mount the grinder to that. Looking for suitable grinder now that I can easily mount.

    Cane,
    The smallest center drill I have would leave a 1/8" meplat. Maybe I could just use a "regular" drill???

  13. #93
    Boolit Buddy
    Join Date
    Apr 2013
    Location
    West Central Fl
    Posts
    451
    Thought I had it figured out for a second. I remembered I had a "radius dressing fixture" for my surface grinder. Figured maybe I could dress the grinding wheel to the ogive needed, then find some way to rotate the .250" rod and present it at 90* to the dressed wheel. Only one problem so far, the diamond points for dressing the wheel are mounted on a shaft that is only about 1.5" long, and just eyeballing it I think I'd need one about 2.5" long to get the correct ogive. Also not sure how the wheel would react with that type of a grind in it. Should be OK as long as it's not too thin at the edge. Maybe I could make another shaft and insert the diamond dresser into it.

  14. #94
    Boolit Master
    Join Date
    Mar 2013
    Location
    seated with Him in the heavenly places in Christ Jesus (Eph 2:6)
    Posts
    1,192
    i have these size 0 center drills, i think the first part of the bit is 3/64, really nice and small "dimple", if you want one i can send you one as i think i got 4 for $5 off evilbay, pm your address if you want one

    keep noodling it our cc, i know you will get it...

  15. #95
    Boolit Master

    Reload3006's Avatar
    Join Date
    Nov 2011
    Location
    West Plains, Mo.
    Posts
    1,584
    you can get center drills fairly inexpensively from most industrial suppliers McMaster Carr, Carr lane, Granger and others. But if you have a center drill you dont need to drill all the way into your piece to get a start for your drill just tick it and it will start your drill. Or if your going to be enlarging the hole anyway then the smaller drill will follow the hole you started with the center drill even if its larger.

  16. #96
    Boolit Master
    Join Date
    Mar 2013
    Location
    seated with Him in the heavenly places in Christ Jesus (Eph 2:6)
    Posts
    1,192
    if you are making D-Reamers or fluted reamers i think just giving the end a small dimple with the center drill helps when you are making the flutes or milling the reamer in half as it makes it very easy to see when you are at the halfway point in taking off the material...

  17. #97
    Boolit Master wonderwolf's Avatar
    Join Date
    Apr 2007
    Posts
    1,655
    Quote Originally Posted by Honorstick View Post
    Just thought I would post up a pic of the fixture I built for cutting D reamers, this is just a proof of concept fixture but it works pretty darn good. The spitzer shape in the lathe is no real size or ogive, just a test cut, the 9mm is the one I turned up this morning now I just have to make up some reamers and see what I can do from there.Click image for larger version. 

Name:	100_0708.jpg 
Views:	1585 
Size:	66.3 KB 
ID:	78442Click image for larger version. 

Name:	100_0709.jpg 
Views:	118 
Size:	62.9 KB 
ID:	78443Click image for larger version. 

Name:	100_0711.jpg 
Views:	101 
Size:	32.4 KB 
ID:	78444
    I'm confused how this works exactly, do you step then blend or do you "shift" as you cut?
    My firearms project blog

  18. #98
    Boolit Buddy
    Join Date
    Apr 2013
    Location
    West Central Fl
    Posts
    451
    wonderwolf,

    I think he has his tool post mounted to the angle iron, and the whole thing is pivoting on the bolt at the end of the angle iron.

  19. #99
    Boolit Man
    Honorstick's Avatar
    Join Date
    May 2013
    Location
    Northwest Michigan
    Posts
    77
    Quote Originally Posted by customcutter View Post
    wonderwolf,

    I think he has his tool post mounted to the angle iron, and the whole thing is pivoting on the bolt at the end of the angle iron.
    That's correct. I set the saddle where I want and lock it down and then I can use the cross slide to feed in on each successive pass and I can swing the tool holder by moving the unistrut based on the pivot point that's to the rear of the workpiece. Hope that helps clarify it a little bit.

    I haven't been able to make much progress on a more permanent (and more proffesional looking) setup due to lots of doctor visits and health issues but it's still on my to do list.

  20. #100
    Boolit Master bearcove's Avatar
    Join Date
    Aug 2007
    Location
    Rio Rancho NM or Bearcove AK
    Posts
    2,414
    You can do a radius, ONE distance from your center. Or do a tangential or secant ogive. Derived from a formula. Better BC, but then you need a form tool or CNC

    The radius is part of a circle, the others aren't.
    I'm just the welder, go ask him>

Page 5 of 7 FirstFirst 1234567 LastLast

Posting Permissions

  • You may not post new threads
  • You may not post replies
  • You may not post attachments
  • You may not edit your posts
  •  
Abbreviations used in Reloading

BP Bronze Point IMR Improved Military Rifle PTD Pointed
BR Bench Rest M Magnum RN Round Nose
BT Boat Tail PL Power-Lokt SP Soft Point
C Compressed Charge PR Primer SPCL Soft Point "Core-Lokt"
HP Hollow Point PSPCL Pointed Soft Point "Core Lokt" C.O.L. Cartridge Overall Length
PSP Pointed Soft Point Spz Spitzer Point SBT Spitzer Boat Tail
LRN Lead Round Nose LWC Lead Wad Cutter LSWC Lead Semi Wad Cutter
GC Gas Check