Also found this on how to make a "ball/sphere" turner. There are also other plans out there on the net, that I've seen in the past. Sure they would turn up with a google search.
http://www.youtube.com/watch?v=YSlS05unHkM
CC

|
   
   
|


|


Also found this on how to make a "ball/sphere" turner. There are also other plans out there on the net, that I've seen in the past. Sure they would turn up with a google search.
http://www.youtube.com/watch?v=YSlS05unHkM
CC

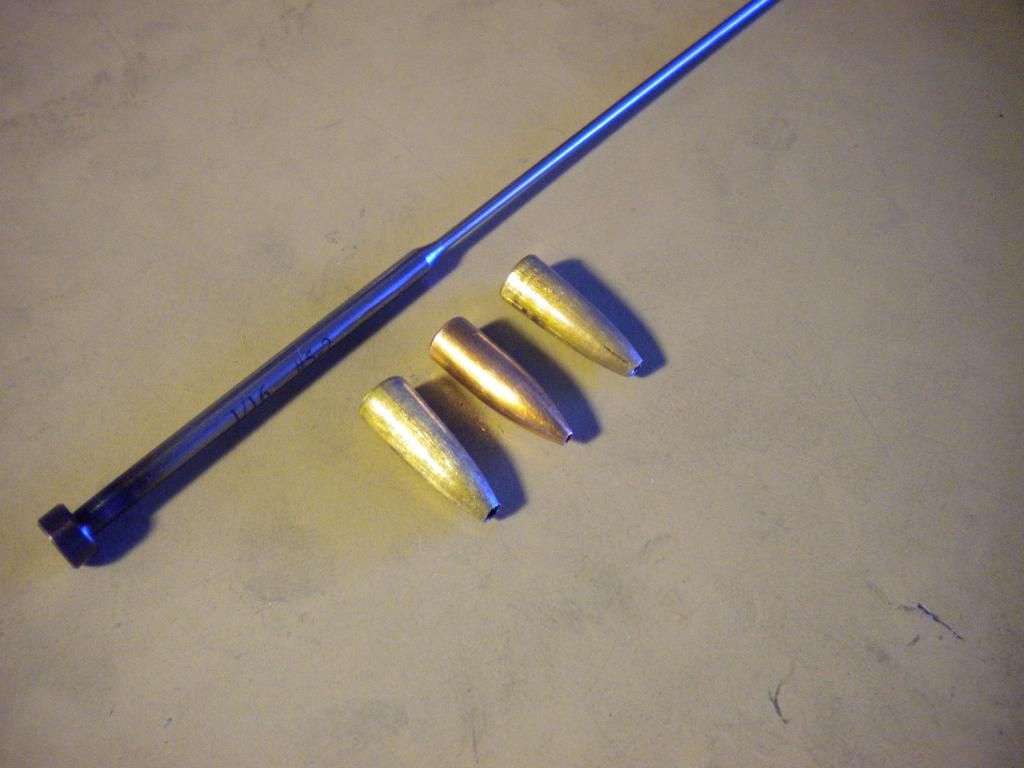
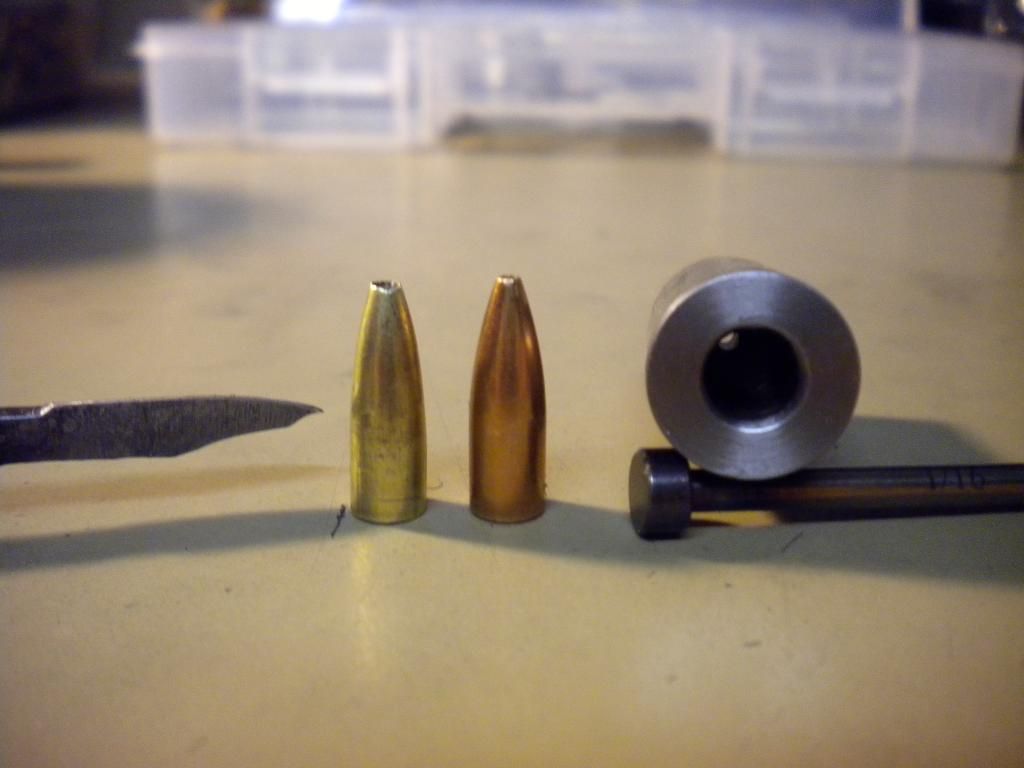
i couldn't stand it any longer so i had to see how that point forming die worked out so i seated some cores to test it out... didn't turn out too bad, the bases are too large but i will probably run them through a sizer anyway as the last step in the process... i was surprised no stuck cases and it didn't take much to punch them out, the ogive is supposed to be 1/16", anyway they are ugly but they are my ugly and i likes em for 224-V1 and the middle bullet is the Sierra factory jword i am trying to copy:
just look at those swelled bases, and one tip is folded, LOL! gots lots of room for improvement, and i will be making a new fluted reamer and a new point forming die, and save this one for grins...
cc, i am going to give you a suggestion that hopefully you will thank me for laterin the back you see a 1/16" ejection punch that i bought from mcmaster, it is 1/8" for the first 2" then the rest is 1/16" and C41 hardness, you just need to buy this thing as making one will be a major PITA, its only about $7 and totally worth it imo, here is the link:
http://www.mcmaster.com/#ejector-punches/=nb5rwt
i am going to drill out a 1/4" grade 5 and use a set screw to support the punch, and use it as the ejection punch for the point forming die assembly...
edit: the 12L14 might just work as this die wan't polished very much at all, and the cases ejected with no problems, so for now i am sticking with this alloy...
.
Last edited by Cane_man; 06-23-2013 at 10:50 AM.


This seems to verify what I suspected. Things don't have to be perfect production dies to swage usable bullets. The oldtimers did know what they were doing!
edit: this is what i think it is, i could be smokin' the drapes on this whole thingOriginally Posted by customcutter

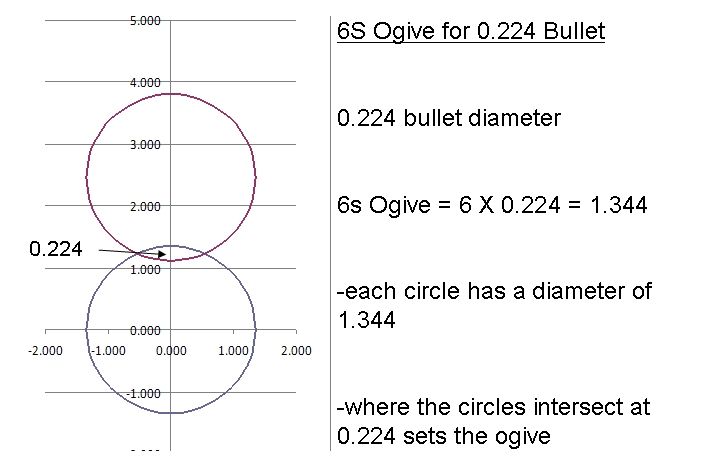
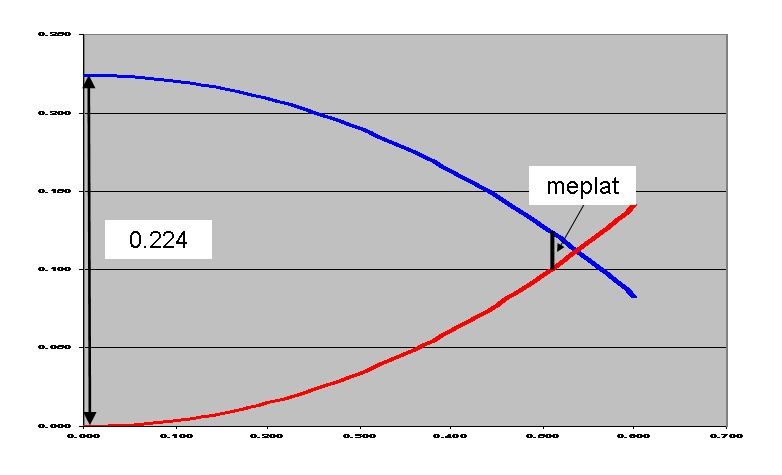
all you need to know is the angle of the tangent line along the length of the ogive at a particular distance from the meplat... i won't bore you with the math but for the .224 bullet with a 6s ogive the design is as follows:
-ogive length = 0.53" to the tip (it is really this long) edit: did not account for 1/16" meplat so ogive length is 0.46!
-meplat width = 1/16" [0.0625"] (for our home made stuff this is about as small as you can get it and make it work)
-23 degree tangent line angle at point (not meplat)
-20 degree tangent line angle at 0.0625" meplat, which is located 0.08" from the point
-14 degree tangent line angle 0.2" from the point (not the meplat) that has a diameter ~ 0.137"
-6 degree tangent line angle 0.4" from the point (not the meplat) that has a diameter ~ 0.209"
-0 degree tangent line angle 0.53" from the point (not the meplat) that has a diameter = 0.224
-overall bullet length is approximately 0.70 ~ 0.75 depending on your taste (Sierra production 55gr is 0.72)
-shank length = 0.71 - 0.46 = 0.25" (i remeasured - not as long as you think)
so how does this help when shaping the ogive?
1) turn the cross slide to angle 14 degrees and from the ogive start cutting until you get an diameter of 0.137" at a distance of 0.2" from the point (yes, lots of stopping measuring checking, and you want to overisze these dimensions by about 0.005" so you can lap it to size)
2) then set cross slide angle of 6 degrees and cut until you hit a diameter of 0.209" at a distance of 0.4" from the point
3) use a fine toothed flat file to smooth out the profile, then use sand paper (80 grit, 400, 1000) to smooth the surface until the shank is about 0.220 so you can lap your point forming die to size
-from there you can make any type of boring bore or reamer that you want, the meplat will be set by the size of hole you drill in the point forming die for the ejection punch
hope this makes sense, using excel and the circle/tangent formulas is far easier than doing it on paper with a compass and straight edge, at least for me
here is a picture from the archives (i believe KTN did this) showing 3 angled cuts instead of the 2 i propose above:
i think this is probably the easiest way to do it at home and get the highest level of accuracy...
Last edited by Cane_man; 06-23-2013 at 11:24 AM.

The bullets made by commericial suppliers have to look great.
The bullets made by shooters have to shoot great.
Not quite the same thing.
The three angled cuts, with the angles slightly rounded over by polishing might just shoot better than most guys can hold.
Experimentation, and sharing ideas will benifit all shooters.
Thanks for the work you guys are doing
To lazy to chase arrows.
Clodhopper
Cane,
Thanks for the explanation. My understanding (probably wrong) of a 6ogive of a .224 bullet. (.5*D)*6=.672 The cutter would be set up on a .672" radius on a ball cutter, then advanced so that the tangent and base of the ogive meet (.53" from the meplat in your calculation above), then the cutter rotated from that point to the point of the bullet or meplat. Offsetting the cutter from the centerline of the chuck and tailstock would produce more of a parabolic shape than a sphere.
Like I said it's probably wrong that's why I was saying I needed to find a compass so that I could do some quick drawings. (quicker for me than getting a cad program and learning how to use it)
CC
ya you got it right cc... i screwed up above and did not account for the meplat correctly, i changed it slightly above
i could be wrong on all this but this is what i think it is! here are a couple of pics of the ogive, it is basically two circles that both have "6S" diameters that are aligned on the centers and move up and down until the length of their intersection is the same length as the diameter of the bullet:
here is the area of the circles that form the ogive, you can set the meplat wherever you want:
this is known as a "tangent" ogive because the circles are tangent to the base of the bullet... a spitzer is a "secent" ogive and the circles are not tangent to the base and this type of ogive is harder to make and the ogive is longer compared to the tangent type...
but at home, for knocking down squirrels and yotes and punching holes in paper the simpler tangent ogive is just fine...
Last edited by Cane_man; 06-23-2013 at 11:17 AM.

Your picture looks distorted because the scale on the x and y axis are not the same.
it is distorted for sure and not to scale... it was more for informational purposes
Cane,
Thanks for the drawings, it goes a long way toward "splaining" things. I almost feel like I stayed at a Holiday Inn last night. Makes me realize that the only way we are going to get repeatable results is by "engineering" a ball cutter. At least for me, all that measuring and metrology seems like it is going to be time consuming.
CC
The picture nicely illustrates what is needed to cut an ogive. To cut a ball (zero ogive) just set the swivel axis offset to zero. I found the one problem with using my compound rest as the ogive cutter is that the piece being machined has to stick out of the chuck a long distance so the chuck clears the rest. I may try installing a steady rest pin to keep it from flexing too much.
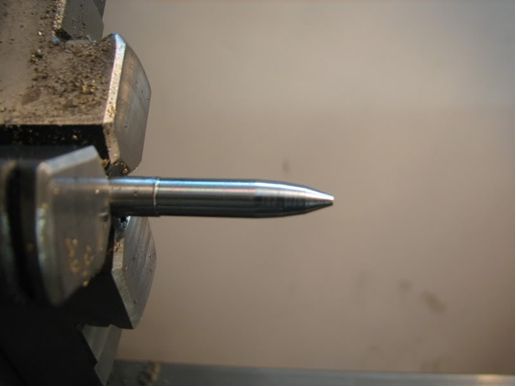
well i got proof of concept today... took one of those swaged bullets above and sized it with a sizing die that i made today and compared it to the factory bullet:
a shootable bullet, imo, not perfect but usable... you see the d reamer, swaged bullet, factory bullet, and the point forming die that i made which needs to be scrapped because it flares the base... but like i said this was proof of concept to see if it could be done at home with a small hobby lathe, by someone who i consider myself not much of a craftsman... i am pleased and see the light at the end of the tunnel on this project
Looks more than shootable to me. Very nice looking bullet. I have enjoyed following your progress on this and looks like your well on your way. Good job.
Cane, for a first attempt I say it looks very good. Now make 4 more and give us a range report. Maybe not MOA accuracy, but MOIntruder. Wish I had time to get back in the shop, but I am back on the truck for the fore see able future. Keep up the good work.
CC
thanks plus and cc... gonna be a few weeks but i will finish these swaging dies and then go to the range and see what happens

Looking good Cane Man your are making some serious progress...great job
Hey Cane, that's looking real good. I like you're idea of making a 4 flute reamer for your next try. I've never used 12L14 steel before, because it seemed like it would be too soft. On your next attempt are you planning on trying to case harden it after you finish lapping it? I think surface hardening is about all you'll be able to do with that type of steel.
Never in history has there been a situation so bad that the government couldn't make it worse.
A foolish faith in authority is the enemy of the truth.
thanks Howard... for the next point forming die i will use O1... this first attempt with 12L14 was just to learn and get my feet wet, and it does case harden pretty well but it is somewhat of a pain the **** to do so... the O1 is easy to heat up to orange in my little coffee can oven and hold for 2 minutes, quench in oil, then temper at 350F for 1 hour... gonna make the 4 fluted reamer next, hopefully this weekend
Anyone else make the dies from ASTM O6? I have been working with it for awhile now and think it works great. I can core swage with it dry but it takes more effort. The cores come out very very smooth and shiny when done dry and they are actually a bit more accurate but I don't think it's worth the extra effort. The first die set I did was made out of O1 and that worked well also but the O6 is smoother and easier to cut/lap.
I used a cheap radius cutter on my lathe. It will cut brass (for the laps) with ease but when cutting O1 steel (for D reamer) you have to go very slow because of flex. But even if the reamer doe snot turn out it doesn't matter because if you lap it out anyways. The worse your reamer is the more you have to lap.
^^^ where are you buying your O6 from? i can't seem to find it available anywhere... this is the steel Ted Smith recommends for die making
i just got some 41L40 to play around with
 Posting Permissions


| BP | Bronze Point | IMR | Improved Military Rifle | PTD | Pointed |
| BR | Bench Rest | M | Magnum | RN | Round Nose |
| BT | Boat Tail | PL | Power-Lokt | SP | Soft Point |
| C | Compressed Charge | PR | Primer | SPCL | Soft Point "Core-Lokt" |
| HP | Hollow Point | PSPCL | Pointed Soft Point "Core Lokt" | C.O.L. | Cartridge Overall Length |
| PSP | Pointed Soft Point | Spz | Spitzer Point | SBT | Spitzer Boat Tail |
| LRN | Lead Round Nose | LWC | Lead Wad Cutter | LSWC | Lead Semi Wad Cutter |
| GC | Gas Check |

 Reply With Quote