Reloading EverythingLee PrecisionRepackboxInline Fabrication
Titan ReloadingMidSouth Shooters SupplyRotoMetals2Load Data
Wideners Snyders Jerky
Page 1 of 7 1234567 LastLast
Results 1 to 20 of 124

Thread: Swaging on the Cheap - 9mm Case to 40SW/10mm JWords

  1. #1
    Boolit Master
    Join Date
    Mar 2013
    Location
    seated with Him in the heavenly places in Christ Jesus (Eph 2:6)
    Posts
    1,192

    Swaging on the Cheap - 9mm Case to 40SW/10mm JWords

    Swaging on the Cheap - 9mm Case to 40SW/10mm JWords

    Some of you guys have been pm’ing me on how I made a swaging system for swaging 9mm to 40SW/10mm bullets at around $100 “on the cheap” using a standard reloading press and Lee die bodies, so I thought I would put my thoughts together to explain the steps that worked for me… all of this info was stolen from the archives or explained by other generous members here on CB (thanks especially to Lafaun, Danr, and Stealthshooter), this swaging solution is nothing new but I have not seen one thread that explains it in detail, so maybe this will be it… here is the thread that got me started on this:

    http://castboolits.gunloads.com/show...l-swaging-dies

    Just to clarify, I am a complete nube, my shop skills are mediocre at best, there are some things I am probably doing wrong so I hope the veterans will step in and add clarification and short cuts- constructive criticism is welcomed… I don’t have this particular 9mm to 40SW system completely finalized (working on solutions for heat treating the inserts, case trimming, and making a point forming die), but all I know is that the bullets that I am making right now are shooting fine for punching holes in paper, and that is as far as I have taken it… one more thing, if you try this you assume all risk and your results may not be the same as mine so dont blame me if something goes wrong!

    The goal of this project is to be able to make jword pistol ammo at home on the cheap using a standard reloading press, cost effective parts/materials, and a small bench top lathe (mine is a Chinese 7x12 that i bought 12 years ago when i was a semi-pro bamboo flyrod maker, thus the id "Cane Man")… homemade jwords became a need for me due to ammo shortages lately, and the fact that I am Swiss and we are a “thrifty” people (cheap azzes) and I cant pay for a professional swaging solution…

    To do this project you have to have the following already or acquire it:
    -a small bench top lathe and know how to do basic lathe operations (facing, drilling, lapping, etc.)
    -the basic tooling, tool cutting bits, drill bits, mic, etc.
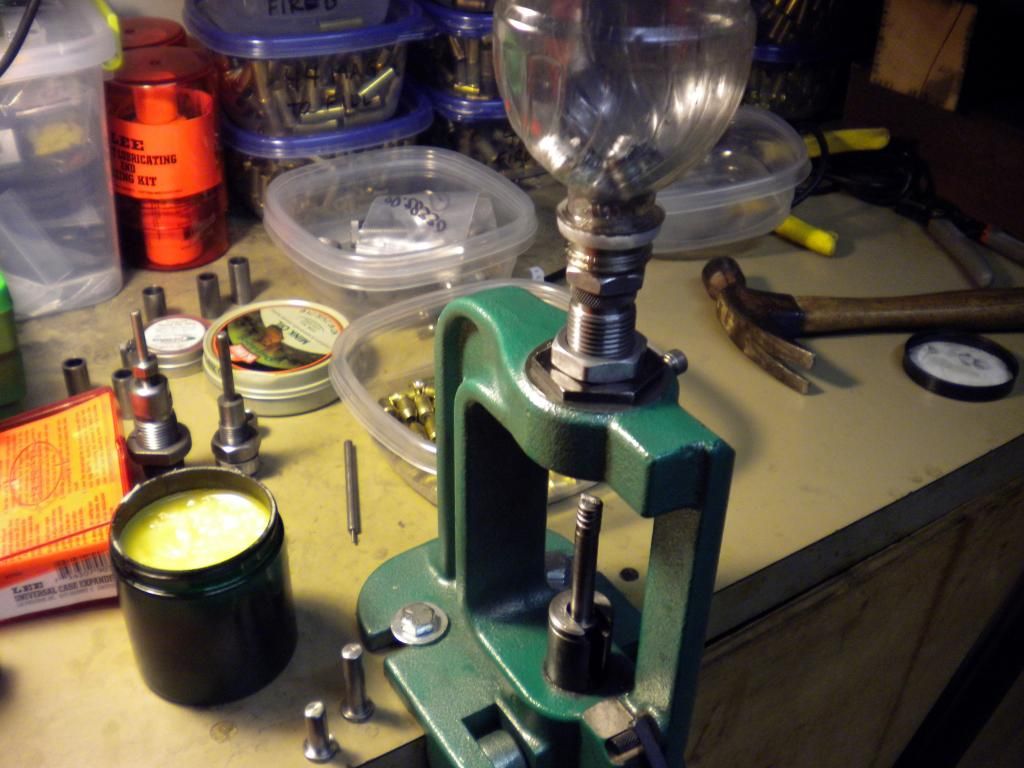
    -a single stroke reloading press, I am using an RCBS Rockchucker
    -357/38spcl/9mm casting molds anywhere from 90gr to 160gr
    -softish lead to use (no more than 10-12 BH)
    -9mm brass; range pickup or check the swappin/sellin section
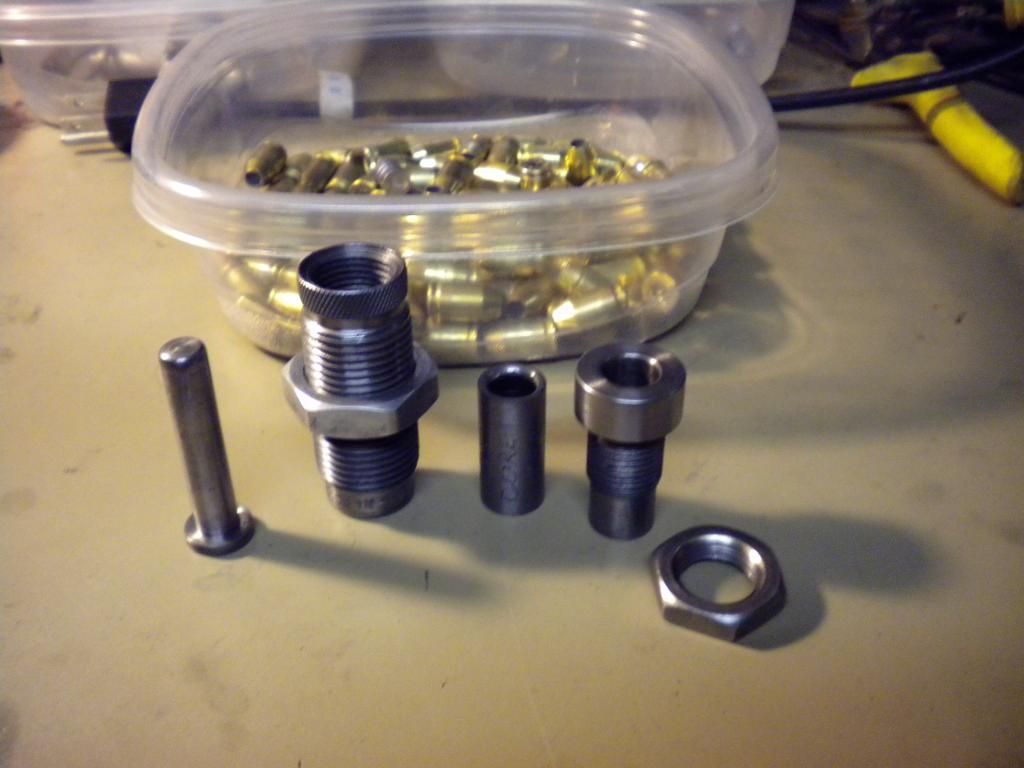
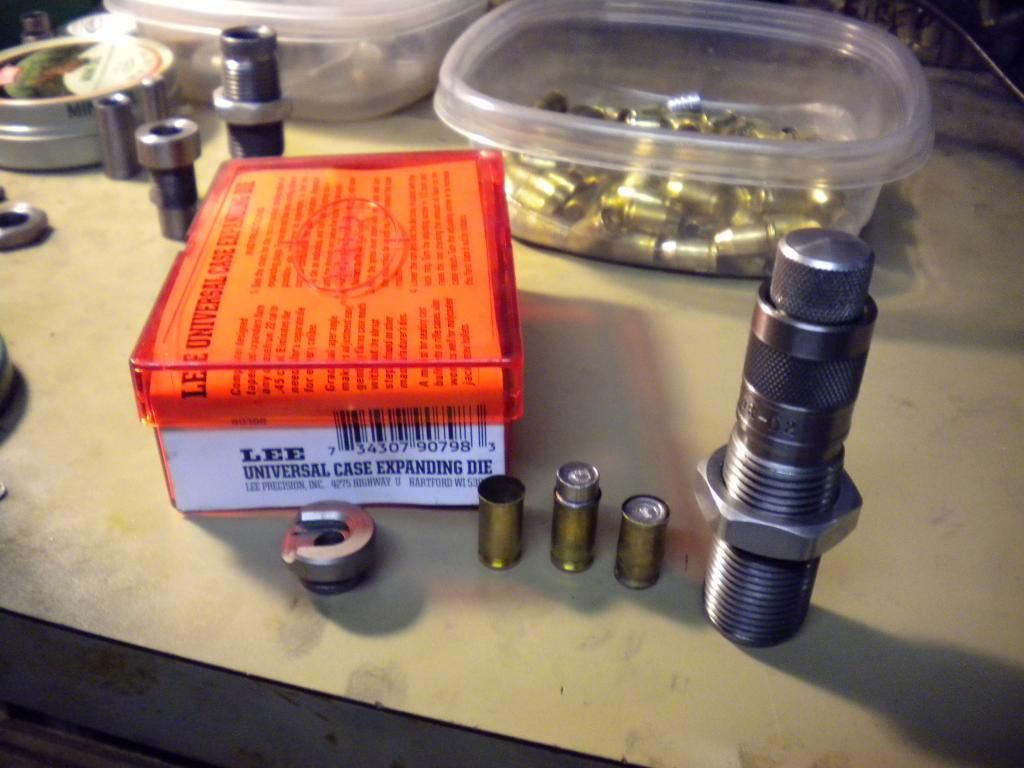
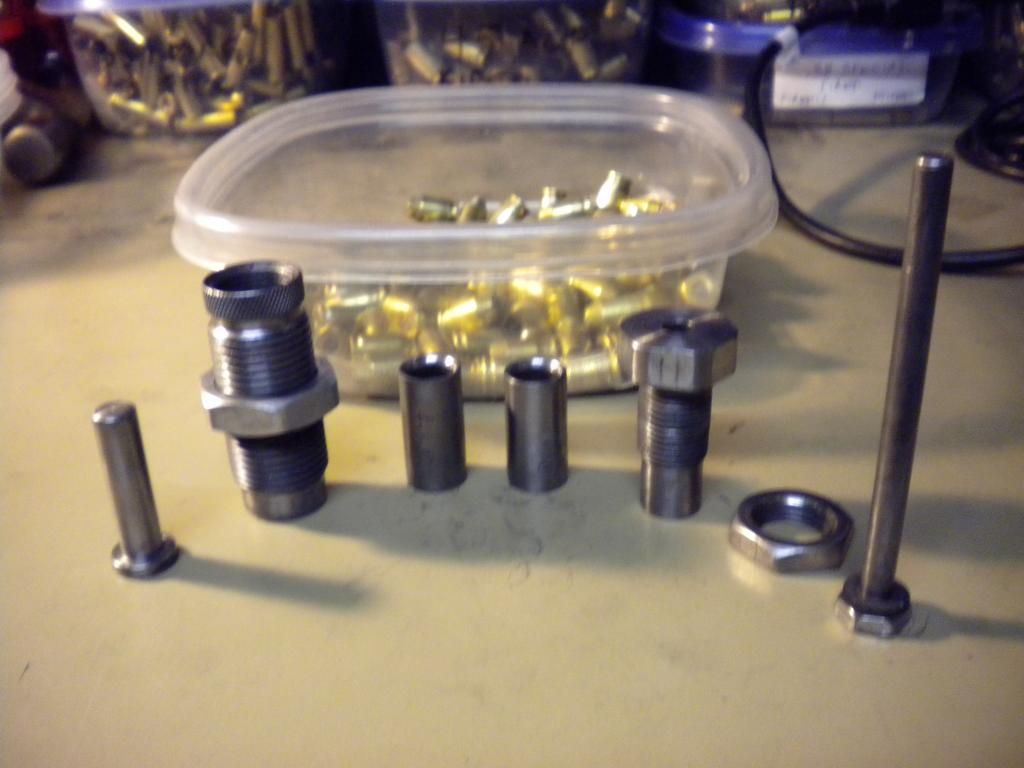
    -some Lee die bodies, which I will explain as I go along

    Don't question your abilities, if you figured out how to cast boolits then you will persevere in swaging and be successful at this as well- you CAN do it! i believe if you complete this project you can use it as a springboard to make any pistol ammo, and hopefully rifle ammo as well (my next project is swaging 22LR to .224 55gr FBHP using a similar system, if i figure out how to make the point forming reamer!)...

    Just to keep expectations real, with this system you won’t be able to make BT perfect and beautiful jwords (but not too far off), but the bullets you make here are functional and cost effective… I know this system can be improved greatly so I post not only for others by myself as well…

    Here are the steps I will explain in this post:

    [1] clean up
    some 9mm range pickup brass, I like to use my ultrasonic cleaner with hot water, a tsp of Lemishine (find at Walmart, etc.), and a drop of Dawn dish washing soap… I have an el cheap HF ultrasonic cleaner and I run it through three 8 minute cycles and they come out clean enough for me… you can also toss them into your vibratory cleaner with some walnut media, whatever works for you… don't bother with depriming the cases, in fact it is better to leave the primer in as it keep lead from flowing out of the flash hole when swaging...

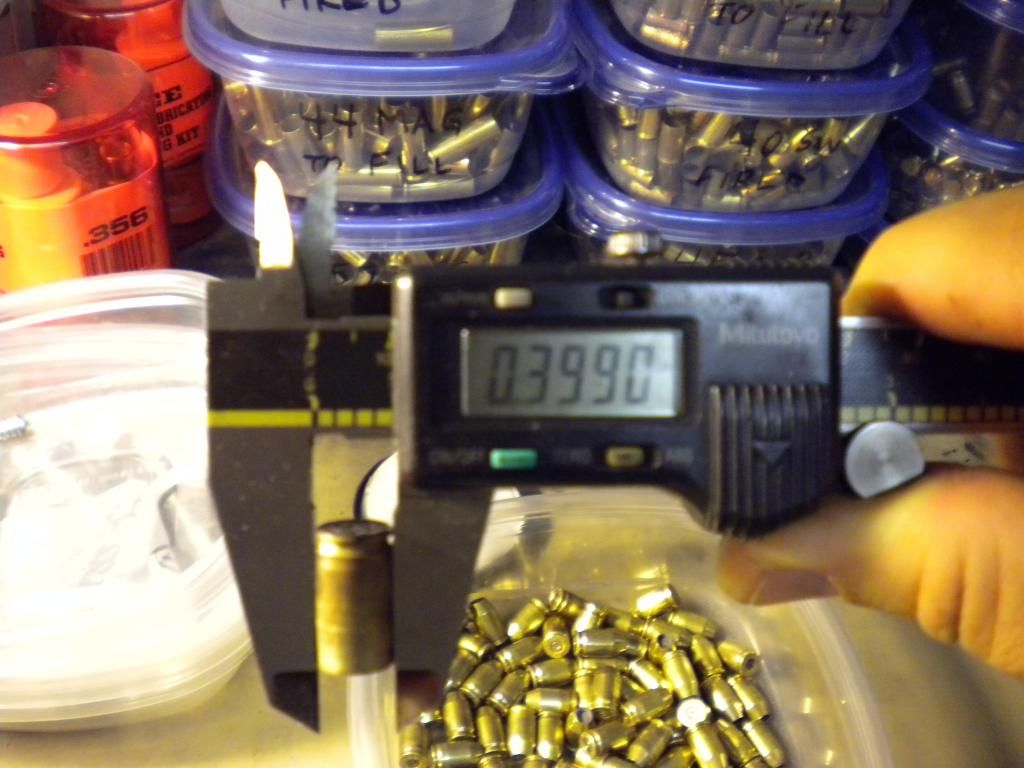
    [2] trim brass
    - if you are making 10mm jwords you wont have to trim the cases (final bullet OD is 0.720" which is about max), but if you are making 40SW you have to trim the cases by about 60 mils (0.060") if you want the bullet to have an OAL of around 0.660... there is a good thread right now where someone is using the HF mini cutoff saw and a home made jig, and that is what i will probably do when i make 40s... not sure about this, but you may have to debur....

    [3] anneal brass – there a few different ways to do this, you can put a propane torch on each case and heat them to orange and let them air cool… I did this at first but it takes time one case at a time, so using a suggestion from the threads (I think it was Lafaun- thanks!) you can put a few hundred in your Lee 4-20 pot, wrap them in aluminum foil, and let them heat soak at 750F for 1 hour… I emptied my pot of lead then let it cool, and the foil keeps any random lead left in the pot from contacting the cases and it keeps the heat in… I have a PID so I just set and forget it for and hour, let them air cool and they are good to go… there is a good thread that is a sticky that gives different options here...

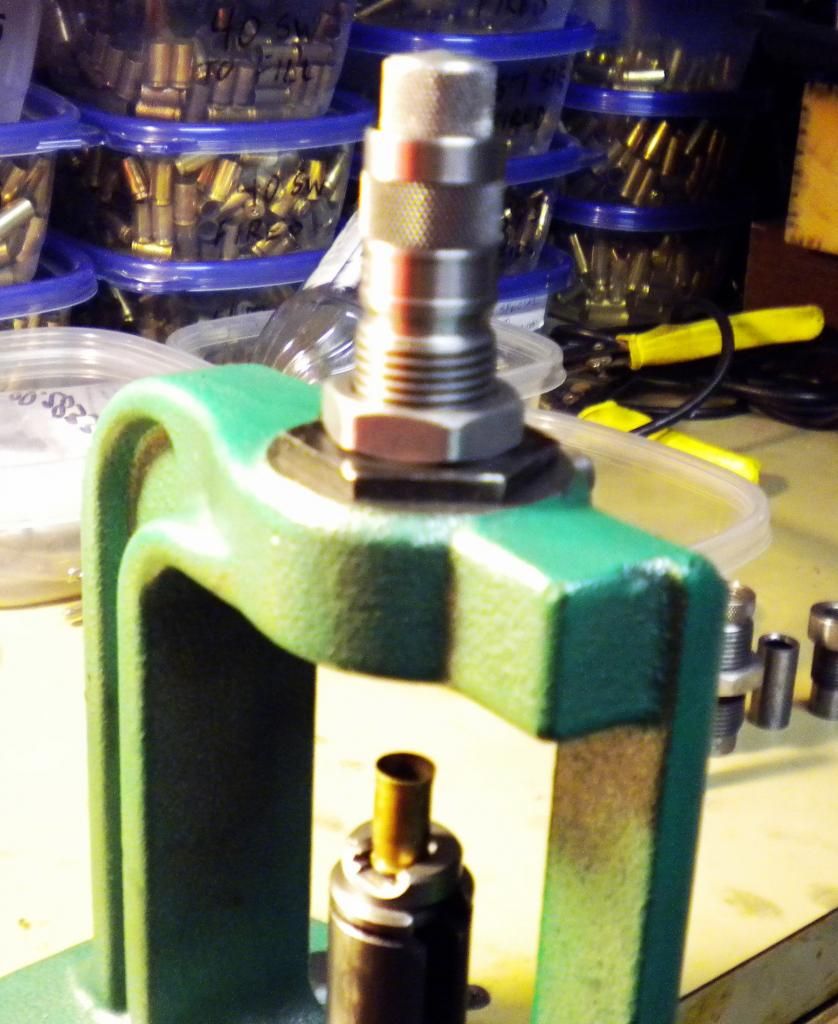
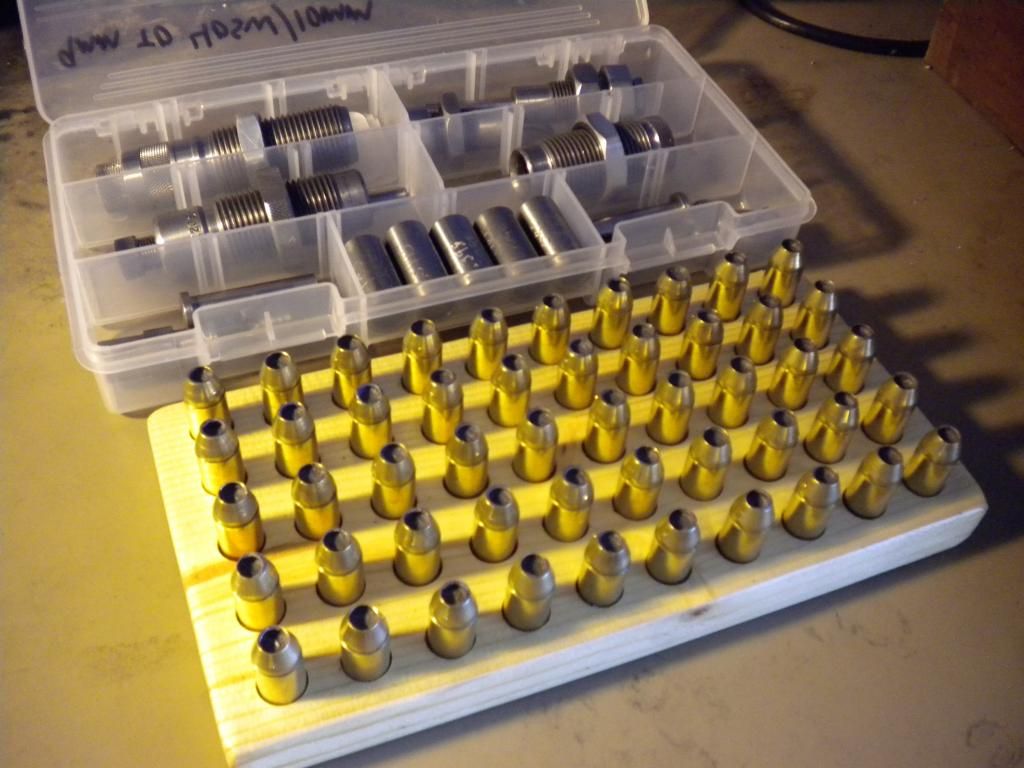
    The above steps are pretty easy to do, so I won’t provide pics for them, but the next steps are better explained with pics and I will post them one step at a time in future posts as time permits and instructions on how to make the dies/inserts:

    [4] Size the Lead Cores
    [5] Seat Lead Cores
    [6] Swage Cores
    [7] Point Forming
    [8] Final J-Word Sizing

    As usual if you have any questions or ideas for improvements post in this thread or pm me…

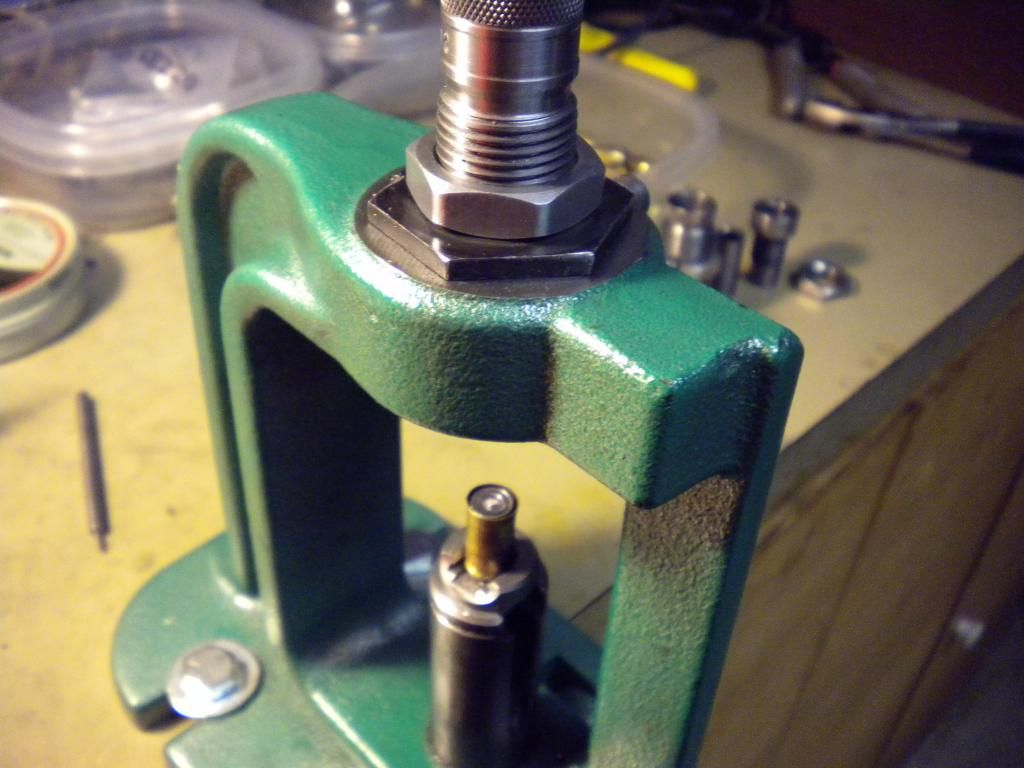
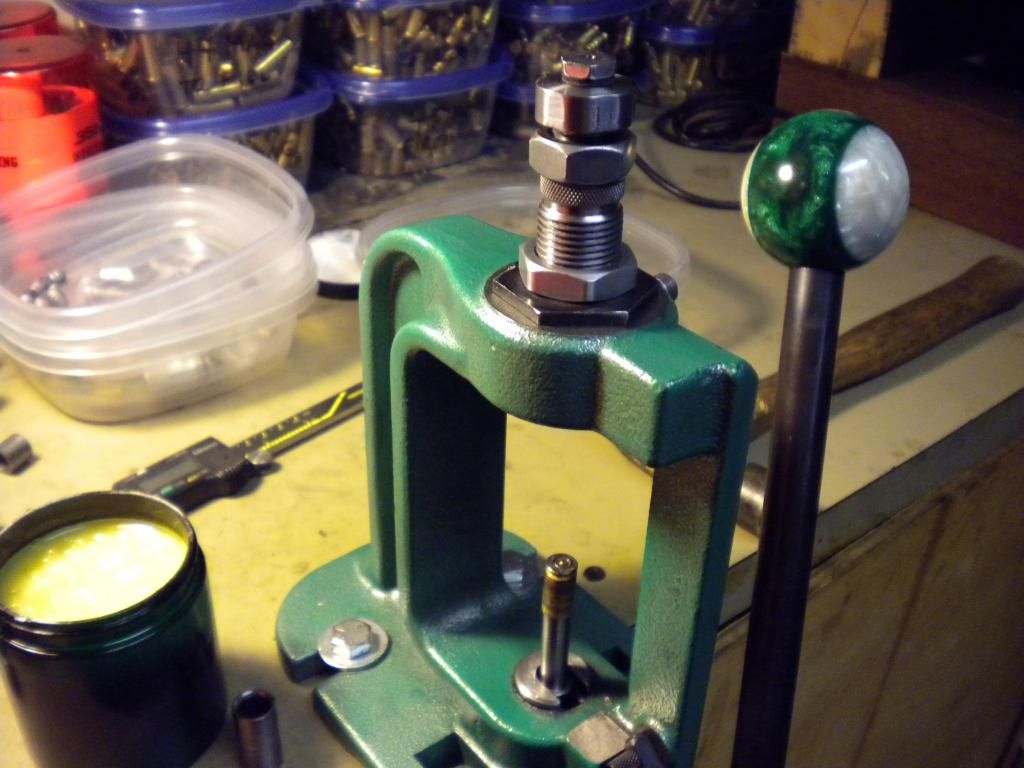
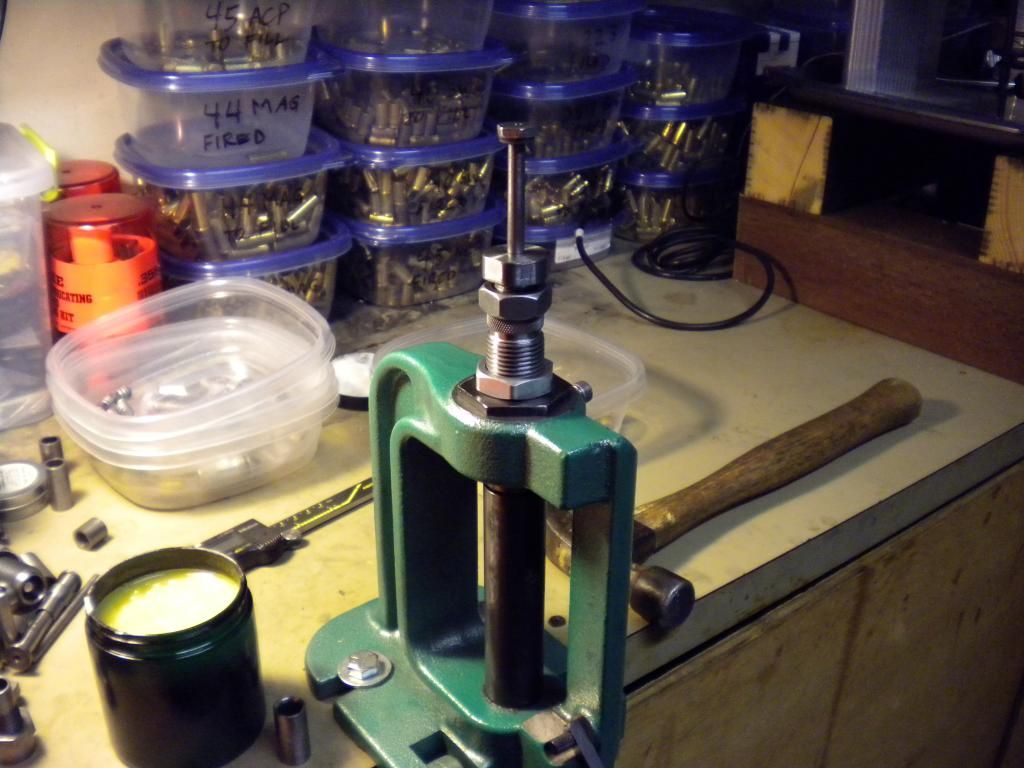
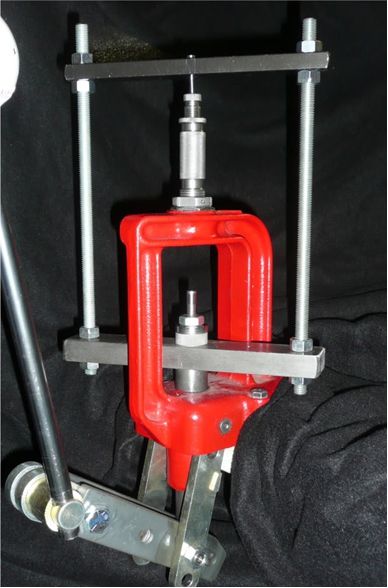
    here is a picture of the swaging system I put together for 9mm to 40SW/10mm (not completely finished):


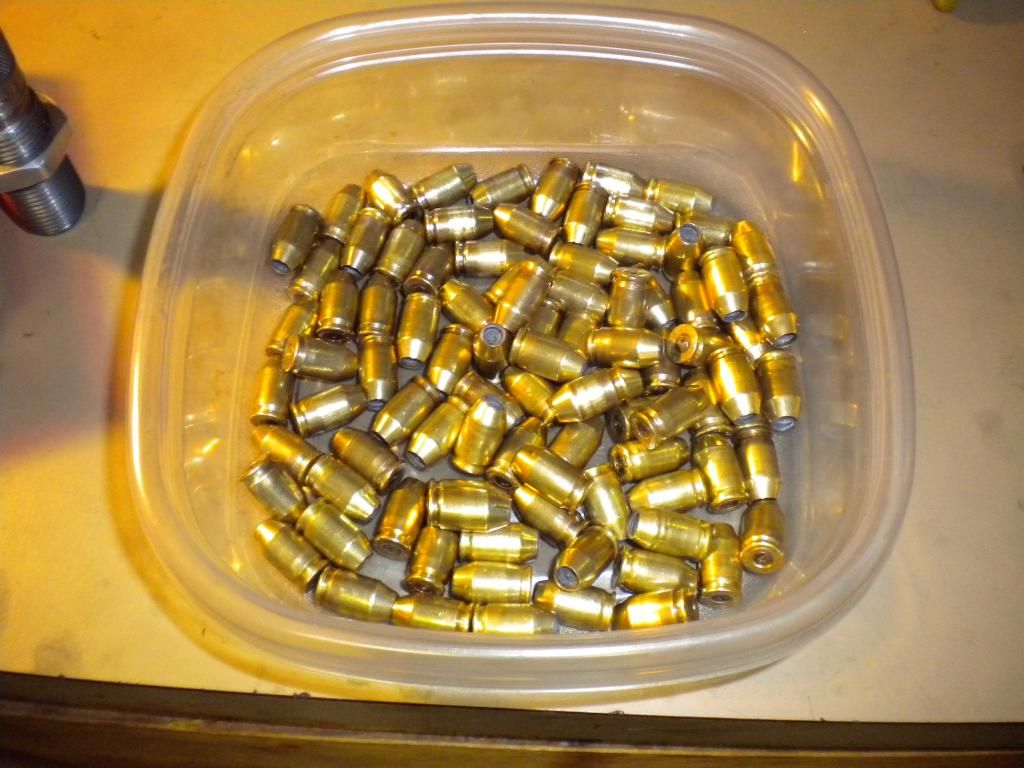
    and here are the results, these are 10mm 200gr FBHP, like i said they aint BT professional but they are functional and cheap!


    more posts to follow as time permits to explain the remaining steps [4] through [8]...


    ************************************************** ***********************


    UPDATES

    5-31-13 auto eject added, see this post:

    http://castboolits.gunloads.com/show...=1#post2240787

    http://castboolits.gunloads.com/show...=1#post2244298


    6-15-13 added core cutter, see this post:


    http://castboolits.gunloads.com/show...=1#post2263498


    7-17-13 explained heat treating and now using O-1 tool steel for die inserts:

    http://castboolits.gunloads.com/show...=1#post2308039
    Last edited by Cane_man; 07-17-2013 at 04:57 PM.

  2. #2
    Boolit Buddy
    Join Date
    Apr 2013
    Location
    West Central Fl
    Posts
    451
    Cane,

    Thanks for posting this for others. I'll be like the rest and trying to figure out how you use the dies and inserts to make the finished products.

    J-Word??? jackets???

    I must be a cheap azzz too, didn't know I had any swiss in me though. I just like being able to rely on myself, if and when I have too. I've ran a landscaping business the past 6 years, and at 58 it's ruining my back. (I already have 3 herniated disc). I've decided to hire someone to take my place on the crew, and I'm trying to learn some machining skills to put a 14X40 lathe, 9X42 mill, 6X28 mill, surface grinder, multiple other tools too work. I used to make custom knives, but if you can make $5/hr doing that you're pretty good. (hence the name CC) I may try making them again buy right now making reamers and dies is teaching me a lot of machining skills. The larger mill was in the middle of a CNC conversion when I bought it. I'm trying to finish that and learn how to do CAD/CAM also. Maybe I can mfg parts I'm hoping. But like I said I also need to learn machining skills.

    thanks,
    CC

    CC

  3. #3
    Boolit Master
    Join Date
    Mar 2013
    Location
    seated with Him in the heavenly places in Christ Jesus (Eph 2:6)
    Posts
    1,192
    no worries CC, i will explain everything you need to know to make this happen... i gotta take care of some stuff but plan to get back later and try to post on core sizing and seating...

    if you learn to make the reamers for the point forming die like the KTN type in the stickies, there would be a market for those for sure on CB... i think custom reamers cost over $100 and on up... so if you were price competitive this would be something to think about for a little side biz... and who knows, if you get good enough you could be the next BT Sniper offering professional swaging systems... after all he got started just like you and i are right now by reading the archives and asking questions

  4. #4
    Boolit Master
    Join Date
    Mar 2013
    Location
    seated with Him in the heavenly places in Christ Jesus (Eph 2:6)
    Posts
    1,192
    [4] Size the Lead Cores

    In this post I will explain sizing the lead cores and the dies and inserts needed for this step, I will spend time explaining this in detail because once you understand how to make this die and insert you will easily understand the rest…

    here is a picture of the process where the lead core of the bullet is sized so that it will fit inside the annealed 9mm case:


    so what you are seeing is a cast lead boolit (from a Lyman 357466 mold) with the ogive trimmed off sitting on top of a bottom punch, ready to be pushed through the core sizing insert so the cores are sized small enough to drop in the 9mm case… they go through the die and collect in a 24 ounce soda bottle on top that has the bottom sliced off, so they pour out easily when you are done…

    here are the definitions I am using for this project:

    die body – this is the die body for a Lee Powder Through Expanding Die in 9mm

    bottom punch – a rod that fits like a shell holder in the press ram, which pushes cores/cases from the bottom up through the die

    top “stop” punch – a 5/8”-18 number 5 bolt that has been turned to thread in to the top of the Lee die body and secure die inserts, this punch will be explained in core swaging

    top “pass thru” punch – same as above but it has a large hole drilled all the way through it that allows sized cores or sized bullets to pass all the way through the top of the die

    top ejection punch
    – a 5/16” number 8 bolt that has been turned down to fit through a top stop punch and a die insert, this will be explained in core swaging

    die insert – this is a 9/16” diameter by 1-1/8” long piece of 12L14 rod that has been drilled through and lapped to a specific inside diameter

    lead cores – for this project they are 357/38spc/9mm cast boolits with parts trimmed off using tin snips to achieve a core specific weight

    here are the parts you need to make and collect for this core sizing step:


    from left to right:

    bottom punch, Lee Powder Through Expander Die body, 0.355 core sizing die insert, top “stop” punch, and a locking nut for the top punch.. the insert fits inside the Lee die body (drops right in), and the top punch threads on top of the die and secures the insert, the locking nut secures the top pass thru punch, the bottom punch fits in your ram like a shell holder…

    the lead boolit cores - I need to explain this… what normal swagers do is use either lead wire or cast cores and then size them in a “squirt” die so they produce a consistent finished bullet weight… I am bypassing the squirt die and just using lead cast boolits for my cores… for these 10mm jwords I am using a Lyman 357466 mold that throws 160gr .360 diameter boolits… you can use whatever 357/38sp/9mm die you want to get the size core you need… for these jwords I need a core that weighs 140gr and this with the 60gr 9mm case gives me a 200gr bullet… I can get 140gr from a 160gr boolit by trimming off the ogive with a pair of tin snips (you can see this in the first pic)… if you play around with your boolit, depending upon where you trim it (ojive, base, front band, ect.) it will give you different core weights, you will have to play with this to get the weight you need… is this as consistent as using a squirt die? No way… but it will get you within 5 grains, so my final jwords weigh between 195gr and 200gr, and for me I just use powder charges based on the heaviest weight and go from there, it works for me and punches holes in paper just fine… whatever size jword you are making subtract 60gr to account for the 9mm case and that will tell you what size core you need (180gr 40SW needs a 120gr boolit, of which a 9mm lube groove Lee mold works perfectly)…

    here is how to make the parts:

    Die Body – this is just the die body for a Lee Powder Through Expander Die in 9mm and is the 1st key to this entire swaging system, it looks like this on Leeprecision.com:


    here is the link:

    http://leeprecision.com/exp-di-body-9mm.html

    Lee will sell this die for about $17 shipped, not too bad… what is key here is that you don’t have to turn 7/8-14 threads on a rod, Lee does this for you already, and the top ½” is threaded on the inside for a 5/8-18 standard bolt… the ID of this die is approximately 0.356”, which is just slightly larger than a 9/16” 12L14 rod, so you don’t have to turn the rod it just drops right inside the die without turning it to size! Remember you are purchasing the die body only, not the entire die, which Lee is happy to sell you the die body only… when you get the die you have to open up the ID of the mouth some… right now it is sized about 0.380 for the 9mm case, you need to take a boring tool to it and open up that ID so that it is about 0.450”… chuck the die in your lathe and go easy on removing the first 0.005 as this is case hardened… I found that taking a rat tail file to it while turn in the lathe took this carbide layer out pretty easily, making easy work of taking out the rest of material with the boring bar… go easy, because removing 0.001 is really removing 0.002 inches because you are removing the entire diameter at the same time… it is easy to remove too much material here so be careful… do you have to use a 9mm die body? Probably not, but the large calibers will seat the die inserts much higher inside the die body and they may not work… a 0.380 auto die body might work as well, but I am not sure about that… there may be other options here, post them if you figure this out!

    Die Insert
    – now you need to make a die insert that will drop right inside the die body, and it will be used to do the work of sizing the lead cores, this is the 2nd key to this project... these die inserts are easy and relatively fast to make, and if you screw them up no biggie, toss it aside and make another... its not like you just spent 8 hours carefully turning threads and drilling to make a master piece swaging die only to screw it up at the end when final lapping and make you want to play in the freeway or go postal… to get started all you do is cutoff a 1-1/8” section of your 12L14 9/16” diameter rod, and chuck it up in your lathe… you can find 12L14 on evilbay and for $10 you can get a 1’ section which will be plenty for this project… 12L14 is the savior for this project, it has lead in the alloy and is free machining, and it turns and drills like it was butter… my lathe loves this stuff and has enough power to turn/drill it… without this material I would not have been able to turn harder/tougher alloys and I would have had to abandon this project… thanks to Buckshot for sharing this tip in the archives… the only drawback to 12L14 is that it wont heat treat worth beans, but it will case harden, which i will discuss later… it is a fairly strong alloy, and may be fine without any heat treating, but the jury is still out on this as far as I am concerned…

    OK, you have your 1-1/8” section of rod chucked in the lathe, now face both ends… then you will drill a 0.355” hole completely through it (a 9mm drill bit works perfect for this)… take one end and flare it open so it will receive a core easily… you want to drill this 0.355 hole in steps… center drill, then 1/8”, then 1/4”, then 5/16”, then the 9mm bit… when you are done, you need to polish the bore out as smooth as possible… here I do it in increments using sandpaper and some oil: 80 grit, 400grit, 1000 grit, then 0000 steel wool… Buckshot has a great tutorial in the archives on how to lap dies, maybe someone can post it here… once you are done lapping this die insert is finished… one more thing, you will end up with several of these die inserts when you are finished, it is almost mandatory to mark them in some way... in the pic i used a sharpie, but this soon wears off, so i got a cheapo metal engraver on evilbay for $12 and i just scribe the size and type of insert right on the outside of it... (whatever you do, don't use letter or number punches to mark the dies... dont ask me how i know!)

    Top “Pass Thru” Punch – once you drop in the die insert, it needs to be secured…fortunately the Lee die body has the top ½” section that is inside threaded with 5/8-18 threads (that’s 5/8 fine)… I use 2” long 5/8” fine bolt grade 5 because this grade is a little easier to turn and doesn’t have to be that tough… what needs to be done is to turn the bolt head to the correct OD so the soda bottle fits on top (approximately 0.85”), and it needs to be cut to the proper length to fit inside the die and secure the insert (punch OAL is 1.5”)… here you will have to turn down some of the threads on the bolt so that it can fit through the threaded section of the Lee die and then make contact with the insert… you will also have to drill through this top punch to an ID of approximately 0.42” (a 27/64 drill bit works good here) so the bullets and lead cores can pass through (that’s why this is a pass thru punch), make sure you drill this large ID out in steps just like with the core sizing insert… tangent thought: if you open up this ID to 0.46 you can use the same punch for making 40sw to 45acp, and other parts of this project can be used like this as well, so you might want to think ahead if you decide to make this system... the threaded section that starts at the bolt head is 0.6” long, and the turned section is 0.5” long… you will use a 5/8” fine “jam nut” to act as a locking nut for the top pass thru punch, I had to reduce the thickness of this nut by cutting it in the lathe some so it had room to fit on the threaded part of the top punch… look at the picture, hope this makes sense!

    one comment about sharp drill bits, you need absolutely sharp drill bits or this project will not work on these wimpy bench top lathes… if you are a machining mastadon bronze idol and you know how to sharpen drill bits free hand using a bench grinder then more power to you, but for the rest of us mere mortals the Drill Doctor was invented… for $90 you get a machine that accurately and effortlessly gives you sharp drill bits to use, and makes this project doable at home with a small lathe… that’s my story anyway, and I am sticking to it

    Bottom Punch – you will now make a punch that fits in the ram of your press just like a shell holder, so that you can push the lead cores through the die body… i used a 3/8” grade 5 bolt here, because this material is tough and can handle the repeated compressive forces of lead sizing… the OAL length of this punch is 1.8”, the OD us 0.350, and the nose of the punch is rounded slightly (take a file to radius the edge)… the portion that fits in the ram like a shell holder has an OD of 0.555” and is 0.17” high… make sure this punch is long enough, or you won’t be able to push your cores or bullets through the inserts all the way! I probably should have hardened this punch by heating it with a torch to red, quenching, then tempering in the over for a few hours but I have not done this yet, and I am not sure it is completely necessary…

    Sizing Lead Cores – screw in the Lee die body in your press and lock it down with a locking ring (i assume you have one of these laying around)… drop in the die insert and make sure the wider opening is facing down! thread in the top pass thru punch, lock it in with its locking nut… put the bottom punch in the ram… lube up your trimmed lead boolit with lanolin (I have been using straight lanolin, but I know most cut it with castor oil, I just have been too lazy to do this yet, you can see the jar of lanolin in the first pic)… just get a tiny dab on your index finger and wipe it on the boolit, then place the boolit on the ram and push it thru… the die will self-center the lead boolit, but try to get it on the center of the punch as best you can as it will make it easier to push thru... you may have to lower the die body if you don’t feel the boolit being pushed all the way through… I have found that the lube you just put on your finger is enough for about 5 bullet lubings, then you have to dip your finger back in the lanolin jar…

    this step goes fast, when you are done you will have a pile of sized lead cores on top of the press inside the plastic bottle, when you are done remove it and dump them in a plastic container for the next step, core seating… the bottle will fit probably 250 cores in it without worries… thats enough for now, more tomorrow...

    so how much have you spent so far? $17 on a Lee die body, $10 for a 9mm drill bit, $10 for 12L14 round stock, and maybe $5 for bolts and nuts... better than a poke in the eye with a sharp stick, eh?
    Last edited by Cane_man; 05-25-2013 at 10:14 PM.

  5. #5
    Boolit Master Forrest r's Avatar
    Join Date
    Nov 2011
    Location
    NE Ohio
    Posts
    2,084
    Interesting, looks like all those do-dads kept you busy for awhile.

    I got kinda a dumb question. Why not just use a reloading press (you already have one) a 9mm shell holder for that press & a old used 38spl belling die (case expanding die) that can be found at any gunshow for $5 to $10 to open the 9mm case to accept the trimmed cast bullet (core)????

    I use a 44spl/mag belling die (case expanding die) on the trimmed to length 40s&w cases to enlarge them & make them able to accept the lead cores to make 45acps.

    I also use a 380acp belling die (case expanding die), a lyman with the round part sawed off to make it flat. It is used to enlarge a 40s&w case to be able to be used to make 44spls/mags. Simply drop a lead core (158gr 38 boolit) into a trimmed 40s&w case & run it up in a press with the modified 380acp belling die in it. The belling die will flatten/swage the boolit flat & expand the case walls @ the same time.

  6. #6
    Boolit Master
    Join Date
    Mar 2013
    Location
    seated with Him in the heavenly places in Christ Jesus (Eph 2:6)
    Posts
    1,192
    Quote Originally Posted by Forrest r View Post
    Interesting, looks like all those do-dads kept you busy for awhile.

    I got kinda a dumb question. Why not just use a reloading press (you already have one) a 9mm shell holder for that press & a old used 38spl belling die (case expanding die) that can be found at any gunshow for $5 to $10 to open the 9mm case to accept the trimmed cast bullet (core)????

    I use a 44spl/mag belling die (case expanding die) on the trimmed to length 40s&w cases to enlarge them & make them able to accept the lead cores to make 45acps.

    I also use a 380acp belling die (case expanding die), a lyman with the round part sawed off to make it flat. It is used to enlarge a 40s&w case to be able to be used to make 44spls/mags. Simply drop a lead core (158gr 38 boolit) into a trimmed 40s&w case & run it up in a press with the modified 380acp belling die in it. The belling die will flatten/swage the boolit flat & expand the case walls @ the same time.
    i am getting ready to explain this in step [5] core seating... i chose to use a Lee Universal Case Expanding Die to bell the mouth and seat the core... i will talk about it tomorrow, i am a little spent and me and Mrs. Bud Light need some quality time together , but i can see how your solution would work fine...

    edit: making the do-dads is half the fun
    Last edited by Cane_man; 05-25-2013 at 10:38 PM.

  7. #7
    Boolit Master Forrest r's Avatar
    Join Date
    Nov 2011
    Location
    NE Ohio
    Posts
    2,084
    Cool!!!

    Alls I'm saying is why not use the expander die that is made for the size core that your using? To open a 9mm case to .360 is very doable with nothing more than a shell holder & an old beat up 38spl expander die that costs $5. I'm opening a 40s&w case up from .401 to .430 witn no problem with a old $5 44spl expander die.

  8. #8
    Boolit Master
    Join Date
    Mar 2013
    Location
    seated with Him in the heavenly places in Christ Jesus (Eph 2:6)
    Posts
    1,192
    [5] Seat Lead Cores

    The next step to accomplish is to take the sized lead cores and seat them inside the annealed 9mm brass… this step is easy and you have no parts to fabricate, you just need to acquire the Lee Universal Case Expander Die, again from Leeprecision.com this is what it looks like:

    http://leeprecision.com/universal-ca...nding-die.html


    With this die you will “bell” or widen the case mouth to receive the lead core, and then push the core inside the case (seat it), and it looks like this:


    from left to right you have a 9mm shell holder (hopefully you already have this), case with belled mouth, a core placed inside case, the cored seated in the case, and the universal expander die…

    here is how it is used: put a case in the shell holder and adjust the die so that you flare out and bell the mouth so it can receive the lead core:


    now leave the belled case in the shell holder and drop in a core, drop it in so that the base of the boolit/core is facing up, then raise the case into the die so that the core gets pushed in and seated inside the case, just enough so that it is a little below the mouth, easy does it, like this:


    that’s it, this step is easy… now the seated cores are ready for swaging… i usually push the core in a little and see how deep it is, and do this 2 or 3 times until it is seated deep enough... after awhile you get a feel for it and you will know how deep it is by feel...

    the Lee Universal Case Expander die will set you back about $20 delivered, however it has punches that will expand any case, and you can use it for reloading as well… so this die can be used for any reloading or swaging that you will do and it is a good investment…

    total project cost so far: $42 from previous steps + $20 for expander die = $62

    next step is swaging, and more parts to make...
    Last edited by Cane_man; 05-26-2013 at 10:02 AM.

  9. #9
    Boolit Master
    Join Date
    Mar 2013
    Location
    seated with Him in the heavenly places in Christ Jesus (Eph 2:6)
    Posts
    1,192
    [6] Swage Cores

    Here you are going to actually start swaging, where the lead inside the case will be placed under pressure and expand the case diameter from 0.390 or so to 0.399… to do this you will have to fabricate a few more parts… here are the parts required:


    from left to right what you are looking at is: bottom punch, Lee die body (already have this), 0.395 die insert, 0.399 die insert, top “stop” punch, top punch lock nut (already have this), and the top ejection punch… now you need to make these in your lathe…

    bottom punch – this punch is made exactly like the bottom punch used for sizing the lead cores, it is 1.5” long and it fits in the ram like a shell holder… here you need to be careful sizing the nose of the punch, it needs to be about 0.350” and radius the edge and the point slightly… make the OD of the punch nose too big and you could wrinkle the case, make it too small and lead will flow up and around the punch and make a mess… take your time with this punch, and get a good polish on the nose area…

    die inserts – there are two inserts you will make, just exactly like the lead sizing insert… one insert has an ID of 0.395, and the other 0.399… here I am swaging in two steps to keep the forces down on my press so I don’t beat it up too bad… Corbin says to swage/size/draw no more than 0.005 at a time to keep forces/pressures from being excessive on a standard reloading press so I took this advice to heart with this project… normal swagers who use a real swaging press will swage in one step not two, so keep this in mind, and if you want to swage only using one step then have at it… whatever you do, you are final swaging to 0.001 under the final bullet diameter, so that is why 0.399 was used as the final swage ID based on a final bullet OD of 0.400 … to make the 0.395 die insert use a 10mm drill bit, and to make the 0.399 die insert use a X size drill bit… these are not common sizes and you can find just about any size bit you will need at mcmaster.com… you will have to lap these inserts to the correct ID, take your time and check often by putting the insert in the lee die body and pass thru punch and push through a lead core through it and measure…

    top “stop” punch – made similar to the top “pass thru” punch made in the lead core sizing step… dimensions are the same, the only difference is that now you need to drill through the bolt so the ejection punch can go through it… you are going to drill through a ¼” hole, take your time and step up to it… this grade 5 bolt is much harder on the lathe than the 12L14 is so use sharp bits and step up in small increments… once you are done drilling out this hole smooth out and polish the inside and you are done… for the lock nut you can make a new one or just use the same one you made for the top pass thru punch… one more thing, you dont have to turn down the bolt head to fit the soda bottle, i just turned down the edges some and polished it up, do whatever you want with it as it wont matter...

    top ejection punch
    – you are going to start with a 4” long 5/16” grade 8 bolt and turn it down to a diameter of 0.240 or so in order for it to fit easily and smoothly through the top stop punch… this can be a PITA turning down this diameter because the bolt will flex some while chucked in the lathe, so I did the first half of the bolt and then the second half trying to match up the diameters as best I could… these dimensions are not critical like the die insert IDs so just close enough is fine… the punch OAL is about 3.5” give or take a ¼”, so cut it off and part the cut end to this length… polish this punch real well and get a nice smooth finish, and slightly radius the edge of the nose… I used a small rubber washer with a ¼” ID up against the inside of the bolt head so that when you hammer the punch for ejection it would cushion it some when it contacts the top of the punch…

    alright, here is how you use these parts… take a case with a seated core and lube it up with lanolin (that is the jar next to the press), then place the case on the punch with the mouth on top of the punch…


    now you have to be careful here because you need to adjust the depth of the die body so that the press cams over at just the right time without over-swaging the case… so at first you push it in take it out and check with the mic, push it in take it out and check with the mic, etc. doing this little by little until your core gets sized correctly with the press camming over… easy does it here as it really does not take much force on your press handle to swage the core in one 0.005 increment… at the top of the stroke pause for a few seconds to let the lead flow and completely swage the case... when the press cams over the ejection punch will raise up, to eject the case hit the top of the ejection punch with a hammer (easy does it, little taps until you feel the case start to come out), lower the ram first to get it out of the way and then cup your hand over the mouth of the die body and you can catch it in your hand when it drops out:


    improvement alert
    - i can easily see the need for an auto eject for the press... it gets to be a pain in the **** hammering out the case after it gets pushed up for swaging… an auto eject will push out the case during the up stroke of the press and it looks fairly easy to make using some flat bar, threaded rod, and nuts/washers, do this and your thumb will like you (don’t ask me how I know this)… I am in the process of making this upgrade now, but it is not mandatory (credit to BT for this design):


    when the swaged case is finished it will be sized to within 0.001 of final bullet OD:


    the bullets are now ready for point forming, and most of the hard work is done... so this step has cost you another $10 for at least one drill bit, $5 for a bolts/nuts, and $0.25 for a rubber washer, new project total is $77.25 (or $87.25 if you make two swaging cores adding in another $10 for another drill bit)… not too bad at all

    hopefully tomorrow i can go on to post about point forming and final bullet sizing... its all downhill from here as the rest is easy peezy!
    Last edited by Cane_man; 05-27-2013 at 08:45 AM.

  10. #10
    Boolit Master
    Join Date
    Mar 2013
    Location
    seated with Him in the heavenly places in Christ Jesus (Eph 2:6)
    Posts
    1,192
    Quote Originally Posted by Forrest r View Post
    Cool!!!

    Alls I'm saying is why not use the expander die that is made for the size core that your using? To open a 9mm case to .360 is very doable with nothing more than a shell holder & an old beat up 38spl expander die that costs $5. I'm opening a 40s&w case up from .401 to .430 witn no problem with a old $5 44spl expander die.
    oh, i get you now... so what you are doing is eliminating core sizing, and just opening up the case mouth wide enough so the cast boolit lead core drops right in (without having to do a core seating step in the press)... nice! i like that, so you would need to find the right expanding die for whatever caliber your were swaging... duly noted, nice improvement

  11. #11
    Boolit Master
    Join Date
    Mar 2013
    Location
    seated with Him in the heavenly places in Christ Jesus (Eph 2:6)
    Posts
    1,192
    went to walmart and got me a $4 box in the fishing dept to box up the parts in, then went home and reloaded 50 in my new awesome possum 10mm reloading tray (he is selling these in the swapin/sellin section, they are a great deal and nice workmanship)...


    redneck swaging!
    Last edited by Cane_man; 05-26-2013 at 06:47 PM.

  12. #12
    Boolit Master
    Join Date
    Jan 2013
    Posts
    895
    Awesome and subscribed. I don't have much machining skills but not afraid, worked with cars and what not for years. Friend owns a professional machine shop that does most of the imports on the entire west coast. My brother is a cnc machinest by trade. I should of exploited my resources a long time ago

  13. #13
    Boolit Buddy

    Join Date
    Jun 2011
    Location
    Lebanon. Pennsylvania
    Posts
    462
    This has been great to follow except I have one discrepency, On the Cheap and You need to have a Lathe dont make any sense they cancel each other out.
    I would like to start doing this for 40 S&W brass to .45 Acp but do not know any one with even a drill press...

  14. #14
    Boolit Master
    Join Date
    Mar 2013
    Location
    seated with Him in the heavenly places in Christ Jesus (Eph 2:6)
    Posts
    1,192
    LOL, i know it assume you already have a small hobby lathe... but look at it this way, you can get the lathe for $300-$500, this is still cheaper than a $750-$1200 professional swaging system, and in the end you keep the lathe...

  15. #15
    Boolit Buddy
    Join Date
    Apr 2013
    Location
    West Central Fl
    Posts
    451
    Quote Originally Posted by newcastter View Post
    This has been great to follow except I have one discrepency, On the Cheap and You need to have a Lathe dont make any sense they cancel each other out.
    I would like to start doing this for 40 S&W brass to .45 Acp but do not know any one with even a drill press...
    Do a daily check on craigslist, newspaper ads, local flyers. Took me 6 months to find a lightly used 14X40 with lots of tooling for $700. I've seen 7X12's for as low as $175, that looked almost new.

    CC

  16. #16
    Boolit Buddy

    Join Date
    Jun 2011
    Location
    Lebanon. Pennsylvania
    Posts
    462
    Quote Originally Posted by Cane_man View Post
    LOL, i know it assume you already have a small hobby lathe... but look at it this way, you can get the lathe for $300-$500, this is still cheaper than a $750-$1200 professional swaging system, and in the end you keep the lathe...
    Even if I do score a good deal on a lathe my only other rebuttal is that I would still have to learn the tooling with no previous experience.

  17. #17
    Boolit Buddy
    Join Date
    Sep 2009
    Location
    Tennessee
    Posts
    360
    Thank you for sharing your adventure in swaging.

  18. #18
    Boolit Master
    Join Date
    Jan 2013
    Posts
    895
    Can't wait to see the point forming step. Just to be clear, does the top stop punch presses against the lead core and expands the brass casing?

  19. #19
    Boolit Master Forrest r's Avatar
    Join Date
    Nov 2011
    Location
    NE Ohio
    Posts
    2,084
    newcaster you don't need anything but a couple of common reloading dies/trimmers/bullet molds/sizing dies to make 45acp bullets out of 40s&w cases.

  20. #20
    Boolit Master
    Join Date
    Mar 2013
    Location
    seated with Him in the heavenly places in Christ Jesus (Eph 2:6)
    Posts
    1,192
    Quote Originally Posted by newcastter View Post
    Even if I do score a good deal on a lathe my only other rebuttal is that I would still have to learn the tooling with no previous experience.
    easy to learn, lots of youtube tutorials on how to do these basic lathe operations... i am a self taught home machinist and it probably took me a few weekends to learn the basics and that is all that is required for this project... and using a lathe for diddling around at home for various projects is just plain fun!

    i will add this, when you do get your lathe you will probably have to spend another $50-$100 for the tooling like a drill chuck for the tail stock, a live center, some drill bits, a few files, and some cutting tools...

Page 1 of 7 1234567 LastLast

Posting Permissions

  • You may not post new threads
  • You may not post replies
  • You may not post attachments
  • You may not edit your posts
  •  
Abbreviations used in Reloading

BP Bronze Point IMR Improved Military Rifle PTD Pointed
BR Bench Rest M Magnum RN Round Nose
BT Boat Tail PL Power-Lokt SP Soft Point
C Compressed Charge PR Primer SPCL Soft Point "Core-Lokt"
HP Hollow Point PSPCL Pointed Soft Point "Core Lokt" C.O.L. Cartridge Overall Length
PSP Pointed Soft Point Spz Spitzer Point SBT Spitzer Boat Tail
LRN Lead Round Nose LWC Lead Wad Cutter LSWC Lead Semi Wad Cutter
GC Gas Check