Ouch ! Pointy, mean little bugger scraping all the way out....
DoctorBill

|
   
   
|


|


Ouch ! Pointy, mean little bugger scraping all the way out....
DoctorBill


Ouch indeed!
I was checking up on your thread and see this at the top of the page so he wonders "What part of a gas check maker is this?" or "I wounder if that hunk of grit got caught in his checkmaker?" So reading back I see this came out of the checkmaker maker! Ouch again!
No fun that I 'm betting.
Take care.
Longbow
That looks like some sort of precious gem.
db, did you just post a pic of your kidney stone? :takinWiz:
My machinist friend, Gary, is out of town and I am getting a result I don't quite
understand, so I will ask all you ex-spurts.
I used my Harbor Freight Mini-Mill - as a milling machine - for the FIRST Time
yesterday. I had never 'milled' anything before....
I am Fly Cutting two pieces of Aluminum as blocks of the same dimensions.
Here one block of Aluminum has been faced on both sides using my Fly Cutter.
Going right to left with the Mill Head rotating clockwise viewed from the top.
What causes the cutter to start cutting on the right side of the block as I go
from right to left ? i.e. cutting on the back stroke ?
Feels like 1 - 2 thousandths deep.
Is my machine out of TRAM ?
If it is out of TRAM, it is going to be Hell adjusting it that fine....
No....checked it - fine to about 0.001" or less.
Have a look at our President when he doesn't get his way
youtube.com/watch?v=q3SFXQfE4kk
DoctorBill
PS - Cane Man - YES. That Kidney Stone was stuck in my Ureter for three weeks !
It is my trophy ! I worked hard to get that cute little monstrosity.
But it crumbled to small crystals after it had dried.....Oh Well.
Was like a chunk of really hard glass when came out.....Calcium Oxalate.
That's what you get for not drinking enough beer ! Guess I'd better start
making Beer again.....
Last edited by DoctorBill; 05-02-2013 at 01:10 AM.


Methinks you need a new workbench built a couple inches taller.Originally Posted by DoctorBill

Thanks for this thread. I follow your machine trials and tribulations. I own a Sieg C6 10x21 and want to go through many of these operations. Only threaded a couple times, threads fit nothing, drill bits tend to shift when first plunging in a centerdrilled piece, etc etc etc. Reading your threads help me get on the right path faster.
-S
WhiteRabbit - GOOD ! Lathe on ! The Milling Machine "bench" is low,
but it didn't cost much and it is moveable...I do what I can afford - I'm 70 and
cash is scarce. Tooling is what costs so much compared to the Machine you first buy.
I know that most of what I post here is old stuff to those with more experience,
but us newbies and inexperienced folk need help and LOTS of pictures...
That is why I come here.
I need a new project !
Spring is here and I have a lot to do with yard work and old automobiles
needing constant attention just to keep them running.
As Arnold, the terminator, said, "I'll be back....."
DoctorBill
BTW - Aluminum does 'work harden' so you might try annealing it BEFORE
punching out any disks - at least the stuff thicker than Pop Can material.
Last edited by DoctorBill; 05-03-2013 at 04:00 PM.
Tip for a bench that is strong and pretty.
Cheap home depot 2x4's. The cheap cheap cheap ones are less than 2 dollars a piece. and they LOOK like it too! But you can clean them up. Rip 1/4 inch off each side and now you have 1.5x3" dimensioned lumber that looks like you spent 4x as much on it. If you staple two pieces together you have a 3x3 that looks like you spent 8x as much on it. Cut to 3' pieces (or whatever height you need), rabbet out the middle and top, and you can sandwich another 1.5x3 in between to lock the front and back legs together. Using those as legs your benches will stand even if the house falls down around it.
like this:
except he used full 2x4's. Cut them to 3" and it will look professional.
and CHEAP!
Always scarce, isnt it? I noticed you have no QCTP on your lathe yet. Me either.
WhiteRabbit - I did make my own wood Lathe Bench which construction is somewhere on this forum.
I am losing track of which threads have what in them....
I used to make a lot of stuff (crude) out of wood.
And yes - I do have a QCTP - I just forget to use it....I don't use the Lathe that much.
"Grizzly"..................adapted to my 9x20 ENCO Bench Lathe
These are older photos - now everything is covered in oil and swarf chips....
DoctorBill
Last edited by DoctorBill; 05-03-2013 at 10:03 PM.
Just put the THIRD axis (Z) DRO on my Harbor-Freight Mini-Mill.
ebay for $38. Amazing.
Showed them to my machinist friend (hadn't seen them) and he was amazed
at the extremely low cost - so he ordered a 39" (one meter) one for under $50,
just to have it ! Works like the big EXPENSIVE ones.......
DoctorBill

DB it appears you are using that mill without any sort of bracing for the column, in that configuration it's about as rigid as a wet noodle! Mount an indicator as if you were going to tram the head but position the indicator to the front instead of either side then grasp the top of the column and tug on it gently (top of the column not the motor or the head) and I am willing to bet you can get a deflection of .010 or more with almost no effort at all! You really need to brace that thing if you plan to do any serious milling with it, a piece of heavy channel will help immensely but a solid table to mount the entire machine on with angled bracing from the top of the column to the table works even better. That big nut and tilting column is a gimmick and a very useless gimmick, it's touted as a feature of the mill when in fact it is an extremely weak point that is there not to make the mill more useful but to simplify production. It's way easier to cast that frame in two flat pieces that are then bolted together than to cast that shape all in one piece. The tilt function is useless with that short table travel so it's best to brace the column as solidly as possible, once braced the surface finish on your work will improve markedly and chatter/vibration will be GREATLY reduced!
OldRed - I know what you mean, but I have no idea how I would do that.
If you could show me with a picture or a drawing, it would sure help.
I had no idea that something so solid looking could move that much.
Side to side - or - back and forth - or - all of the above ?
It does chatter if I use a big diameter drill.
DoctorBill
Here are a few ways several people have done it, some methods are very effective and some not so good.
(I stole these pics off the 'net but I will try later to get a couple of the one I did for my buddy, my apologies if one of these machines belongs to one of our members here.)
This is the minimum I consider effective while the common method of just bolting a flat plate or channel to the back of the column and connecting to the base helps but not nearly enough,
That setup would help a lot but it really should extend all the way to the top of the column and farther to the rear of the mounting plate or bench top, this would of course require remounting the power box but that's simple to do.
Another very solid method but a bit more involved,
That one works well, I know because I have used an almost identical setup which turned out quite rigid but the trick to making it (or any method for that matter) work is a thick solid machine base mounting plate.
This one is a good compromise between the extremes but hard as it might be to believe that base plate really does need to be heavier, that particular set-up will reduce flex quite a bit but the one my buddy and I did we used first a 1/2" plate then went to a 1" thick plate in an effort to eliminate the flex and vibration. The 1/2" plate would probably work just fine if it's anchored solidly to a bench top but ours extended over the back of the bench it was mounted on and we got a surprising amount of flex from that 1/2" chuck of steel plate!
This last example would work MUCH better if the base plate was extended farther to the rear and the bracing closer to the top, as it is most of the flex would be gone but extending the base plate/bracing and using a heavier base would greatly reduce vibration. We discovered this after trying several configurations during our effort to reduce chatter and vibration.
Last edited by oldred; 05-07-2013 at 07:46 AM.
I will consider doing one of those !
Have enough on my plate at the moment !
It is GOOD to have a lot of projects to do - keeps one's mind working.
THE worst thing is NOT have things to do....use it or lose it.
I have a LOT of reloading to do ! 45-70's and 577-450's and 30-06's
for my son's Enfield. I want to show him how it is done.
DoctorBill
db, what up dog?!
i broke the timing chain on my lathe last week drilling out a Grade 5 bolt, but got the replacement in today and it is back up and running... blamed it on dull drill bits, so i decided to break down and get a drill doctor to sharpen up my bits, we'll see how it goes...


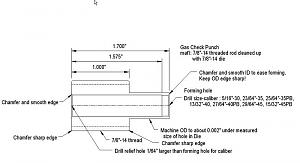
Not being a machinist I decided to build a prototype punch for some GC PB 40SW bullets. Now some 600 rounds later my prototype still works great. It worked so well I built some for my other calibers so I can use soft lead with aluminum checks in all my pistols. I used a short piece of 7/8-14 threaded rod for the punch and forming die, a piece of 1018 CRS makes up the punch die with a short forming pin attached inside it. I use 6" wide x .011" thick aluminum flashing cut into 5/8" strips on a guillotine paper cutter as stock. I punch, form, and eject a GC on each stroke of my low end Lee press. Anybody interested in this design?
^^^ sure, sounds interesting lets see what you got
Here's a photo of what it looks likeThe threaded rod is screwed into the top of the press and is the punch and forming die. The other part sits in the shellholder and is the die with the forming pin screwed inside
My drawings
 Posting Permissions


| BP | Bronze Point | IMR | Improved Military Rifle | PTD | Pointed |
| BR | Bench Rest | M | Magnum | RN | Round Nose |
| BT | Boat Tail | PL | Power-Lokt | SP | Soft Point |
| C | Compressed Charge | PR | Primer | SPCL | Soft Point "Core-Lokt" |
| HP | Hollow Point | PSPCL | Pointed Soft Point "Core Lokt" | C.O.L. | Cartridge Overall Length |
| PSP | Pointed Soft Point | Spz | Spitzer Point | SBT | Spitzer Boat Tail |
| LRN | Lead Round Nose | LWC | Lead Wad Cutter | LSWC | Lead Semi Wad Cutter |
| GC | Gas Check |


 Reply With Quote


