Snyders JerkyMidSouth Shooters SupplyInline FabricationRotoMetals2
WidenersLee PrecisionLoad DataRepackbox
Reloading Everything Titan Reloading
Results 1 to 19 of 19

Thread: 8" Lead Pot

  1. #1
    Boolit Buddy HotGuns's Avatar
    Join Date
    May 2005
    Location
    Arkansas
    Posts
    305

    8" Lead Pot

    For years I've been reading and watching some of the homemade lead pots in hopes to someday create a pot that I didn't have to load up all of the time. As most here know, using Lee 6 bangers will empty a 10 pound Lyman pot pretty fast. Eventually, I up sized and went to the 20 pounder, which was better for most bullets but still a bit quick when casting 850 grain lead bullets for my 50 BMG.

    Casting up lead ingots using a Lyman ingot mold, the little spigots on the bottom pour pots were just simply too small to get good looking ingots.

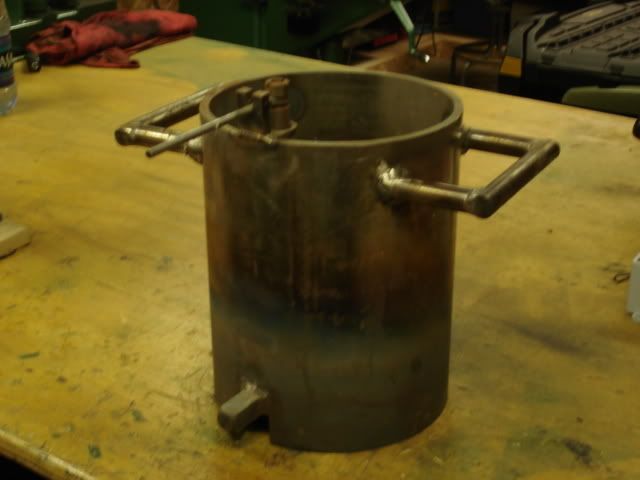
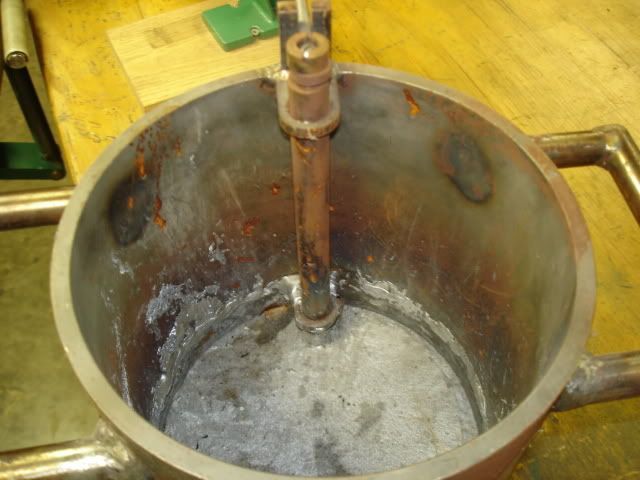
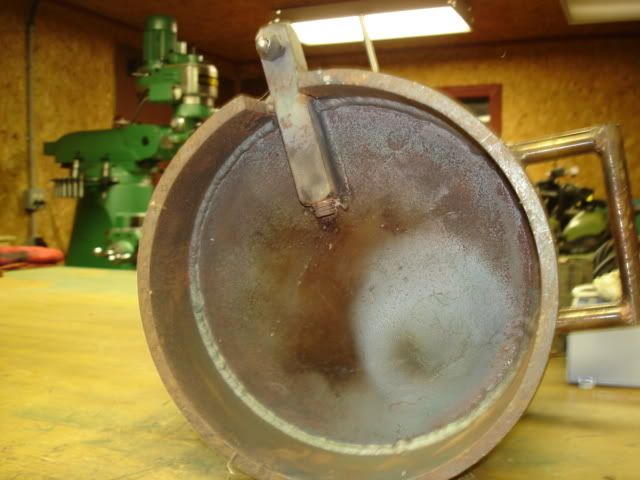
    So, I got some 8" scrap pipe at work and set about making a pot that would hold an estimated 300 + pounds of lead. It is a bottom pour pot with a spigot that I made from a piece of 3/4 key stock and welded to the bottom plate. The valve arrangement is somewhat of a takeoff from the Lee pots, but it works even better than I expected. One simply pushes the lever down, which lifts the valve out of the hole and allows the lead to go through the key stock and through the nozzle which I drilled out to 1/4 inch diameter. The nozzle is interchangeable, just in case in actual practice I needed to go up or down a size for best efficiency.

    So I had a welder friend of mine weld everything up. He being an avid caster also, I made two of everything, one for me and one for him for the effort of welding everything together.

    I use a turkey fryer burner running off of Propane and it works well.

    The valve performed beyond my wildest expectations and is very efficent...with almost zero leakage. What surprised me the most is that it is very fast acting. Push down on the valve and the lead instantly pours out, let up on it and it stops.

    Using this for pouring ingots has spoiled me to the point that I'll never use anything else again. I poured over 50 ingots just play around with it, to the point that I had to cool my ingot mold several times just to get the lead to harden.

    Since a picture is worth a thousand words here are some below.

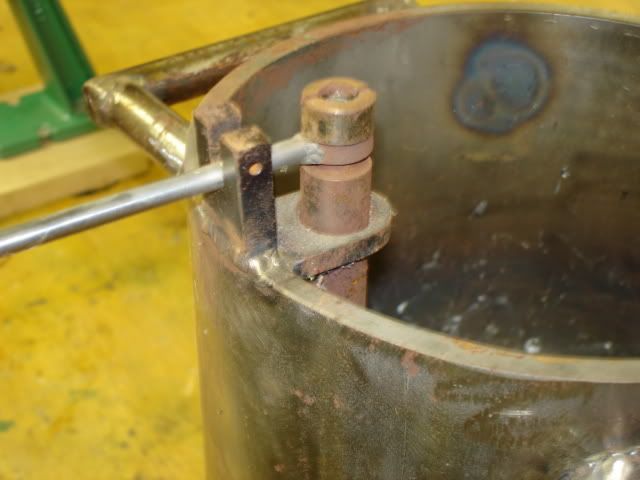
    Its not a hard project. WE got some scrap, squared up the ends with a lathe, flame cuts some 1/4 plate for the bottom, cut it to diameter on the lathe , drilled and tapped the key stock on the drill press and cut the valves stem and handle arrangement. I actually built to wings on top of the pot so as to pin the valve handle to it, but found that it wasn't needed, just the weight of the valve stem was sufficient to make things work. The nozzle is threading into the key stock so that different size nozzles could be used if needed.

    I am seriously contemplating building a 6 station nozzle to fit the Lee 6 cavity molds exactly.
    Would that be cool or what ?

    The pot...


    Upper Valve Stem arrangement
    Last edited by HotGuns; 07-24-2007 at 10:06 PM.

  2. #2
    Boolit Buddy HotGuns's Avatar
    Join Date
    May 2005
    Location
    Arkansas
    Posts
    305
    More pictures...

    Inside the pot...


    The bottom side of the pot...


    The bottom plate is welded about 2 inches uo into the pipe in hopes to conserve heat when placed on the turkey fryer. I think it works, filling the pot to the top with wheel weights will melt everything in it in around 20 minutes or so. The clips must be skimmed off asap or the sheer number of them will start absorbing too much heat.

  3. #3
    Boolit Grand Master


    Join Date
    Dec 2005
    Location
    Southwestern Ohio
    Posts
    8,456
    I hope that you have a STRONG turkey fryer to hold all of this weight up?!!

    Otherwise, I am extremely envious. Looks like a fine job.

    Please show us the turkey fryer in operation.

    Dale53

  4. #4
    Boolit Bub
    Join Date
    Sep 2006
    Location
    Tuscon AZ
    Posts
    52
    HotGuns

    sorta supprised that you are smelting, and casting from the same pot, most people i know have one for smelting/alloying in, and a good pot that they only put in pure lead/alloy for casting from.

    but hey what ever works for you.

  5. #5
    Banned
    Join Date
    Jan 2007
    Location
    Clatskanie, OREGUN
    Posts
    388
    Man my back hurts just looking at it Nice job!!!!

  6. #6
    Boolit Master
    Join Date
    Dec 2005
    Location
    Edmond, Oklahoma - that's N. of the Red River
    Posts
    638
    Your welder friend is a goodun dude! That looks to be 8" sch 40 and he welded the handles with enough heat to see it thru to the inside and his bead on the bottom plate looks nice!!

    Dave

  7. #7
    Boolit Master
    BD's Avatar
    Join Date
    Mar 2005
    Location
    Moosehead Lake
    Posts
    1,818
    I've been using that same setup, (much more crudely welded and with no bottom pour valve), for years. Two things I did to improve efficiency: Find a steel lid which fits ; and wrap the cylinder's sides with high density rock wool wired in place for insulation. I've found that tall narrow pots do an excellant job of making clean alloy if you hold the melt at 650 deg or so for 20 minutes while stirring and fluxing to give the crud time to float up to the top.
    BD

  8. #8
    Boolit Buddy HotGuns's Avatar
    Join Date
    May 2005
    Location
    Arkansas
    Posts
    305
    Knowing that it would be quite heavy when filled with lead, I "load" tested my turkey burner first. Since we figured it'd hold around 300 pounds of lead, I simply stepped up on my burner after first adding 2 lead bricks that weigh 35 pounds apiece. Then I jumped up and down on it. It held. I know its not the most scientific method, but it appears to work. Since I weigh 280, that plus an extra 70 pounds for a total weight of 340 lbs. it ought to be good to go, since I'll probably never let it get more than 2/3 full anyway.

    As for smelting, I would have to change the nozzle to actually fill molds with it. That 1/4" nozzle would fill one up to fast I think.

    My welder friend is an avid shooter/reloader. Just yesterday we put a bunch of rounds downrange in his new Custom Shop S&W .500. He had cast some 440 grainer's for it and it was quite fun to shoot and very accurate. After 2 cylinder loads I had to break down and use his padded shooting glove...as the web of my hand was getting a bit tender.
    Anyhow, he is a Nuclear Welder. He works at the local Nuke plant and he does that for a living. He knows what he is doing.

    I don't think I need additional insulation. Once the lead comes up to temperature, I turn back the throttle on the Propane and it seems to hold a constant temperature fairly well. I have contemplating making a lid, maybe I will one of these days.

    Being a bottom pour has its advantages as the metal will be fairly pure. Its also not as tedious as a ladle, which gets some of the impurities from the top when it passes through the top layer of crud.

    Although Ive only used it for ingots thus far, I'm still thinking that a nozzle that has 6 spouts spaced correctly for a Lee 6 cavity might be the way to go. If I do that, I'll need to build some sort of shelf for the mold to sit on while it gets the lead poured to it. I've been hashing it over, I think I can just cut a piece and weld it the right height to the side of my burner frame and call it good.

    I figure the pot weighs about 40 pounds...that why we put some gorilla sized handles on it. Although I don't really think we'll ever need to, if we ever did need to move it while it had lead in it, we could do that without fearing for our lives.

    The valve at the bottom is a simple arrangement.I The valve seat is just a 3/8 hole drilled though the bottom plate with about an 1/8 " 45 degree seat on it that I cut with a chamfer tool. The valve stem itself is a 1/4 radius, that sits on the angle. Its actually a pretty good seal, basically leak free. You notice that I used 2 brackets welded on the inside of the pot to align the valve stem to the seat. Using a radius instead of an opposing 45 angle on the seat allowed some misalignment when welding the brakets.

    At first, our valve stem had a .45 angle on the seat. We tested it with water, and it just wouldnt seal that well no matter what we tried. We even lapped the seat and the valve but if there is ANY misaligment at all it will leak and ours did.

    We scrapped that idea and recut the angle into a radius. Theoretically, the valve stem could be at a pretty good angle and still have 100 percent contact on the seat. Its hard to keep everything in perfect alignment when you are in cramped quarters welding.

    Any how, our problems with leakeage were cured with the radiused valve stem. We filled the pots with water and got zero leakage. We figured that since the viscosity of molten lead is much less than water that if we could get it to hold water then the lead would be no problem.

    After we got the pots built, we sandblasted them. I've been thinking of using some high tempature black paint on it just to keep the rust off, but Im not sure how it will stand up to the flame.
    Last edited by HotGuns; 08-11-2014 at 01:59 AM.

  9. #9
    Boolit Grand Master


    Join Date
    Dec 2005
    Location
    Southwestern Ohio
    Posts
    8,456
    HotGuns;
    It is obvious that you are a "thinkin' kind of man". You do good work! I am especially interested in your solving the potentially leaking valve problem. That is the kind of set up that a lot of us could use.

    I am still using an 80 lb pot (60 lbs working level) that is quite big enough for my use and works really well. Mine is also a welded up pot done by a welder friend who also made me a couple of 5 lb ingot moulds to go with it. Now, I have ½, 1, and 5 lb ingots. It makes it real easy to alloy in my casting pots.

    Thanks for sharing with us.

    Dale53

  10. #10
    Boolit Bub
    Join Date
    Apr 2007
    Location
    NC
    Posts
    43
    Very nice!

  11. #11
    Boolit Bub
    Join Date
    Dec 2009
    Posts
    54
    Old thread but still a good looking pot. I built something close, but want to modify it with the bottom pour. I PM'd in regards and am poting this to bring the thread back to the top for others to see.

    Glenn

  12. #12
    Boolit Master
    jdgabbard's Avatar
    Join Date
    Sep 2008
    Location
    Tulsa, Oklahoma
    Posts
    2,520
    Wow.... I'd hate for my turkey fryer to give out on that big dude... That'd be one heck of a clean up. Talk about a big pot...
    Currently looking for a Lyman/Ideal 311419 Mold - PM if you have one you'd like to get rid of!

    JDGabbard's Feedback Thread

    "A hand on a gun is better than a cop on the phone," Jerry Ellis, Oklahoma State House of Representatives.

    The neighbors refer to me affectionately as, "The nut up on the ridge with the cannon." - MaxHeadSpace.

    Jdgabbard's very own boolit boxes pattern!

  13. #13
    Boolit Master in Heaven's Range
    madcaster's Avatar
    Join Date
    May 2005
    Location
    Virginia
    Posts
    1,083
    Great job!
    The .30/06 Springfield,the ULTIMATE cartridge combat,hunting and target cartridge,a .45 single action and a good FLINTLOCK is all I need to be happy!

  14. #14
    Boolit Buddy
    Join Date
    Oct 2009
    Location
    Kalifornia
    Posts
    205
    This thread is in desperate need of photos!

  15. #15
    Grouchy Old Curmudgeon

    shooter93's Avatar
    Join Date
    Oct 2005
    Posts
    1,795
    PICS!!!!!!!!!!!!!!!!!!!!!!!...smiles.

  16. #16
    Boolit Master Digger's Avatar
    Join Date
    Apr 2009
    Location
    NorNevada
    Posts
    1,430
    Yes indeed...another vote for the pipe section ! ...mine is ten inch but not as nicely set up as HotGuns.
    Last edited by Digger; 05-07-2011 at 07:03 PM.

  17. #17
    Boolit Buddy
    Join Date
    Oct 2009
    Location
    Kalifornia
    Posts
    205
    Digger, I see handles and a spout, are you hand pouring from a 10" pot?

  18. #18
    Boolit Master Digger's Avatar
    Join Date
    Apr 2009
    Location
    NorNevada
    Posts
    1,430
    Hey there Rock , .. if only I was that strong !! , if you look a little closer you will see a rowel ladel #3 in the pic. Best money I spent for the process , (next to the burner !).
    When the lead gets down to a few pounds, go ahead and grab the pot and pour , works fine.
    sorry the pics are not closer detail.
    digger

  19. #19
    Boolit Buddy HotGuns's Avatar
    Join Date
    May 2005
    Location
    Arkansas
    Posts
    305
    WOW.
    This thread is over 3 years old and I still get asked questions about the pot. Since I have had a couple of computers and some of the links went dead, I'll repost the pictures of the pot but these are the only ones I have left.


Posting Permissions

  • You may not post new threads
  • You may not post replies
  • You may not post attachments
  • You may not edit your posts
  •  
Abbreviations used in Reloading

BP Bronze Point IMR Improved Military Rifle PTD Pointed
BR Bench Rest M Magnum RN Round Nose
BT Boat Tail PL Power-Lokt SP Soft Point
C Compressed Charge PR Primer SPCL Soft Point "Core-Lokt"
HP Hollow Point PSPCL Pointed Soft Point "Core Lokt" C.O.L. Cartridge Overall Length
PSP Pointed Soft Point Spz Spitzer Point SBT Spitzer Boat Tail
LRN Lead Round Nose LWC Lead Wad Cutter LSWC Lead Semi Wad Cutter
GC Gas Check