RotoMetals2Snyders JerkyReloading EverythingLoad Data
Titan ReloadingMidSouth Shooters SupplyLee PrecisionInline Fabrication
Wideners Repackbox
Page 17 of 29 FirstFirst ... 789101112131415161718192021222324252627 ... LastLast
Results 321 to 340 of 579

Thread: reloadable .32 rimfire brass

  1. #321
    Boolit Master
    Chev. William's Avatar
    Join Date
    Aug 2013
    Location
    Sun Valley, California
    Posts
    1,956
    Ndnchf,
    Perhaps a "Counter Bore" Bit or an aviation Rivet Trimming 'spot face' bit, which takes replaceable pilots, might be adaptable?

    W30wcf,
    I have talked to Buffalo Arms and we came to a mutually satisfactory solution.
    Shipping one pound would have cost about the same shipping and HAZMAT fees (about $60) as shipping the original Five pounds order, and I suggested some other solutions and they agreed to one of them, so I am satisfied.

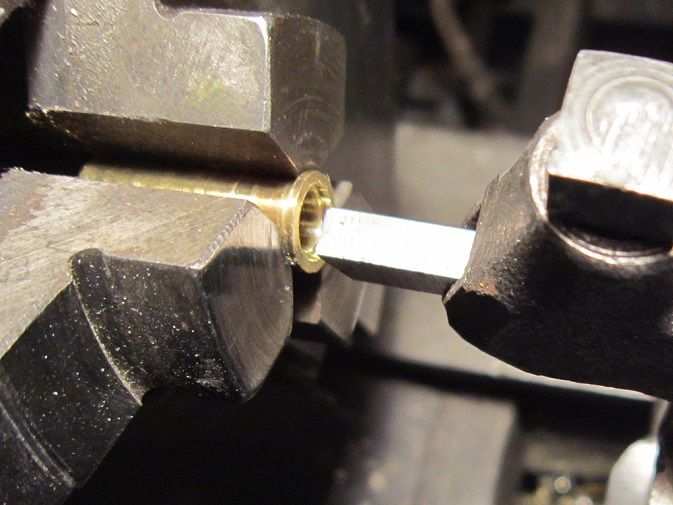
    Also, my "new old stock" Stevens 44 Center Fire Breech block, and my order of "44" pins and screws from "Muzzleloader Builders Supply", both arrived and I am happy to report some of the items fit as received, others are slightly larger than the holes they should go through but are within 'reaming' range to fit tightly for little lost motion in the action.
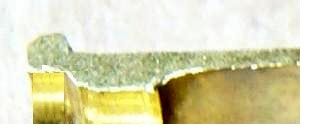
    - The Breech Block Pivot Pin and Pivot Screw fit the receiver holes tightly but are about .002 big for the Breech Block hole.
    - The Lever Pivot, same as BB Pivot, is slightly large for both the Receiver holes and the Lever I have.
    - The Hammer Pivot Screw fits the Receiver hole tightly, but I do not have a hammer yet to try.
    - The Trigger Pivot Screw does not fit the Receiver holes.
    - The firing pin retainer is very tight in the Breech Block and also the threads for it, so fitting may be needed later.
    - The Breech Block seems to fit my receiver well, side to side, and front to rear but the up and down will need to wait until I can work the Pivot Pin through both the Breech Block and receiver holes simultaneously.

    As to my two 1894 Actions, more delay as my Gunsmith's wife went into the Hospital Thursday. I do not know the cause nor the results.
    I believe other things are set aside in times of personal worry, and I agree with that.

    My 1915 action is on hold for the moment, waiting upon Pacific Tool and Gauge to complete my .250ALRM Roughing Chamber Reamer, to go with the Finish Chamber Reamer they did last year. I am not using the Finish Reamer until I can rough the chamber first, I do not want to dull or chip the Finish Reamer in a raw bore.

    I received the order of Swiss Black Powder from Buffalo Arms with one 'little' problem, they 'substituted' 1fg for the 2fg I ordered.
    I have already talked with Buffalo Arms and we came to a understanding on what will happen, so I am satisfied.
    This means I now have Swiss in 1fg, 3fg, 4fg, and Null-B to experiment with along with my previous stock of GOEX 3fg and Pryodex "CTG".
    I also have several types of modern Smokeless Powders I have used or planned to experiment with so I am now well positioned to do the necessary powder loadings for my .25 calibers and my .32 Calibers.

    I have a supply of .312" to .315" 90 grain heeled bullets in two designs, and a supply of .255" 51 grain Lead bullets along with some .25" Jacketed bullets. The experimental loadings will be made up when the weather here drys out and gets warmer as it is done on my back patio which faces to the North, not the Warmest nor calmest at the moment.

    I did buy a second 1915 Receiver, but it appears to have been 'Bubba' Repaired in the past, further inspections will wait until after the 18th when I can pick it up from my FFL dealer due to California Regulations. This one does NOT have a visible serial number nor other markings, has partially cleaned up weld at the body to lower tang joint cleaned up Braze at the body to upper tang joint, and a heavy boss at the end of the lower tang with a screw fitted between the two tangs, which are close to the same length as I remember it from when I saw it during filling out the transfer paperwork.
    For $45 plus $5 shipping and $89+ for the transfer, it was inexpensive; but may be unusable as is for a firing arm. Wall hanger maybe?

    In addition relative to my 'fire sale Lathe project', I won two auctions on Ebay for used replacement Quick Change Threading Gear Box detent handles so the 'crispy critter' ones can be relegated to the scrap bin. I am still looking for a 'quadrant' to replace the cracked one I have. I am reluctant to order an new one at he moment as the $269.00 plus shipping would limit my money for taxes at this time.

    Now Back to the 'mundane', getting ready for Tax Preparation, replacing shredded shelter canvas, Getting my dogs to Vet for annual checkup then getting their licenses renewed for the year. keeping ahead of the mushrooms popping up in my back lawn, etc., etc.

    Best Regards,
    Chev. William
    Last edited by Chev. William; 03-12-2014 at 05:03 PM.

  2. #322
    Boolit Grand Master uscra112's Avatar
    Join Date
    Jun 2006
    Location
    Switzerland of Ohio
    Posts
    6,337
    Yah, quote a lot of .22 reamer choices. I use a Lilja from PT&G for my target barrels.

    Click image for larger version. 

Name:	chamber dimensions chart.jpg 
Views:	59 
Size:	25.5 KB 
ID:	98931

    A small boring bar would do the rim recess, of course, but harder to get depth right.
    Cognitive Dissident

  3. #323
    Boolit Grand Master uscra112's Avatar
    Join Date
    Jun 2006
    Location
    Switzerland of Ohio
    Posts
    6,337
    If Favorites are like Model 44s, the receiver is malleable iron. (I just drilled some holes in my bitza, and that's what the chips came out like). Carbon content so high that any weld attempt makes the weld and surrounding metal hard and brittle as glass. I'd have to get out my references, but as I recall you can't even anneal it, the way you can steels.
    Cognitive Dissident

  4. #324
    Boolit Master
    Chev. William's Avatar
    Join Date
    Aug 2013
    Location
    Sun Valley, California
    Posts
    1,956
    Very high Carbon content? I wonder if it responds to Welding like 'Chilled Iron' As used by the Railroads and Street Cars of the 1880s and 1890s. Iron Casting that had treads and flanges cast against 'heat sinking' inserts (Chills) in the sand molds. They gave really long service life but were so hard they were considered unmachineable at the time; cleanup or contour correction was done with Grinding and was time consuming.

    I had to anneal some Mexican Cast Wheel Blanks (for 7.5" gauge Models) that were made form melted Auto Engine blocks, Complete with the 'internals' still present. They were 'Cutting, or rather abraiding, H.S.S. and Carbide Tooling bits without raising a chip, so I made a small 'bonfire' out of heavily oil soaked scrap wood in a 'fire pit', the wheels went to 'White Heat for a time then I waited until the coals had burned completely to ash and cooled before removing the wheel castings, they then would machine and yield short Blue chips off Carbide tooling, but would machine, and still lasted well in service.

    I would expect Such Materials to require heavy preheating, maintaining heat during and after welding for a very slow cooling process to get workable welds. Trying TIG or Arc welds would leave most of the workpiece 'cool' with a white hot weld zone quickly 'quenched' so it would be Very Hard after welding, and brittle to boot. By the way, my the machining was done on a used "EMCO Maximat Compact 9 Lathe/Mill" that my Father 'mumbled' at because a previous owner had employed it in Production with abrasive cuttings left on the bed, it has a .008" dip in the ways from about 4" to 9" from the spindle nose. Makes for 'strange contours' on turning projects if not compensated for. I have not used it now since about 1990, and the Motor Capacitors are in need of replacement again, the Motor start current trips the Circuit Breaker for the Garage just from the Chuck inertia. Dad was a Precision Parts Inspector for most of his working life that I know of, but had machining experience from before I was born. We have found records that indicate he worked for "Winton Motors" in Detroit around 1920, as that is where the Census recorded him, and his work history on Security Questionnaires copies we found support this.
    Side note: I am using some of the unmachined wheel castings as 'ballast' in my Ram50 Work truck to smooth the ride. About 100 lbs of them near the tailgate did wonders for the ride of the empty truck, it has a roughly 2000lb load capacity on leaf spring rear suspension.
    Best Regards,
    Chev. William
    Last edited by Chev. William; 03-12-2014 at 05:19 PM.

  5. #325
    Boolit Master
    Chev. William's Avatar
    Join Date
    Aug 2013
    Location
    Sun Valley, California
    Posts
    1,956

    Reamer dimension choice Queation:

    Quote Originally Posted by uscra112 View Post
    Yah, quote a lot of .22 reamer choices. I use a Lilja from PT&G for my target barrels.

    Click image for larger version. 

Name:	chamber dimensions chart.jpg 
Views:	59 
Size:	25.5 KB 
ID:	98931

    A small boring bar would do the rim recess, of course, but harder to get depth right.

    Uscra112,
    Hmm... have you considered the "22 Frieland MG" Spec. reamer? Base =. 2242", mouth = .224", case body length = .600" sound like a good fit for the PTL blank body.
    Best Regards,
    Chev. William

  6. #326
    Boolit Master

    Join Date
    Mar 2009
    Location
    Fredericksburg, virginia
    Posts
    1,347
    W30wcf - what you describe sounds like the best way to go for a repeater. No doubt it is easier to trim .010" off the rim than cut a notch. To cut my notch I set the case in a vertical mill and make a simple .015" plunge cut with a small end mill. My thought process for going with the notch was two-fold:
    1 - I wanted the .22 blank rim to be flush with the .32 rim so I can safely compress BP without putting undue pressure on the .22 rim. While I have not made it yet, I want to make shell holder (similar to the depriming stand I showed earlier) to use specifically with the compression die. My idea is to machine a recess for the .32 case to sit in like the depriming stand, but not drill a hole through it. I would machine a small relief ring about .020" below the area where the .22 blank RIM will be. This would leave the bottom of the shellholder supporting the .32 rim AND the center of the .22 blank, but leave the .22 blank rim floating. Then with BP added and the compression plug brought down, the .32 case would be supported and the center of the .22 blank would be supported to keep it from being pushed out of the .32 case, while allowing the .22 rim to float, alleviating the danger of pressure being applied to the .22 rim and setting off the charge. I know it normally takes a sharp blow, not steady pressure to set it off, but I don't want to take any chances. This has been kind of hard to explain, but I hope you get the idea.

    2 - my other thought for keeping the .22 blank rim flush with the .32 rim was to provide support for the otherwise exposed .22 rim in case of a rim blow-out. Perhaps not a big concern with just a .22. But when loaded with a larger smokeless charge, I thought there might be the possibility of a blow out. Using a notched .32 rim provides at least nominal support for most of the .22 rim. The notch is located at the 6 O'clock position. If a rim blow out were to occur here, the gases would be directed down into the action, rather than up towards my face. This may not be a realistic concern, but I'm charting new territory here, and want to be safe. Did I mention that I'm a safety engineer by trade?

    As has been mentioned, there are a number of different ways to cut the .22 rim recess. I have a system that works well for me. I'd like to see photos of how you guys are doing it.

  7. #327
    In Remembrance w30wcf's Avatar
    Join Date
    Apr 2005
    Location
    Erie, PA
    Posts
    1,604
    ndnchf,
    Great ideas.
    Cutting the recess .04" deep so that the .22 rim sits flush with the .32 cartridge rim sounds like good idea but I would suggest that after converting one case, that you section it to see how much case is left at approx. 45 degrees below the outer rim of the .22 case. The .22 rim thickness is just .010" less than the .32 (.05 - .04).

    Since a .22 LR cartridge develops 25,000 psi and the .32 operates at around 1/2 that with normal loads, there is no danger of the rim blowing out. (Assuming the blanks meet the industry standards.)

    There is very little pressure on the base of the rimfire when compressing black powder. The early rimfire .32's were loaded with b.p. and compressed. The factories would not have done that if they did not feel it was safe. The .32 rim fire does have a bigger rim though.

    VISE TEST -
    I just had an idea to test the strength of the rimfire case head. I took a .225" H&I die with the ejector pin removed and placed a .22 blank into it. I put the unit into a vise and applied pressure to the .22 case head.....a lot of pressure....enough so that the grooved vice face made some faint marks in the .22 rim. It did not fire.

    w30wcf .
    Last edited by w30wcf; 03-08-2014 at 11:41 AM.
    aka w44wcf
    aka Jack Christian SASS 11993 "I can do all things through Christ who strengthens me." Philippians 4:13
    aka John Kort
    NRA Life Member
    .22 W.C.F., .30 W.C.F., .44 W.C.F. Cartridge Historian

  8. #328
    In Remembrance w30wcf's Avatar
    Join Date
    Apr 2005
    Location
    Erie, PA
    Posts
    1,604
    Cutting the recess for the .22 rim.....

    So far, I have converted 5 cases for testing purposes. Using a blank tool bit, I adjusted the tool post for the diameter and required depth and then set the carriage stop. It was then a simple matter to back off the carriage, remove the modified case, place another into the chuck and move the carriage forward to the carriage stop, then repeat.

    Once set up it, took a bit less than a minute to modify a case.


    w30wcf
    Last edited by w30wcf; 03-08-2014 at 03:03 PM.
    aka w44wcf
    aka Jack Christian SASS 11993 "I can do all things through Christ who strengthens me." Philippians 4:13
    aka John Kort
    NRA Life Member
    .22 W.C.F., .30 W.C.F., .44 W.C.F. Cartridge Historian

  9. #329
    In Remembrance w30wcf's Avatar
    Join Date
    Apr 2005
    Location
    Erie, PA
    Posts
    1,604
    RANGE REPORT

    Yesterday the temperature finally climbed into the lower 40's and it was a day with lots of sunshine.
    So...I headed to the range to test the converted .32 LC cases for accuracy.

    I was using the .91" case with the 31-090A bullet in my 1892 Marlin .32 loaded with the Duo-Fast Power Level 3 blank.

    I set up a target at 25 yards with the chronograph in front of the bench. I was very happy to see that the Number 3 blank provided good accuracy. Average velocity of 10 rounds was 978 f.p.s. High - 1014 / Low - 947


    w30wcf
    aka w44wcf
    aka Jack Christian SASS 11993 "I can do all things through Christ who strengthens me." Philippians 4:13
    aka John Kort
    NRA Life Member
    .22 W.C.F., .30 W.C.F., .44 W.C.F. Cartridge Historian

  10. #330
    Boolit Buddy kootne's Avatar
    Join Date
    Dec 2013
    Location
    Libby, Mt.
    Posts
    426
    Hi all,
    w30wcf, glad you are getting accuracy with the nail gun blanks, that was on my list to try today. The weather finally mellowed a little but my back went on strike today so not sure I will get out. I came at solving this .32rf from an aspect of a black powder cartridge shooter (which I will always be) so it took me a while to get my head around the idea of the blank being ignition AND power. I was messing around in the garage the other day shooting into a chunk of firewood just to see how long a case will last and I don't know if it will ever wear out. That was with a #3 level .22 blank.

    I am reading how you guys are doing these things and I am envious of ndnchf and his pictures. I still don't have that process grasped. Anyway, I thought I would give my current thoughts and the processes I am using;

    trimming to length; I have a small 5" 3 jaw chuck and the jaws have several notches in them. A case can be set in with the rim in the first set of notches and clamped with the mouth end sticking out. I part them off with a threading tool turned so the left edge is perpendiculer to the case. This is fast and cuts very free. I folded up a couple trying to use a parting tool but the threading tool doesn't do this.

    sizing; I made up a setup to use my old 16" shaper as a case former, press 'em in, press em' out at 17 stokes/minute.

    trimming head/ thinning neck; I made a fixture out of 5/16" drill rod with 3 diameters. The first diameter slips inside the reformed case and acts as pilot/support. the next diameter is .298" with a tapered transition to the first diameter. the last diameter is 5/16" with a 90 degree shoulder to the .298' diameter. This is the length stop. A .130" hole is drilled lengthways through the thing for a 1/8" pin which is used to tap the case back off. This fixture is held in a collet in the lathe. The case is pushed onto the fixture with the tailstock. I put a faced off rod in the drill chuck of my tail stock to get enough length to reach over the carraige. I can slide the tailstock and "bump" the case against the rim to press it on the fixture. I then machine the bulge at the case head and the the bulge at the case mouth (created by the .298" step) to .317" with a small parting tool. This gets me two cuts with one setup. When done, I stick a length of 3/4" rod through the spindle and tap the 1/8" rod to knock the case off the fixture.

    Drilling for the blank; I am using a stepped drill bit previously described which does everything in one shot.
    I hope I was able to convey the operations in an understandable way, I know not every one will do it the same but always good to have multiple choices and pick the best one best suiting your situation.

    Regarding my current thoughts on the rim/firing pin clearance I made a firing pin as suggested by ndnchf that is cut away on the bottom so it can only hit a .22 rim, thus no relieving is required. I still think that is my biggest "ah-ha" moment gleaned from this thread. Thanks
    kootne

  11. #331
    Boolit Master

    Join Date
    Mar 2009
    Location
    Fredericksburg, virginia
    Posts
    1,347
    w30wcf - great idea on the vice test, that makes me feel a little better. Glad to see the very good accuracy from the #3 Duo-Fasts. That's very encouraging. I sectioned a discarded .32XL case that I had screwed up the hole on. This was made from 327 Federal Magnum brass that started out at .334" at the head. After swaging and turning the head down to .318" I wanted to see how much meat was left. I was glad to see that it is still thick enough for this use. But it also shows how much meat remains around the .22 rim recess. I have 20 of these cases that I've fired a couple times with no ill effects.


    I just finished making 20 more .32XL cases. I haven't done the .22 pockets yet, but the cases are all formed, reamed and ready otherwise. I may try cutting the rim recess using the carriage as you described. I went to a local gun show this morning, but found little of interest, except one thing. I bought a box of 50 327 Federal Magnum ammunition for $16. That's not much different than buying empty brass, when it can be found. I will of course pull the bullets, dump the powder and use them to make .32XL brass.

    kootne - thanks for sharing your methods and techniques. Would like to see some pics if you can get some. I use a 10+ year old digital camera and have a couple of add on lens magnifiers I use to get the close up shots. I then crop out all but the subject. Most of my pics go on photobucket and then I link them in here. Its quite easy once you get the hang of it.

  12. #332
    Boolit Master
    Chev. William's Avatar
    Join Date
    Aug 2013
    Location
    Sun Valley, California
    Posts
    1,956
    Kootne,
    Very Good Description of your process and tooling to make cases and .22 'primers'. Your use of BP will bring others to enjoy this hobby after seeing your shooting in action.
    Thank you for Sharing.
    Best Regards,
    Chev. William

  13. #333
    Boolit Master
    Chev. William's Avatar
    Join Date
    Aug 2013
    Location
    Sun Valley, California
    Posts
    1,956
    Ndnchf,
    Nice photos of your sectioned case.
    I am curious though as to the measurements of that case.
    It appears that the Web of the case is about four times the original rim thickness. And the cut for the .22 rim is about one third the original rim thickness.
    IF the original rim is .050", then it would seem the .22 cut is shallow.
    IF the .22 cut is .045", then it appears the original rime is about .135" which doesn't seem reasonable for a production .327FM case.
    What are the actual measurements of the sectioned case?
    Best Regards,
    Chev. William

  14. #334
    Boolit Master
    Chev. William's Avatar
    Join Date
    Aug 2013
    Location
    Sun Valley, California
    Posts
    1,956
    W30wcf,
    Very Nice Target Results from the Duo-Fast #3 PTL and 31-090A bullet in your '.32 Long' .91" Adapter cases. I will hope my own rifles shoot as well eventually.
    This lets me know that accurate results ARE possible, I just need to do my part well enough.

    Perhaps more practice will get me there again, the last outing to the range, I fired my M1 Carbine at 100yards OFF Hand but did not get targets like yours. Stock USGI Iron sights and 71 year old eyes seem to combine to make me less accurate than in my youth.
    Best Regards,
    Chev. William

  15. #335
    Boolit Master

    Join Date
    Mar 2009
    Location
    Fredericksburg, virginia
    Posts
    1,347
    Chev - very observant of you. I had forgotten that this was one of the first cases I made, and early on I was letting the .22 blank stand proud of the .32 rim. I laid a .22 Duo-Fast in the sectioned case half and the .22 rim is about .015" proud of the .32 rim. After I made about 10 cases I decided to go back and drill them deeper so the .22 rim was flush or a couple thousandths below the .32 rim. The sectioned case I messed up and started drilling the hole too large, so it was set aside. I really didn't want to section one of my good cases, so I just grabbed this one. So its not the best example, but it did show me that the base area was still thick enough, and that is what I was concerned with.

  16. #336
    In Remembrance w30wcf's Avatar
    Join Date
    Apr 2005
    Location
    Erie, PA
    Posts
    1,604
    kootne,
    Thank you for the explanation of your conversion process. As far as shortening the case, are you placing the mouth of the case over a mandrel in the tail stock for support during the cutting process?

    I would have a bit of a concern over using the #3 blank with a case full of b.p. That will raise pressures due mostly to the reduction in case capacity and additionally the added pressure of the b.p. Personally, I would either use a b.p. blank or an empty #3 blank case to ignite the b.p. charge. Stay safe.....

    ndnchf,
    Thank you for the sectioned case pic. As Chev. William noticed, I too thought the counterbore was not .04" deep. Even so, looks like there would be enough case left. Here's an approximation of the .04" recess....


    I added a pic to my previous post describing the method I use for making the counterbore.

    Chev. William,
    My target was at 25 yards and made from a solid rest. If I were to fire offhand at 100 yards as you did, I would be lucky to keep them in a 9" circle.......

    w30wcf
    Last edited by w30wcf; 03-08-2014 at 03:21 PM.
    aka w44wcf
    aka Jack Christian SASS 11993 "I can do all things through Christ who strengthens me." Philippians 4:13
    aka John Kort
    NRA Life Member
    .22 W.C.F., .30 W.C.F., .44 W.C.F. Cartridge Historian

  17. #337
    Boolit Master

    Join Date
    Mar 2009
    Location
    Fredericksburg, virginia
    Posts
    1,347
    w30wcf - thanks for the pic of your lathe bit. I was just going through my bits to pick one out. It looks like yours is a new, unground blank. That makes it easy.

  18. #338
    Boolit Buddy kootne's Avatar
    Join Date
    Dec 2013
    Location
    Libby, Mt.
    Posts
    426
    w30wcf, Here is picture of my case trimming set up you requested. Rim is in 3rd notch, not 1rst as I previously posted from faulty memory.
    Click image for larger version. 

Name:	.32rf 004.jpg 
Views:	49 
Size:	44.2 KB 
ID:	99012
    Hope that is a 1000 word picture
    kootne

  19. #339
    Boolit Buddy kootne's Avatar
    Join Date
    Dec 2013
    Location
    Libby, Mt.
    Posts
    426
    Quote Originally Posted by w30wcf View Post
    kootne,
    Thank you for the explanation of your conversion process. As far as shortening the case, are you placing the mouth of the case over a mandrel in the tail stock for support during the cutting process?

    I would have a bit of a concern over using the #3 blank with a case full of b.p. That will raise pressures due mostly to the reduction in case capacity and additionally the added pressure of the b.p. Personally, I would either use a b.p. blank or an empty #3 blank case to ignite the b.p. charge. Stay safe.....
    w30wcf
    It has come up before about some of my loads. Just to be acurate, my black powder loads are put up using CCI noise blanks, not level 3 nail gun blanks. To be honest, I don't know the relative power difference between the noise blanks and the nail gun blanks. I appreciate concern for safety and hopefully have expressed that in practice and on this forum. I have a picture here, 2 rifles, same action except the .32 has .200" thick sidewalls vs. .250" for the .40/70. All the locking components of both will interchange. So I think I am safe to assume the weak link will be the modified brass and I see no indications that the .22 case changes. With level 3 nailgun blanks the .32 case does not expand at the mouth. With a .22 noise blank + 8 grains of Goex 3f the mouth will expand enough the bullet will slip fit so I know there is more pressure, but get no leakage or swelling/distortion of the primer blank case head. So I am comfortable with the load in my gun only. Most other actions do not have anywhere near the strength of a 1-1/2 rolling block and you are right, shouldn't use my BP load in one of them.
    kootne

    well, no picture is showing up
    Last edited by kootne; 03-12-2014 at 06:49 PM.

  20. #340
    In Remembrance w30wcf's Avatar
    Join Date
    Apr 2005
    Location
    Erie, PA
    Posts
    1,604
    ndnchf,
    Yes, it is just an unground blank tool bit.

    kootne,
    Thank you for the pic.....it is worth a 1000 words Looks like a great set up. Your rifle is pretty strong compared to others chambered for the .32 LC and as you said, it wuld be best not to use your bp load in those. I have seen pics of the CCI noise blanks but have not had any specimens to dissect.

    w30wcf
    aka w44wcf
    aka Jack Christian SASS 11993 "I can do all things through Christ who strengthens me." Philippians 4:13
    aka John Kort
    NRA Life Member
    .22 W.C.F., .30 W.C.F., .44 W.C.F. Cartridge Historian

Page 17 of 29 FirstFirst ... 789101112131415161718192021222324252627 ... LastLast

Posting Permissions

  • You may not post new threads
  • You may not post replies
  • You may not post attachments
  • You may not edit your posts
  •  
Abbreviations used in Reloading

BP Bronze Point IMR Improved Military Rifle PTD Pointed
BR Bench Rest M Magnum RN Round Nose
BT Boat Tail PL Power-Lokt SP Soft Point
C Compressed Charge PR Primer SPCL Soft Point "Core-Lokt"
HP Hollow Point PSPCL Pointed Soft Point "Core Lokt" C.O.L. Cartridge Overall Length
PSP Pointed Soft Point Spz Spitzer Point SBT Spitzer Boat Tail
LRN Lead Round Nose LWC Lead Wad Cutter LSWC Lead Semi Wad Cutter
GC Gas Check