Does anyone know where or who makes paper patching templates. I also see some of your guys photos of paper patched bullets and it looks like they were printed out on a computer.

|
   
   
|


|


Does anyone know where or who makes paper patching templates. I also see some of your guys photos of paper patched bullets and it looks like they were printed out on a computer.
I keep trying to stay afloat but can't help from shooting holes in my own boat.

That would be me. Mine are shaped to match my tapered boolits. Others also print theirs but I seem to have done most of the posting of photos of them. Cutting them out with scissors is somewhat painful. One day I'll build a shaped punch for the job. I design the patch profile on CAD using measurements of the boolit to be patched. That works for dry patching but wet patching has to take into account wet expansion which is a correction that gets done after the designing.
Rest In Peace My Son (01/06/1986 - 14/01/2014)
''Assume everything that moves is a human before identifying as otherwise''
How did you come up with your measurements? Also may I ask what calibers you load for?
I keep trying to stay afloat but can't help from shooting holes in my own boat.

Cut a strip of paper 1" wide.
Take a casting and roll the paper around it twice. Where the ends meet, that is where you make your angle.
I use venetian blind pieces. Our cats like to go in the windows and on each window several pieces of blind fall loose. The blinds are vinyl.
Cut one end of the blind piece in a 45* angle.
Take the rolled paper on the casting, and then cut 45* angles opposite each other. This will give you an over lap when wet.
Take the rolled paper, and lay it on the venetian blind piece. This will give you both ends. Cut the other end.
You now have a template.
Now, to make it fit.
Take a patch, soak it, and roll it on the casting. I use a cigarette roller. You can see how much further the paper goes. Trim the blind piece the amount to make the patch fit.
Soak another one, trimmed to the length of the cut blind piece. Soak it, wrap it, and see where the patch lines up.
Now, I wrap .30s and .303 Brits. I size my prime castings to .308, then wrap twice with lined notebook paper, or computer printer paper. When dry, these I size to .309. My .303, I size to .314. A lot of Enfields need .317, but the patch goes to that size, unsized.
You will have to find your size, but that is how I do it.
Works well for me.
I will have to try this. I read in the paper jacket about setting up a paper cutter to cut patches. I know where I can get one and look forward to trying it.
I keep trying to stay afloat but can't help from shooting holes in my own boat.
At the moment I load for 303 Brits. Each one has its own boolit and patch. I hold the casting in a fold of the intended paper then measure the diameter at the front and again at the base then the distance between those points. I then calculate the segment length at those two points then use CAD to work out the patch profile. I hope I didn't make it sound too simple - it's not so simple for me! But once I got it worked out it works a treat - for dry wrapping. For wet wrapping, I use the same method then wrap wet. I measure the overlap top and bottom then adjust the profile. The tail or skirt in my case is pretty easy. I just do an offset with CAD.
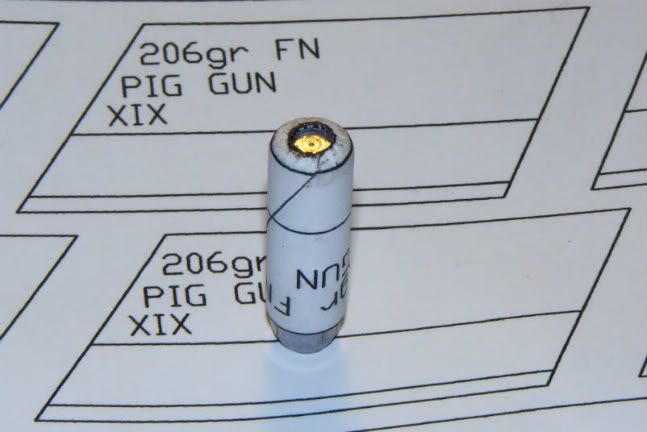
Here you can see the curve. It's essentially two wraps of a truncated cone. The lines assist with alignment.
This one as you can see is for my pig gun and it uses my XIX mold. As said before, it's a pain cutting out these things so volumes are low. (It's not like I shoot many pigs anyway. Like none so far).
Last edited by 303Guy; 12-10-2011 at 05:13 AM.
Rest In Peace My Son (01/06/1986 - 14/01/2014)
''Assume everything that moves is a human before identifying as otherwise''

I cut mine on a paper cutter. Gave up on the templates. Lost too many. Now I record the length need for each bullet, and set a dial caliper to that dimension and use the sharp points on the ID end to mark my paper. I can easy cut 500 patches in less than an hour that way.
45 AUTO! Because having to shoot someone twice is just silly!


I use the paper cutter too, in a manner similar to Paul Matthews. I say similar because I found it too much of a pain to use the wooden angle guide, and often the bottom layer of paper would slip under the guide. My solution has been to mark patch angles and length with painter's tape on the cutting platform itself, and just align the paper with the tape carefully.
On some boolits, my wet-patch needs to have different angles cut on the ends to accomodate the taper and still have the patch ends meet parallel. This requires cutting the paper so the long grains go across the patch (in-line with the bore) and pulling the wet paper tight for a snug patch. Take Docone31's description of the process for determining patch length and triple it. It's a pain, but once you figure it out for one particular boolit, paper, and process, you can make hundreds of them and not have to do it again for a long time.
Another tip, figure which direction of the sheets you're going to cut, mark your patch width divisions on the sheet, an staple a stack of five sheets together carefully, then staple between each division so when you slice out your strips with the paper cutter, you have five strips stapled together. Start whacking out your patches with the paper cutter starting from the un-stapled end, working toward the staple. This keeps you patch lengths even and lets you cut five at a time.
Gear
Ditto on using the paper cutter. Once you start getting tight groups, you can't seem to load enough PPCB for all the experiments you dream up. The paper cutter helps with that addiction!
Best regards,
CJR

I no longer contribute to this forum.
Last edited by MBTcustom; 02-13-2018 at 02:18 PM.
Precision in the wrong place is only a placebo.
I no longer contribute to this forum.
Last edited by MBTcustom; 02-13-2018 at 02:18 PM.
Precision in the wrong place is only a placebo.
I wish the book Ii just got had as many photos. Thanks because it answers a lot of questions for me.
I keep trying to stay afloat but can't help from shooting holes in my own boat.
Anybody else think this would make a good "sticky" as long as Goodsteel promises not to delete his photos?
Gear

Gear, I think it meets all the requirements for stickification
with ONE caveat....
I want Goodsteel to do a pictoral on his "Pointy Pencil" wrap
Hey, GS, you wrap 'em all dry?

I think that It would make a great Sticky.
Brodie

Same here on the sticky!
When you want a sticky, it sure helps if you let the staff know directly, rather than just posting it on a topic. We don't see every post, by a long shot!
The solid soft lead bullet is undoubtably the best and most satisfactory expanding bullet that has ever been designed. It invariably mushrooms perfectly, and never breaks up. With the metal base that is essential for velocities of 2000 f.s. and upwards to protect the naked base, these metal-based soft lead bullets are splendid.
John Taylor - "African Rifles and Cartridges"
Forget everything you know about loading jacketed bullets. This is a whole new ball game!

This PP guy is saying, "That sure is a nasty gap where the ends of the patch fail to meet."Originally Posted by goodsteel

CM
Retired...TWICE. Now just raisin' cows and livin' on borrowed time.
Since I have been patching for a large number of different calibers, I just put a strip of masking tape on my paper cutter at the right angle, and put pencil ticks on it to indicate the right length for the patches. (start by using pi*D*2) This way I can lay one or many strips of paper along the edge of the tape and put a tick mark on the top sheet. Advance that to the edge and slice it. If the mark isn't right I can then adjust it to be where it needs to be. Once I know for certain the mark is in the right place I use a permanent marker to darken the mark and note the caliber. By now my paper cutter is all marked up and I can cut a patch to whatever caliber I want quickly and with no measuring.
That's how I do it also Nobade..
I also drew I line with a fine tip magic marker down the length of the masking tape (that is on a angle) to give me a reference to slide my length of paper along as I cut the patches off..
 Posting Permissions


| BP | Bronze Point | IMR | Improved Military Rifle | PTD | Pointed |
| BR | Bench Rest | M | Magnum | RN | Round Nose |
| BT | Boat Tail | PL | Power-Lokt | SP | Soft Point |
| C | Compressed Charge | PR | Primer | SPCL | Soft Point "Core-Lokt" |
| HP | Hollow Point | PSPCL | Pointed Soft Point "Core Lokt" | C.O.L. | Cartridge Overall Length |
| PSP | Pointed Soft Point | Spz | Spitzer Point | SBT | Spitzer Boat Tail |
| LRN | Lead Round Nose | LWC | Lead Wad Cutter | LSWC | Lead Semi Wad Cutter |
| GC | Gas Check |


 Reply With Quote