I have had that Little finger for 33+ years now and really like it.

|
   
   
|


|


I have had that Little finger for 33+ years now and really like it.
[The Montana Gianni] Front sight and squeeze
I have a small Gerber with a 3" blade that I normally use. But I'm looking for a skinning/butchering knife. I don't really have one, I've been using some of my kitchen knives. But they don't work to well with full deer and hog.


I bought that smallest Case fixed blade knife. When I bought it I thought that would be a great knife to have in my tackle box for fishing. But Man it has become my favorite knife for about everything. I have cleaned more fish with it than I care to remember. It has skinned and field dressed more deer than I want to think about. Yep give me a little blade a lot more user friendly.
Yup, like most the fellers said...anything over 3 or 4 " ain't needed...
My favorite is a BUCK 110 folder...
Neat thing about them, is you can open them one-handed....
skint (& butchered) MANY deer, several hogs, goats, rabbits, coons, fish, apples, etc. etc.
I have an Edgemark folding hunter that is about like a Buck, but lighter. I've had it for 30 years, and it has dressed a lot of deer. I've never stoned it, just touch it up on a crock stick. For butchering, it is hard to beat boning knives made from power hacksaw blades. The blades I use are about 1/16x1x12. Grind them to shape, drill a couple of holes, attach the scales, and finish up on a belt sander. [/I]


I had a Buck Crosslock that I really liked. It had two blades, one being a gut hook that the handle near the opening stud had raised dots so I could tell which blade was being opened without looking. The guthook needed some refinement as it had to be held in an exact position to cut reliably. I lost it and replaced it with a Gerber that was similar, but it also took a walk when loaned out. Currently using an Old Timer fixed blade with gut hook. I do like gut hooks.
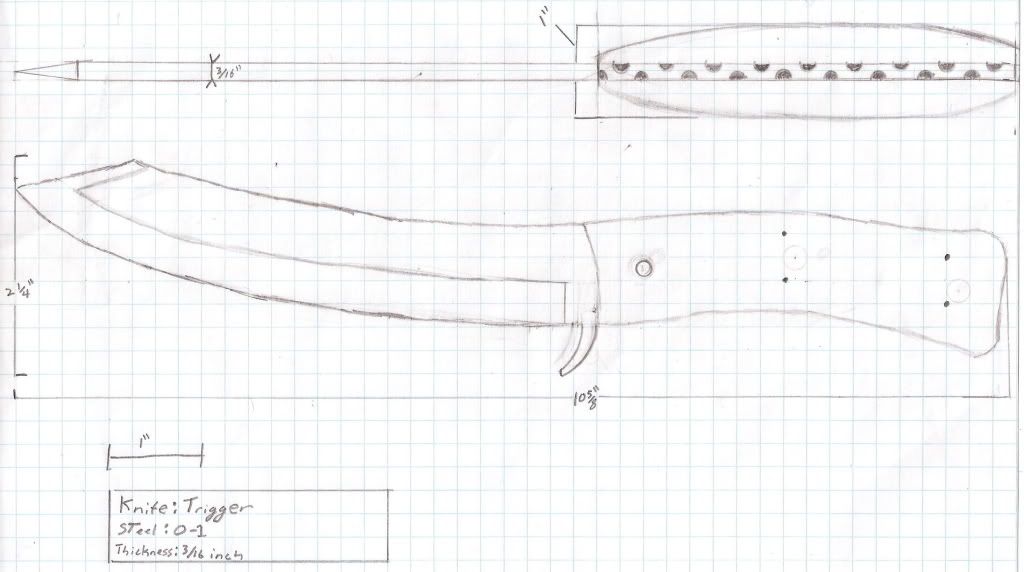
Well I got my steel in today. I'm going to draw out my design. I've gone with a pattern I pulled off of an old knife. Here's what I'm planning on making, plus some modifications.
What I've drawn out with a couple of modifications.
I'm thinking of changing the guard before I start. I made a wooden model of it and had a bit of trouble with the cutting surface. I'll make a couple of more wooden ones before I start on the Steel.
The heavily swept back commercial skinne rin 5: works well, as does the 6.25" Giesser Messer scimitar knife. I reground a New one for a Chef Friend of mine,, and it is his favorite for boning, and greaking down carcasses. I am a Chef, and use both bor breaking, when it comes to actual boneless cutting go to 10" to 14" Scimatar shapes for slicing, and sometimes a 11.8" Gyuto design for cubing.
I cut almost all of the Meat and Fish at work, I won't tolerate a design that doesn't work, or a dull knife.
Greg
You would be better off bringing the grind line higher, all the way to the spine. I like the Spines to be filed, and polished to a full radius, so I can bear down if need be.
Torch harden the balder in warm 120-140F heavy oil, and draw the back to a blue purple. If you don't know how to harden it, seek help.
Greg
Thanks Greg, I was planning on bringing it up higher, I just didn't change my drawings. I'll be sure to do that, although I don't think I'll bring it all the way to the spine.
As far as hardening and heat treating I've got a friend that makes tools for a living and has all of the equipment to do that. He's offered to heat treat and temper for me. That was the only part I was worried about. I got the steel in a couple of days ago so I'm a bit excited, so I'm going to get started on this in the next few days. I hope it turns out nice. I'm going to take my time on it to make sure it is as perfect as I can make it.


Hi,
Well I've forged knives for the past 20 years or more and I can tell you if you want to get a knock down drag out going among a bunch of knife makers start talking about heat treating of knife steels!!! With just you and your buddy working on it you should be safe! Good luck!
Seagiant, I know what you mean. Luckily there isn't that many ways to heat treat O-1 steel. The directions are pretty well clear on that. I'm going to get started later on today. It's a bit cold out there right now, and I still need to get a new belt for my sander. Hopefully I can take some pictures while I'm making it.
So, since you've been forging knives for 20 years, Got any tips before I start?
Hi,
I guess you are doing stock removal instead of forging which is ok! I started out as a forger as that is what I wanted to do. I joined ABANA and found my local chapter in my state and started going to meetings. I also got the directory for the different bladesmiths society's and called some knifemakers to see if I could visit their shop. Living in Florida I was blessed with a lot of pro knifemakers in the state. The first knifemakers shop I ever visited was Randall's in Orlando! Very nice people and Mr. Bo Randall was the man that put custom knifemaking back on the map!!!
My best advice is to try and get a mentor to cut the learning curve as much as possible! The learning never stops but you want to get the basics down ASAP then it's up to you to let your talent grow! There are a lot of older knifemakers out there very willing to pass on knowledge if asked!
Hi,
I had to put this in this entry as I type slow and when I tried to add to my last post I get timed out,anyway one thing you want to do with your O-1 or any other plain carbon steel is to heat cycle it before quenching to bring your grain structure down. This will make for a sharper blade and improve edge holding ability in the end product This is one of the many things you can do to make a superior blade to any factory offering! This is not in the heat treat specs! You are not making a widget for a machine you are making a blade and YOU have to work the steel!
To heat cycle bring your blade up to it's "critical temp" which for O-1 is about 1550 off the top of my head you have the specs. This can be done by color of the steel but is also possible to use a magnet as it will go non magnetic when at it's at it's CT! Do this 3 times letting the steel cool between each heat and on the third time go ahead and quench! This will shrink the grain structure of the steel for the improved property's mentioned. For Quenching medium I have used just about everything including real mobil quench oil and now use the cheapest ATF transmission fluid I can find!
Take an old file (W-2,1095) and try it before you do the O-1 you bought. Heat cycle once then quench and then break the hardened steel and look at the grain at the break. Then heat cycle 3 times then break and look at the difference in the structure. It should go from peeble looking to a silk type structure which is what you want! This is just one of the things you can do to make a super blade that will out cut and outlast anything you've used before!
Last edited by seagiant; 12-26-2011 at 06:36 PM.
Thanks Seagiant, I didn't know that about the heat cycle. Once I get to that point I'll be sure it's done. Makes sense though.
What do mean by stock removal? Taking the original scales off an existing knife? I'm not up on the jargon just yet.
Hi,
Stock removal means that you are going to take a piece of steel as close to the finished size as you can and then remove by whatever means the portions that need to be removed to give the shape that you want.
In forging you move the metal to where you want and then just do clean up. I prefer forging as I enjoy moving the metal under the hammer,but for smaller knives it's really easier to just stock remove!
Try to not take anyone's advice as true or as holy writ no matter who told you but experiment for yourself and find out for yourself what works for you and then when you make a knife and someone makes a comment about what it can do you can speak with authority because you already KNOW what it is capable of! I had a co-worker talk about one of my knives in a context that it would snap if bent to 90 degress angle. I told him I would bet him the price of the knife and then we would see if the knife would snap in the vise or not. Of course the knife would be usless after the bend,but I knew what it would do and was ready to back it up. He sensed my positive attitude I guess and declined the bet!
Here is an excellent site from a man I took a week long class under and one of todays premier knife makers!
http://www.dfoggknives.com/
Get it hot! Hit it hard!
Last edited by seagiant; 12-27-2011 at 03:19 PM.
I guess I am going with stock removal. I checked out that site, he has some good stuff there!
I've had a small set back but I'm planning on getting restarted again in the next few days. Hopefully by next week I can get it in to a forge and start heat treating and tempering.


You can buy most of the pieces and parts from the knife suplly houses and glue the whole thing together, finsih the handle material and then polish.
The Leather Factory/Tandy has a video and plans for making sheath and holsters.
I have made them for many years, was a member of the Ohio Knifemakers Association and the Canadian Knifemakers Guild.
Jerry
Honor is a Way of Life
NRA Benefactor Life Member
handmade knives are so cool, but my favorite skinnin' knife is a Geber Gator non serrated. the 110 buck is another timless classic. years ago a friend made me a knife out of a old basterd file, it worked very good, but took to long to sharpen. then i dropped it on the floor and it broke like glass. i was heartbroken.
 Posting Permissions


| BP | Bronze Point | IMR | Improved Military Rifle | PTD | Pointed |
| BR | Bench Rest | M | Magnum | RN | Round Nose |
| BT | Boat Tail | PL | Power-Lokt | SP | Soft Point |
| C | Compressed Charge | PR | Primer | SPCL | Soft Point "Core-Lokt" |
| HP | Hollow Point | PSPCL | Pointed Soft Point "Core Lokt" | C.O.L. | Cartridge Overall Length |
| PSP | Pointed Soft Point | Spz | Spitzer Point | SBT | Spitzer Boat Tail |
| LRN | Lead Round Nose | LWC | Lead Wad Cutter | LSWC | Lead Semi Wad Cutter |
| GC | Gas Check |

 Reply With Quote