yea, could be.. i dunno.. its just easier for me to get one of my blanks out. i can make blanks for around $20 each, and that includes hardening to 50+rc.Originally Posted by drhall762

dan

|
   
   
|


|


yea, could be.. i dunno.. its just easier for me to get one of my blanks out. i can make blanks for around $20 each, and that includes hardening to 50+rc.
dan
Thanks for the tip about the sizing die. Makes perfect sense now that you pointed it out. For turning grade 8 bolts, I made a new rod for my Rockchucker press and threaded the end 1/2" NF female threads. I drop it out of the press and chuck up a bolt with a nut loctited on the threads. That gives me up thru 45 cal for all the punches I should need for pistol.
Somewhere I recall a comment that Lee used 4150 but can't confirm the source. My guess is that it is nitrided or something similar to just make the surface hard according to your description.
Stole(borrowed) the bolt /rod idea from BTSniper.Made a 22 derim die for fun like that.Have you gotten into making reamers yet?I have a very small inventory of W1 drill rod but haven't ventured to trying to make rifle bullets with longer ogives. Mostly a pistol shooter anyway. Maybe someday I can make a ball turner for my lathe so I can cut radiuses . A few guys are lucky enough to have friends who can provide custom reamers good buddy style.
A good TV night for the less ambitious retiree tonight. Will try to post later when I've tried the tips you've given.
Thanks.
yea, i have my reamers made by a professional reamer company.. i get them perfect from them every time. but they are expensive, around $100 - $150 each. they are carbide, and last a good long time, so its worth the extra money.
heck, if you already have a btsniper style ram in your RC press, that makes life much easier.
for chucking up bolts in your lathe, you can easily make a coilet by chucking up a bolt in your lathe so the thread is accessible for turning..
then put 2 nuts on the threads, lock them in place by turning them together..
then do a face on the outside nut.
then turn that nut until its round.
then un-chuck it from the lathe, leaving the bolts in place.
then use a good saw, and cut 4 slits down the sides of the bolt that you faced.. dont cut all the way down, leave about 1/8 of an inch left.
then remove the bolts.
the one you faced, rounded and slit, becomes your coilet. you can chuck that into your lathe, and thread a bolt into it, tighten the chuck, and it will hold the bolt in place without harming the threads.
this trick comes from the machinist manual's.. works great for making poor man coilets. they are not the best, so make sure you always center each time you change out the bolt its holding.
dan

bump... old thread, anyone tried this lately, swaging pistol bullets using Lee rifle dies?
i am thinking about using the Lee 220 Swift sizing die as a point forming die with 9mm cases to make 0.40SW bullets, anyone done this lately?
i'm using that same die for 40 cal's right now to make my 40's. works great.
one catch, is that the lee sizing dies has a small air bleed hole in the ogive, it will leave a small mark on the side of your projectiles, but its no big deal. i still get great accuracy with them.
you'll also want to make a core seating die to bump the 9mm cases to a bit larger before swaging, or you'll end up with wrinkles.
cheers,
Dan
i was wondering what that "burr" looking thing was on the ogive... from the air bleed, makes sense, maybe the hole can be plugged somehow (JB Weld?)
i found that the 222 Rem sizing die can be used as a decent core seating die (using the lower half), it will swage up to 0.397 then point form in the 220 Swift... just need a short section of round stock between the shoulder forming part of the 222 die and the base of the bullet
how are you sizing down the bullet after point forming? coming out of the 220 Swift sizing die the diameter at the beginning of the ogive is around 0.402 and gets slightly bigger toward the base of the bullet around 0.406...
i made a sizing die on my lathe.
you maybe able to get a lead bullet sizing die from lee, though, i'm not sure what the spring back would be so, you may have to get two of them.
i went through this once before with lee bullet sizing dies in my early days before i got a lathe. i ordered a .224 sizing die, then discovered that the spring back was bringing them to .225, then i ordered a .223 sizing die, to make them come out at .224. then i turned around and resold the .224 sizing die on craigslist.
i'm pretty sure that the 9mm's will also have spring back.
when i made my 9mm bullet sizing die, i just lapped it until the bullets came out the correct size. having a lathe lowers costs.
dan
oh and JB weld to fill the air hole, good luck, i tried everything including TIG, and it never worked out so well.
i am trying to make this project with my wimpy little 7x12 hobby lathe, the timing belt broke today when i tried to drill out a hole in a 5/8" grade 5 bolt! but what i am going to try is to use the Lee powder thru expanding die for a .500SW as the die body (because it is threaded and my lathe won't cooperate with making 7/8-14 threads), and put different inserts inside of it for whatever i am trying to do like size the core, seat/swage the core, size the final bullet, and eventually make a point forming insert (ya right)... the threads for the Lee expander die are 5/8-18, and a bolt on top will secure the insert and it can be drilled out for a punch or as a pass thru the top for sizing, etc.... that is the plan anyway, not sure how it will go... for now, i will have to use the 220 Swift sizing die for my point forming, and it looks like it will do just fine
for the die inserts i am going to give 12L14 a try because it plays so nice with my lathe, and then try to case harden the inside bore by carburizing the inside surface with either something like Cherry Red hardening compound, or use one of those homemade mixtures (crushed wood charcoal, barium chloride, sodium carbonate, and calcium carbonate) and place the insert with the mixture in a 3/4" threaded pipe (with a vent hole of course) and put it in the coals of fire for a few hours and quench in oil... i have read that leather works well also as a carburizing agent, and that maybe much easier to use
this project is too much fun, and this thread is such a great resource for making the poor man's .40SW swage
great idea using the lee powder thru expanding die.
when your trying to drill your center on your lathe, remember, LATHE DRILL BITS have a negative inclination, as compared to a normal drill bit with a positive inclination. if your not up with the terms, it means that with normal drill bits, the cut on the tip causes the bit to be pulled into the work. lathe bits are just the apposite, they push away from the work. so if your trying to drill your holes with a normal drill bit, you'll run into lots of problems.
with soft steels, its not so bad, but the harder steels, its nothing but problems. get your self a drill guide and re-sharpen your drills bits for lathe work. drill guides can be purchased at freight harbor ultra cheap.
you would be surprised, 12l14 is pretty hard, and it will do just fine for core swaging without hardening. also, be for warned. improper hardening of 12l14 will only result in annealing it. bad juju.
12L14 should be put through a hardening process if its going to be sizing though.
a little trick for threading on lathes, is to use a thread die, and your tail stock as a guide. check youtube for how to die thread on a lathe with a tail stock guide. its VERY easy to make a guide. the basic is that the guide chucks into your tailstock, and gives a plumb 90 degree surface for the thread die to rest on while you start the threading. turning your head stock BY HAND. not to be done under power. i use a modified socket extender in my chuck key slot as a torque bar while threading.
in all reality, making dies for the first time is a learning experience, after about 3 or 4 attempts, you'll be amazed at how easy it is. just remember, Take NOTES and pictures, so that you can go back over your work in case something doesn't work.. so that you can modify your plan to correct the problem. otherwise, you'll be trying to remember, which drill did i use for that step?!.. lol.
also, it would be great if you could share your experiences with everyone here.. we would all benefit from it.
thanks,
Dan
What type of problems did you have trying to do 7/8x14 threads on your 7x lathe?
the tool bit would dig into the material and bind up the spindle and freeze it up! too much play in the cross slide... didn't seem to matter how little i advanced the bit, eventually it would lock up after a few passes... i think the diameter is just too big for this little lathe and the material too tough (grade 5 bolt)... danr had a suggestion that seems promising and that is to look into a tail stock attachment that enables you to do the whole thing by hand with a thread cutting die...
no worries, though, as i am going to avoid threading all together and use a Lee Powder Through Expander as my threaded die body, and then turn inserts that will drop into it... the die bodies are about $17 delivered from Lee, and the inserts are easy enough to turn, drill, and lap on the lathe... the dreaded point forming die will be avoided for now as I will use the 220 Swift sizing die to form the ogive (another $17), works like a charm... if you already have the lathe (and either 9mm or 357 mag casting dies), you can complete this project for probably around $100 for a complete 9mm to 40SW swaging system... i am using a Lyman 357466 die that drops 362gr 0.360 boolits, cutting the ogive off with some tin snips and when they drop in the 9mm case they come out between 175-180 gr!
when i get around to the point forming die i will try to shape an ogive cutting D reamer and see if i can make that work... but that will happen at the end...

I got some bullets from a fellow that was doing something similar. He fully annealed the 40s&w cases, pushed them into a 308Win Sizing die to get the tapered nose. He then pushed the cases through a 410 sizer die. Very little spring back when fully annealed. Then he made a couple of simple tools for his press, He used a short piece of all thread lathe faced on one end to be flat and square. The other tool is just a short fat punch that fits in the press ram. The flat ended allthread is put in the top of the press flat end down and the punch goes in the ram. Set a prepped 40S&W case on the punch and raise the ram all the way, then screw the flat all thread down until it touches the prepped case. Now you heat up your bottom pour lead pot with some prepped cases on the rim of the pot to heat. When lead is melted, grab a case with pliers, overfill slightly with lead, quickly place on punch and raise ram to flatten top of bullet and squish off extra lead. Set aside to cool. For rifle bullets with a longer taper on the nose use a 22jet sizer die. The trick is to find a case just a little larger than you want your finished bullet to be, cut it to desired length, anneal to dead soft, size it with the ogive you want and fill it with melted lead. With a drop of soldering paste in the case you may have a bonded core. You could cut your own ogive using a D reamer in 7x14 all thread without it having to be super hard or super smooth as you would just be ejecting an empty fully formed jacket with no serious pressure swaging going on. I think I'm going to give this a try using 10mm cases in my 416Rem. Cutoff 223 cases will work in the 358Norma. This isn't really swaging but it should give you a jacketed bullet without the $800 dies and it wouldn't even put a strain on a normal loading press. Might be a little harder to do with a tiny 22cal bullet though.
^^^ that is interesting
ordered the drill guide, will check out how to sharpen for lathe work...
thanks for your insight i appreciate it... regarding the case hardening, i plan to try it on simple pass thru sizing insert, if it doesn't work then there won't be much lost as they are easy to make out of 5/8" 12L14 and it won't be like starting over making a die body, threading it inside out and, etc.
maybe i will start a new thread that would be like a progress report/diary as this will take me probably several weeks... if you read it and add advice and experience!!!
first die i will make is the core sizer, so i can size these 357466 bullets to 0.355, as this will enable me to try a sort of "proof of concept" with the Lee die body and drop in inserts, and the case hardening... then if it works go on to the core swage and point forming dies...
one area i dont get at all is lapping... i understand the mandrel type lap explained in the SAS booklet, and how to make it and how to use to use it for thru holes... but for the life of me I don't understand his drawing for the point forming lap as shown in the SAS booklet and how to lap a blind hole like the point forming die...
edit: random thought, perhaps the drill guide could be useful in shaping ogive reamers on the bench grinder?
Last edited by Cane_man; 05-05-2013 at 02:39 PM.
success!
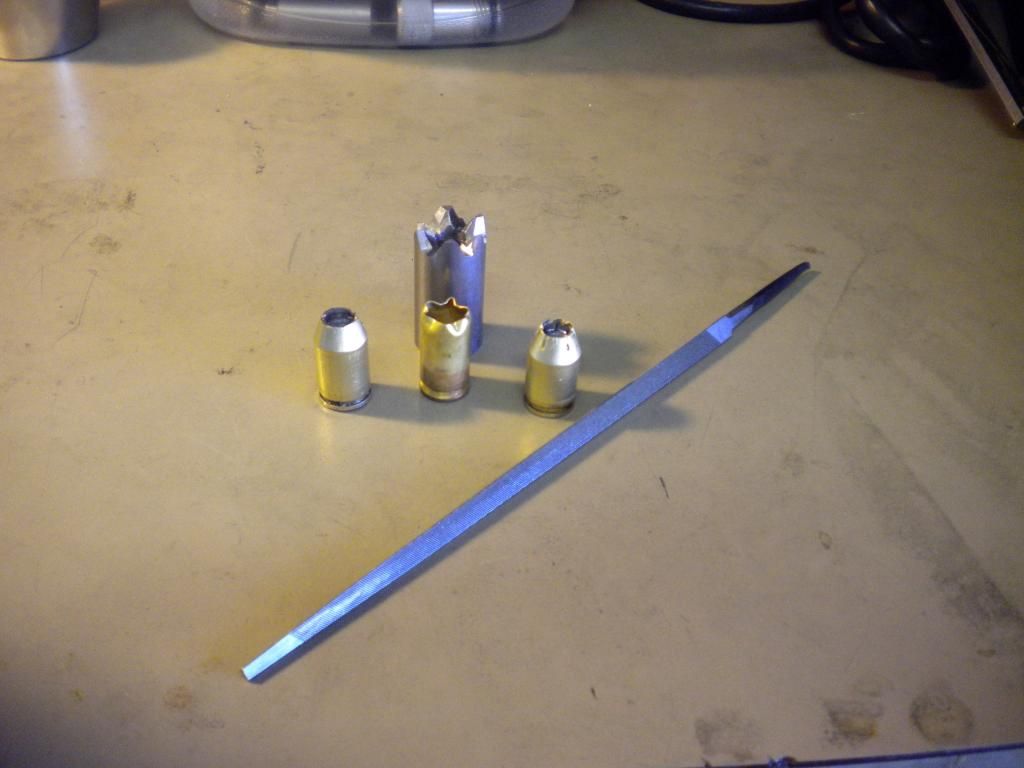
can't say it was easy, but this is a 10mm 200gr FBHP j-word made with swage dies fabricated from a bench top 7x12 hobby lathe and a few Lee die bodies with entire project cost < $100, the bullet was made from a 9mm range pickup case and a 357466 cast boolit with the ogive trimmed off and swaged using my RCBS Rockchucker:
let me know if you want details, thanks to danr and the archives for 90% of the details for this project... swage on
i plan to test these at the range on monday
Last edited by Cane_man; 05-11-2013 at 10:34 PM.
Nicely Done.
now, figure this out out.. make the jacket roll into the hollow points.. like this -->
you can do this with a 45 bullet seating die, where you press the half swaged projectile into the seating die, this causes the nose to be made smaller and close in.. then finish swaging the projectile.. you'll notice it nicely curves the noise right into the hollow point.
Dan
^^^ LOL, that was my next step, figure out how to make the lip of the meplat roll over, i'll pull out my 45 seater and play with it, thanks again...
danr is the man for swagin' on the cheap!
oh and, did i mention, that when you roll the nose into the hp, you no longer have to trim the cases.
but dont forget, this is not my thread, the credit should go to stealthshooter who started this thread making his own 45 cal swage dies.. his came out really nice, and set the standard for home made swage dies to a new level.
thanks stealthshooter, and great job cane_man.
dan
stealthshooter, wherever you are a big thank you for this concept of being able to swage on the cheap and swage at home for $0.10 on the dollar compared to commercial dies
danr, having difficulty getting the nose to roll over... my 45 acp seating die did not like my swaged cores, so a i turned a die that would slightly round and flatten the rim of the case, but when i tried to point form in the 220Sw resizing die it swaged the roll/flat end to the mouth right out... any suggestions? what type of internal cavity shape should i make to get that rim to roll over, and will i need some type of special punch to get the rim to turn down?
i did get to fooling around with a notching die, and after turning an insert and drilling it out 1/4" and used a triangular file to notch it had some success (this is an ugly prototype for proof of concept):
these inserts are super easy to turn on the lathe, and if you use 9/16" round stock you don't have to turn the OD they just drop right into the Lee expander die as is!
actualy, that notching punch looked pretty good. the resulting projectile wasn't bad either. keep up the good work.. in reality, it dont matter what it looks like when your only making it for your use.. what matters is how well it works for you.
my 45 seating die has a round nose cavity in the top seating punch, which causes the nose of swaged projectile to curve the nose inward, almost to the point of closing it off. i started out trying to figure out how to make an extra die to close off the projectiles 100% for a full metal jacket with no seams. but ended up leaving it when i was able to roll the nose enough for the really nice hollow points.
here is a picture of my 45 acp top seating punch, and a picture of my notching punch that i use with my 45 seating die.
i have yet to try and do a notched rolled nose combining the two.. maybe after i'm done moving, i'll try it out.
Dan
Wow, what info to be had, just wish I had the brain to comprehend it all.
CAN YOU SAY STICKEY?
Slim
JUST GOTTA LOVE THIS JOINT.
 Posting Permissions


| BP | Bronze Point | IMR | Improved Military Rifle | PTD | Pointed |
| BR | Bench Rest | M | Magnum | RN | Round Nose |
| BT | Boat Tail | PL | Power-Lokt | SP | Soft Point |
| C | Compressed Charge | PR | Primer | SPCL | Soft Point "Core-Lokt" |
| HP | Hollow Point | PSPCL | Pointed Soft Point "Core Lokt" | C.O.L. | Cartridge Overall Length |
| PSP | Pointed Soft Point | Spz | Spitzer Point | SBT | Spitzer Boat Tail |
| LRN | Lead Round Nose | LWC | Lead Wad Cutter | LSWC | Lead Semi Wad Cutter |
| GC | Gas Check |

 Reply With Quote