Snyders JerkyReloading EverythingTitan ReloadingMidSouth Shooters Supply
Load DataLee PrecisionRotoMetals2Repackbox
Wideners Inline Fabrication
Page 8 of 9 FirstFirst 123456789 LastLast
Results 141 to 160 of 168

Thread: Rhineland 45 ACP Kit

  1. #141
    Boolit Man
    dano440's Avatar
    Join Date
    Feb 2010
    Posts
    90
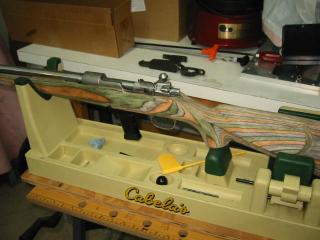
    sound good Randy, I would like to see some more pictures as you get your other parts. nice looking stock too.

    I have been Slow Rust bluing mine this weekend and now down to the small parts, barrel and receiver in now done also done a NEF 20 gauge barrel for cousin of mine.

    And now I am doing the bolt cap, and pin along with cocking piece and the trigger guard and trigger, and as a favor for a friend doing a Uzi and grease gun magazines.
    Last edited by dano440; 01-22-2012 at 01:53 PM.

  2. #142
    Boolit Man
    dano440's Avatar
    Join Date
    Feb 2010
    Posts
    90
    Quote Originally Posted by deltaenterprizes View Post
    I got to shoot my conversion on Wednesday the 18th! What a blast, like shooting a 22LR, no recoil, mild report.
    Open sights at 25 yds 2.5'' groups. The front sight is hard to see, I need to highlight it with some orange, red or yellow paint.
    Mag feeds fine with 5 rounds but with 8 it nose dives and jams against the feed ramp. I plan to make 8 dummy rounds and try a different mag.
    Any other suggestions?
    I too experience some feeding issues with a 7 round magazine the first one wants to nose dive and the second one too but after that all five feed really well I was blaming the cheap 7 round magazine I got from Sarco for $7

  3. #143
    Moderator

    W.R.Buchanan's Avatar
    Join Date
    Mar 2011
    Location
    Ojai CA
    Posts
    9,888
    I got all of my piece parts finally.

    The magazine follower was a complete failure, so it is going back. The Novak mag works just fine and in fact it worked better than the Chip McCormik mag I got for this project,.

    After getting all of the mag release parts installed, I started playing with the placement of the magazine adapter.

    I have questions and maybe Larry Gibson can elaborate.

    There is a lot of slop in the magazines placement when in the adapter. It will move up or down about .090/ 3/32".

    If the mag is all the way down then the mag adapters step has to be about .08-.09 below the mag well so that the bolt doesn't run into the magazine. I spaced it down by taping two 3/32" drills onto the step, and clamping the adapter in place, and running the bolt. It actually worked after I re-profiled the extractor a little more. This is with the action assembled outside the stock.

    What I need to know, is in a normal installation does the mag well of the receiver bottom out into the bottom of the receiver or does the stock space it off.

    Obviously if the stock spaces it away then the adapter doesn't need to be spaced down. But if it doesn't space the receiver and mag well apart ,,,then,,, did you guys space your mag adapter down or how did you cope with this issue?

    I finally got my action into the stock. It took some filing and beating and I got it in all the way and the top and bottom of the action appears to be spaced apart a little. Much more filing and fitting is required. I think Richards 99% drop in is more like 95% as there is alot of interference.

    It has become obvious that I need to completely install the action into the stock before I continue on with the kit installation.

    I can't believe how cockeyed this action is. The mag well is a few degrees off strait in line with the barrel and the sides of the front ring are not parallel to the barrel. When the mag adapter is installed into the mag well the magazine is 1-2* out of alignment to the barrel.

    I was told by someone who should know that these Turkish actions were made in Germany. I have to disagree as I have never seen anything made in Germany that was as far out of kilter as this action is. War or not the Germans just didn't do work this shoddy, even if it was going to Turkey. I can however believe that it would be the product of Turkish hands, and I have seen many things made there, and short of Cotton Towels the vast majority is Iffy.

    Randy
    Last edited by W.R.Buchanan; 02-10-2012 at 12:11 AM.
    "It's not how well you do what you know how to do,,,It's how well you do what you DON'T know how to do!"
    www.buchananprecisionmachine.com

  4. #144
    Moderator

    W.R.Buchanan's Avatar
    Join Date
    Mar 2011
    Location
    Ojai CA
    Posts
    9,888
    Went back after dinner and was running some parts on the CNC lathe that were taking care of themselves, so I had time to fit the action into the stock a little better. Still some more work left on fitting but it is just about there.

    I answered my earlier questions about the Mag adapter position.

    I still have to relieve the barrel channel to accommidate the barrel lock nut and the largest section of the barrel. The stock will probably be cut off just behind the first step on the barrel so I won't have to go further with the rout out of the barrel channel.

    The project progresses.

    Randy
    "It's not how well you do what you know how to do,,,It's how well you do what you DON'T know how to do!"
    www.buchananprecisionmachine.com

  5. #145
    Moderator

    W.R.Buchanan's Avatar
    Join Date
    Mar 2011
    Location
    Ojai CA
    Posts
    9,888
    Making some head way on my project. got the trigger guard into the stock and nearly got the action in as well. Just a little left to do on that part.

    Got the stock cleared for the barrel nut and will be rasping on the barrel channel tonight. I bought a barrel channel tool from Gunline 35 years ago and have never used it until now. HA!

    Still trying to figure out where I should cut the fore-end off at?

    Hoping it will become more a little more obvious when the action is completely in the stock.

    I want the sling swivels mounted on the side of the gun. This is so you can carry it without the magazine stuck in your back. This would get old real fast. I don't want a sling swivel stuck on the side of the buttstock so I will probably rout out a channel in the stock for a rod to wrap the end of the nylon sling around. Kind of like a Swedish Mauser Carbines sling arraingement.

    I am also getting closer to a solution to the ejector. It involves use of two ejector boxes mounted in line one in front of the other. The rear one is full length and the front one is cutoff near the front of the screw hole. This will allow the new ejector and bolt stop to sit right in the thumb slot and limit the bolt travel to just behind the magazine. It looks like it will work, but it will take some machining and some welding to get it done. Getting the springs to still work is the challenge. Without them the whole thing is useless.

    Here's some more pix

    Randy

    Last edited by W.R.Buchanan; 02-03-2012 at 08:35 PM.
    "It's not how well you do what you know how to do,,,It's how well you do what you DON'T know how to do!"
    www.buchananprecisionmachine.com

  6. #146
    Boolit Mold
    Join Date
    Nov 2011
    Location
    Wauseon Ohio
    Posts
    28

    93 carbine

    I did one on a 93 action.
    Took a lot of tweeking to get it to feed ,and eject.
    I used a type 99 Arisaka ejector ,it shortened the stroke 3/4 in
    Had to fill in behind ,and in front of the mag .you needed tweezers if a case fell in there.
    Attached Thumbnails Attached Thumbnails .45 carbine 002.jpg  

  7. #147
    Boolit Master
    Join Date
    Jan 2009
    Location
    30 miles South of Cheyenne, unfortunately
    Posts
    1,223
    Earlier I had mentioned the fact that my conversion had some trouble feeding the RF, TC, and SWC bullets and I was looking for a RN mold that more or less duplicated the MIL RN bullet since it fed flawlessly.

    I decided to go with the Lee RN with the 1R nose. I use 4.2 grains 700X, std LP primer and the bullet is cast from straight WWs,(more or less). Works great! Hits the 100yd. gong with about as much authority as my 44 MAG from an 8 3/8" barrel, (10 gr, Unique behind 429421 bullet) from the sounds of and it is a ton of fun to shoot.

    Now I just need to finish everything. Since I installed the JAP ejector I have not had any problem with the cases falling into the action but I may put a filler in there anyway.
    When it's time to fight, you fight like you are the third monkey on the ramp to Noah's Ark.... and brother, it's STARTING TO RAIN!!

  8. #148
    Boolit Man
    dano440's Avatar
    Join Date
    Feb 2010
    Posts
    90
    Quote Originally Posted by W.R.Buchanan View Post
    Making some head way on my project. got the trigger guard into the stock and nearly got the action in as well. Just a little left to do on that part.

    Got the stock cleared for the barrel nut and will be rasping on the barrel channel tonight. I bought a barrel channel tool from Gunline 35 years ago and have never used it until now. HA!

    Still trying to figure out where I should cut the fore-end off at?

    Hoping it will become more a little more obvious when the action is completely in the stock.

    I want the sling swivels mounted on the side of the gun. This is so you can carry it without the magazine stuck in your back. This would get old real fast. I don't want a sling swivel stuck on the side of the buttstock so I will probably rout out a channel in the stock for a rod to wrap the end of the nylon sling around. Kind of like a Swedish Mauser Carbines sling arraingement.

    I am also getting closer to a solution to the ejector. It involves use of two ejector boxes mounted in line one in front of the other. The rear one is full length and the front one is cutoff near the front of the screw hole. This will allow the new ejector and bolt stop to sit right in the thumb slot and limit the bolt travel to just behind the magazine. It looks like it will work, but it will take some machining and some welding to get it done. Getting the springs to still work is the challenge. Without them the whole thing is useless.

    Here's some more pix

    Randy
    how is your project coming along now? any progress?

    I had mine out and shot it about 150 rounds now and enjoying it. I have not pursued the filling the void behind the magazine, I got everything blued and it put back together, but that is about it. the weather has been hindrance here, it's hard to get motivated lately.

  9. #149
    Moderator

    W.R.Buchanan's Avatar
    Join Date
    Mar 2011
    Location
    Ojai CA
    Posts
    9,888
    Still working on fitting the stock. I worked on the barrel channel last Sat and got it near where it needs to be.

    I have to go back in and move the cutout for the mag catch forward a few mor e .000. the mag adapter is seating a little farther forward than it was when I first put it together.

    Mine seems to like the Novak magazine better than the CM mag. It feeds SWC's and Ball rounds equally as well. The CM mag doesn't feed anything because the rear of the mag needs to be altered to clear the bolt. If it is low enough in the adapter to strip the rounds, they hit too low on the feed ramp and bind up. Also the follower in that mag is not as smooth as the Novak one and wants to push it's way forward which won't work at all.

    I will know more as soon as I shoot the thing.

    I can't believe there is so much difference in 1911 mags. You'd think they had this stuff sussed out and standardized after 100 years?

    Still lots to do. Going to alter my bolt handle pretty soon, maybe next Sat.

    Maybe some more tonight,,, oops,,, Valentines day,,, maybe tomarrow.

    Randy
    "It's not how well you do what you know how to do,,,It's how well you do what you DON'T know how to do!"
    www.buchananprecisionmachine.com

  10. #150
    Boolit Man
    dano440's Avatar
    Join Date
    Feb 2010
    Posts
    90
    so what are you doing to your bolt handle. I got a little crazy with mine. since lately I have more time than money. I took a old bolt handle I had cut off of last years Mauser project ( 308 win sporter) and added on to it using a grade 8 bolt and extended it out about 2 inches, then put it in the forge and heated it up and flatten it out and squared the round shank in to small rectangle then put a small curve in it the I cut off the old bolt and and welded it on a little filing and shaping it turned out pretty good

  11. #151
    Moderator

    W.R.Buchanan's Avatar
    Join Date
    Mar 2011
    Location
    Ojai CA
    Posts
    9,888
    I'm going to duplicate the standard Mauser sporting rifle configuration which is strait down at an angle out from the square lug. The handle will probably be at 20-30 degrees off vertical but strait otherwise. Not going to sweep this one back like I've done before.

    I have several cut off bolt handles but none of them are long enough to transplant, so I'll probably chuck up some material in the lathe and hack on it until it is some what close to my mental picture.

    You can also chuck one up in a drill motor and go after it with a belt sander or sidewinder. I've made several like that in the past.

    They all are different and finding the right one for the particular application is sometimes just trial and error.

    I know this one is going to be just a little longer than I usually do so there is more leverage to run this old action ,,, smoother.

    Randy
    "It's not how well you do what you know how to do,,,It's how well you do what you DON'T know how to do!"
    www.buchananprecisionmachine.com

  12. #152
    Moderator

    W.R.Buchanan's Avatar
    Join Date
    Mar 2011
    Location
    Ojai CA
    Posts
    9,888
    OK for some of you who would like to see the process of making a bolt handle here's how I did it.

    First I looked everywhere in my shop for something that would be easy to use , I started out thinking I would just use the cutoff bolt handle and extend it and reuse it, however I abandoned that idea after seeing too many problems. I couldn't find a suitable piece of stock to make a complete bolt handle with knob either.

    All the rage now in the Tactical Rifle world is large bolt handles, and usually these are screw-on knobs requiring a thread on the end of the handle.

    I had done my Swedish Mauser this way and had a smaller knob left over from that job, so I decided I would make another bolt handle like that.

    I started with a piece of 1/2" rod and chucked it in the lathe, I turned the end down to 5/16" and ran a die onto the spud for threads. I then took a cutoff tool and undercut the threads at their base so the knob would thread all the way on and seat..

    Next I took a radius tool and made a cut behind the shoulder I had previously formed. This made a nice transisiton for the tapered part of the handle to the round knob.

    At this point I had a rod with threads on the end and a half circular cut, so I cut the part off about 4" long and chucked the threaded end in an electric drill motor. I then stood in front of my belt grinder and ground a taper above the previously machined features until it finally blended with the radius I had cut earlier.

    I had previously cut the old bolt handle off even with the outside of the receiver. I then decided how I wanted the bolt to look when done and then welded the handle onto the bolt.

    You'll note that I heliarced the two pieces together. Even though this did turn the rear of the bolt blue it probably didn't affect the heat treat that much. It was not that hard in the first place as I could easily file it. If I see any significant wear on the cocking cam after some use I might send the bolt out and get it case hardened, but I doubt that will happen as I don't see this gun being shot thousands of times.

    After the weld was cooled I ground some on it and filed some on it and used my Scotchbrite wheel to blend in some of the weld. I got it close enough so the bolt would close nearly all the way and here is what it looks like.(see pics) I still have to go back and remove a little more metal on the underside so that the bolt will close the last few thousnadths as the safety will not lock the bolt closed as the slots don't line up yet , but this is minor and you can see what it will look like in the end. I had origianlly wanted to have to handle go strait down liek the Mauser Sporting rifles I saw at the SHOT Show last month however I wanted to avoid at all cost having the handle look like it was sloping forward. I hate this look! So when I set up the weld I slanted the handle back about 1 degree. You can see it in the pic below, and I have to say I think it was a good choice.

    I am not a big proponent of forging a bolt handles. It will certainly ruin the heat treat and I have seen very few non professional forge jobs that look good. Cutting and welding a handle on is my preferred way of doing this job, and I think you'll agree it looks pretty good.

    Also it gives you the freedom to create your own bolt handle shape. There are also premade bolt handles you can buy from Brownells, and some of them would take a lot longer to make than what I did, but for what I was trying to accomplish on this project this will work out fine.

    The first bolt handle I ever made was for my Rem 514, and I made it buy chucking a piece of steel rod in an electric drill and grinding on it with a sidewinder until it got to where I liked the shape. I welded it on wiht a torch and wasn't worried in the slightest about the the heat treat simply because there was none on that gun. It is still on there, and where as I don't like the shape now as much as I did when I did it in 1976, I may just saw it off a do something a little nicer some day. I know I can do better now.

    It's just not hard to do and the above process took me all of 1 hour to complete.

    I hope this encourages some of you to go a little deeper into your projects and make something a little different.

    Here's some pics.

    Randy
    Last edited by W.R.Buchanan; 06-02-2012 at 06:04 PM.
    "It's not how well you do what you know how to do,,,It's how well you do what you DON'T know how to do!"
    www.buchananprecisionmachine.com

  13. #153
    Moderator

    W.R.Buchanan's Avatar
    Join Date
    Mar 2011
    Location
    Ojai CA
    Posts
    9,888
    Decided to go finish the bolt handle today. Finished up nice.

    Now I'm looking at sights.

    My original idea was to use a Lyman 57M that I have for the rear and then build some kind of Muzzle attachment like a flash hider to clamp onto the muzzle and then have an M14 front sight from Smith Enterprises clamped to a dovetail on the muzzle adapter.

    I like the M14 sight over the M1 sight as it looks the same, it is just smaller.

    They have several and the ones I am interested have either a Tritium Dot or a Vertical Line. Either one would be great for the night.

    Randy
    Last edited by W.R.Buchanan; 04-15-2012 at 07:50 PM.
    "It's not how well you do what you know how to do,,,It's how well you do what you DON'T know how to do!"
    www.buchananprecisionmachine.com

  14. #154
    Boolit Man
    Max Brand's Avatar
    Join Date
    Jan 2012
    Location
    The Gap
    Posts
    89

    Thumbs up Excellent!

    My hat is off to you, this is one nice looking project. I am anxious to see what the finished product will look like and will continue to follow your progress. Lookin' good!

  15. #155
    Moderator

    W.R.Buchanan's Avatar
    Join Date
    Mar 2011
    Location
    Ojai CA
    Posts
    9,888
    I finally located my mag adapter in the mag well today.

    I did not use the three pin method of securing it. I used the three flathead screw method.

    I chucked the mag well and adapter in the mill and drilled and tapped 3 10-32 holes into it and then countersunk the 3 holes so 10-32 hex drive flathead screws were below flush.

    This will allow me to assemble and disassemble this unit as many times as necessary to get this whole thing to work right.

    So far my Novak magazine is the only one that feeds rounds correctly. I have 4 dummy rounds assembled and I need to make a few more as two are semi wadcutters and two are 230 gr RN's. The RN's feed perfectly nearly every time. SWC's feed sometimes.

    The Chip McCormmik mag sticks up too high and won't allow the bolt to close. I hacked on it to try to get it to work, and basically made a mess of it so now I can't even send it back to Brownells. Luckily they have more Novak mags. I'll get 2 more for this gun, and save the CM mag for a 1911 I might get someday.

    Also I can't just shove a mag into this gun, I have to depress the mag release button a little to get it started then I can shove it home. Pops right out when released, especially if there is a round still in the mag.

    Next I have to start bringing the stock down to final fit and outside shape, and this will also include making a cutout for the receiver sight.

    I also have to mount the rear sight on the receiver which will involve Drilling and Tapping the receiver. Hope it's not as hard as the Springfield was. (I don't think it is).

    I'm still in a quandry on the front sling attachment. I want the sling on the left side of the rifle. I can make a cutout on the left side of the buttstock fairly easily but the front attachment is eluding me. Maybe Velcro ?

    Randy
    "It's not how well you do what you know how to do,,,It's how well you do what you DON'T know how to do!"
    www.buchananprecisionmachine.com

  16. #156
    Boolit Man
    dano440's Avatar
    Join Date
    Feb 2010
    Posts
    90
    Look like I need to take some picture of mine on how it turned out, I don't think mine is as nice as your turned out. it's been a nice winter project so far. I have waiting for the weather to warm up so I can get out and play with my rifle a little bit.

  17. #157
    Moderator

    W.R.Buchanan's Avatar
    Join Date
    Mar 2011
    Location
    Ojai CA
    Posts
    9,888
    Dan: Mine is along way from done.

    If your's shoots and feeds well then you are light years ahead of where I'm at.

    Cosmetics are achieved by keeping after something until it looks the way you want it too. I get ideas from pictures, everybody else can do this too.

    Sometimes that happens, often it doesn't. But you are a better craftsman everytime you try.

    Still you can always go back and redo something like a stock that doesn't look the way you want it to. Sand paper fixes all kinds of flaws.

    Mine has a $80 laminated stock on it that didn't fit this action all that well. I covered up as much of the bad parts as I could. I didn't have a mil stock to use or I probably would have gone that way.

    No reason why a Mil stock can't be finished to a high gloss oil finish. A bottle of BC Tru-Oil and some sand paper is $5. Elbow grease is free.

    We still want pics! I refuse to be the only one posting pics on this thread. The idea of the pics is to share ideas, I leave them on for a few weeks and then delete them so I can put other pics on and share more ideas.

    The thread is entitled "Rhineland 45ACP" Not "Randy's Gun Project."

    I learned something very valuable in the Cub Scouts in 1958. Our troop made individual characters for a troop totem pole. Each of us 8 year olds made our own totem with virtually no help from the Scout Master. We showed up at the big meeting and next to the other troops totems ours looked like pure WKRP! They literally laughed at our pole.

    We were all crying until we found out that the other troops all had their dads make the totems, and the kids didn't do anything.

    Our scout master took us out side and told us to never be ashamed of what we made ourselves, and the object of the task was for us to learn how to use tools and do the best we could.

    Our Scoutmaster went to the head guy and told him that we did all the work ourselves and the others had their dads do the work.

    We won the day, as everyone else was disqualified!

    Since that day in 1958 I have never been ashamed of anything I made. If it was that bad, I threw it away or redid it until it looked good. I learn something new everytime and that's what it is all about.

    Randy
    "It's not how well you do what you know how to do,,,It's how well you do what you DON'T know how to do!"
    www.buchananprecisionmachine.com

  18. #158
    Boolit Master
    Join Date
    Feb 2011
    Posts
    861
    I like the way it is turning out.Sweet
    The receiver shouldn't be all that hard and you will be ok on the cocking ramp as well.

  19. #159
    Boolit Man
    dano440's Avatar
    Join Date
    Feb 2010
    Posts
    90
    I am fairly pleased with how the my stock turned out but still need to have the cosmoline melted out of it which i think i will wrap in paper towels this summer and put it in my car and melt it out that way. bluing turned out good on everything but the bolt. (German slow rust bluing) I just go in to much of a hurry on the bolt, I might go back later and redo it right. the magazine adapter really worked me over. I make mind fit as far forward and I could filing sanding grinding until it butted up with front of the box, then drilled one hole for one pin then played with it until I got a angle that would work well feeding then drilled a second hole and pinned it at that angle. it don't like trunkcated cones or flat nosed bullet but ball or round nose no problem. I have been going to fill the void behind the magazine just have not figured out with what. I think i did a little sanding on the feed rail just in the front of the feed ramp ever so lightly. i still have the cleaning rod to shorten and re-thread and get it put on and I think I will be done, until summer baking in the car to get the grease out. then stain it and tung oil it.

  20. #160
    Moderator

    W.R.Buchanan's Avatar
    Join Date
    Mar 2011
    Location
    Ojai CA
    Posts
    9,888
    I played with mine for 2 hours today after making a bunch of dummy rounds.

    Mine nose dives the first few rounds with 8 in the mag. They nose dive right into the feed ramp.

    I am probably going to make some little piece of metal to sit right in front of the magazine, (similar to the idea of plugging the rear of the mag adapter) so when a round trys to dive, it is held up in place by this filler piece.

    Either that or weld on the feed ramp and make it longer. I have to grind on it anyway and reduce the lower sections angle to be more like the upper section.

    From about 5 rounds in the mag down to 1 it feeds just fine. I even got the Chip M magazine to feed. You can even work the bolt slowly and watch the cartridge get spit up under the extractor. (Most of the time.)

    Randy
    "It's not how well you do what you know how to do,,,It's how well you do what you DON'T know how to do!"
    www.buchananprecisionmachine.com

Page 8 of 9 FirstFirst 123456789 LastLast

Posting Permissions

  • You may not post new threads
  • You may not post replies
  • You may not post attachments
  • You may not edit your posts
  •  
Abbreviations used in Reloading

BP Bronze Point IMR Improved Military Rifle PTD Pointed
BR Bench Rest M Magnum RN Round Nose
BT Boat Tail PL Power-Lokt SP Soft Point
C Compressed Charge PR Primer SPCL Soft Point "Core-Lokt"
HP Hollow Point PSPCL Pointed Soft Point "Core Lokt" C.O.L. Cartridge Overall Length
PSP Pointed Soft Point Spz Spitzer Point SBT Spitzer Boat Tail
LRN Lead Round Nose LWC Lead Wad Cutter LSWC Lead Semi Wad Cutter
GC Gas Check