Load DataLee PrecisionRotoMetals2Snyders Jerky
RepackboxWidenersReloading EverythingMidSouth Shooters Supply
Titan Reloading Inline Fabrication
Page 1 of 3 123 LastLast
Results 1 to 20 of 50

Thread: Winchester/Miroku 1886 Rebounding Hammer Fix Tutorial

  1. #1
    Boolit Buddy steveb's Avatar
    Join Date
    Jan 2006
    Location
    Southern Indiana
    Posts
    415

    Winchester/Miroku 1886 Rebounding Hammer Fix Tutorial

    I used some of the info I got from an article on the Winchester/Miroku 1892 hammer and trigger mods by SAAJim (that also works for the modern Miroku '86's http://web.tampabay.rr.com/jimstags/win1892/index.htm and from other members on the www.leverguns.com board about modifying the rebounding hammer on the Winchester/Miroku 1886's. Also from the thread on Winchester/Miroku 1886 misfires http://leverguns.sixgunner.com/topic...55&whichpage=1 I have been getting misfires from light primer strikes and it was time to castrate the rebounding hammer and fix the terrible trigger pull. This fix does wonders for the action and makes it run much smoother. It is always easier for me to see pictures or watch something being done than just reading about it. This is why I have done this tutorial. Hopefully this will help some of you Miroku 86 owners out.
    P.S. This is what I done to MY rifle and it works fine. Your may be different. It is best to go slow. If you happen to screw it up, its your fault and not mine!
    On to the hammer modification.[]

    STEP ONE:
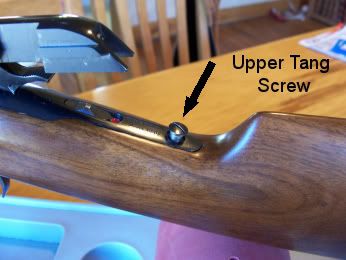
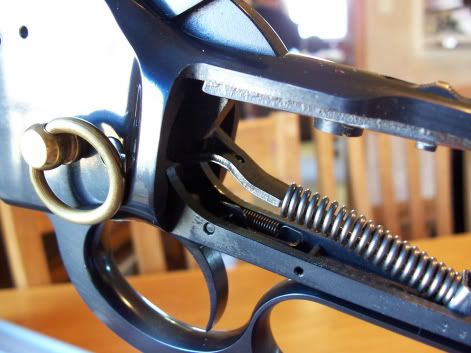
    Remove the upper and lower tang screws and pull buttstock off. The upper tang screw goes all the way through and screws in the bottom tang. The lower tang screw is a wood screw.


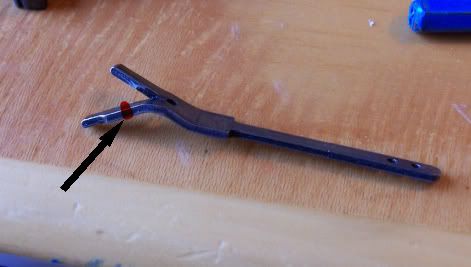
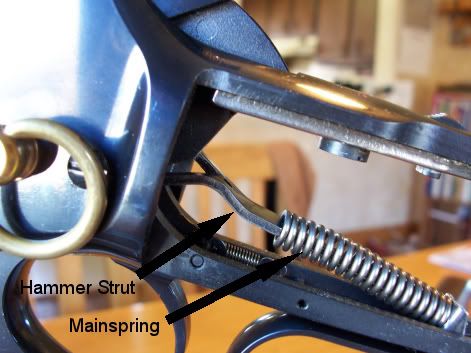
    With the buttstock removed you can see the Hammer Strut and mainspring. The culprit is the lower leg of the Hammer Strut pushing against the the hammer causing it to rebound or bounce back.


    STEP TWO:
    With the action closed pull hammer to rear and remove the receiver (hammer) screw. You may want to captivate the mainspring before removing the receiver (hammer) screw. This coil mainspring is strong and may fly to the next room if not held in place. You can use a paper clip or similar item to hold the mainspring in place.


    STEP THREE:
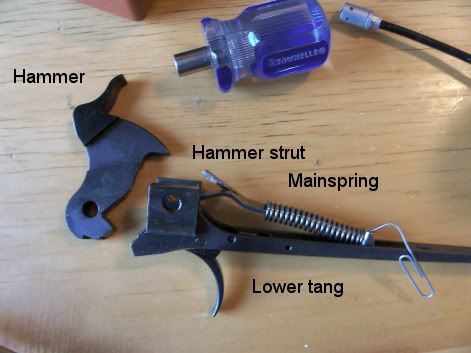
    After removing the receiver (hammer) screw, open the lever and pull the lower tang straight back out of the receiver. At this time the hammer will drop out as well. Pictured below is the hammer and lower tang assembly.

    Take the mainspring off the hammer strut.(Be careful, as this spring is strong and under tension)
    [SIGPIC]http://i104.photobucket.com/albums/m193/stevensavage/avatars/reloadnPalacescriptresized.jpg[/SIGPIC]

  2. #2
    Boolit Buddy steveb's Avatar
    Join Date
    Jan 2006
    Location
    Southern Indiana
    Posts
    415

    Continued

    STEP FOUR: MODIFYING THE HAMMER STRUT:
    You want to cut off part of the lower leg of the hammer strut so it doesn’t touch the hammer when the hammer is all the way down . I cut it off to approximately here and rounded off and polished the lower leg to remove any sharp edges where I cut it. The top leg of the hammer strut was already polished from the factory so I left it be. At this point the rebounding feature is GONE!


    As far as the mainspring goes I chose to cut a few coils off to lighten it some. If you do this it is best to go slow and have a replacement spring handy just in case. I cut three coils off the mainspring( THIS IS WHAT WORKED WITH MY GUN SO IT IS BEST TO CUT OFF A LITTLE AT A TIME IF YOU CHOOSE TO DO THIS!!!)but did so in two different tear downs and it works great with no light primer strikes. Again if you elect to do this it is best to go slow.

    STEP FIVE: REASSEMBLY

    An easy way to captivate the mainspring for reasembly is to install the hammer in lower tang out side the receiver then insert the reciever (hammer) screw into lower tang, then allow the hammer to fall as far forward as possible and insert the spring and guide into the lower tang.Pull the hammer back compressing the spring. Once the mainspring is captivated pull out the Reciever screw out of lower tang. (thanks for the tip Griff!) Also I found it easier to look at the end or back of the receiver when putting the hammer and lower tang back in to help line up with the carrier. I used a punch to help line up the hammer, carrier, and inserted the receiver (hammer) screw. This modification helped tremendously in smoothing the action, and lightening the trigger pull.


    Heres the finished product.

    [SIGPIC]http://i104.photobucket.com/albums/m193/stevensavage/avatars/reloadnPalacescriptresized.jpg[/SIGPIC]

  3. #3
    Boolit Master


    Nueces's Avatar
    Join Date
    Dec 2006
    Location
    Texas Hill Country
    Posts
    2,239
    Wow, steveb, NICE job. Well done. Great photos, too.

    If you don't mind me pickin' your head a little, now that you've been inside the receiver, how does that saddle ring attach. My Browning SRC has a steel one and the clatter alerts sentries.

    Mark

  4. #4
    Moderator Emeritus


    Join Date
    Mar 2005
    Location
    SW Montana
    Posts
    12,479
    Nueces, a quick but ugly fix of a rattling saddle ring is a couple of wraps of black tape. Trim it down to 1/4" across and a few wraps will quiet it for social and hunting situations. Gianni.
    [The Montana Gianni] Front sight and squeeze

  5. #5
    Moderator Emeritus / Trusted loob groove dealer

    waksupi's Avatar
    Join Date
    Mar 2005
    Location
    Somers, Montana, a quaint little drinking village,with a severe hunting and fishing problem.
    Posts
    19,370
    I use a buckskin thong clove hitched through the ring. Quiets things down pretty well.

  6. #6
    Boolit Buddy steveb's Avatar
    Join Date
    Jan 2006
    Location
    Southern Indiana
    Posts
    415
    Quote Originally Posted by Nueces View Post
    Wow, steveb, NICE job. Well done. Great photos, too.

    If you don't mind me pickin' your head a little, now that you've been inside the receiver, how does that saddle ring attach. My Browning SRC has a steel one and the clatter alerts sentries.

    Mark
    It was put on after the fact(not by me) and is not factory. Luckily, mine just screws in. I am going to replace it with a filler screw as I never liked saddle rings to begin with.
    Last edited by steveb; 01-06-2007 at 02:34 PM.
    [SIGPIC]http://i104.photobucket.com/albums/m193/stevensavage/avatars/reloadnPalacescriptresized.jpg[/SIGPIC]

  7. #7
    Boolit Buddy
    Join Date
    Nov 2006
    Location
    SEUS
    Posts
    155
    I second the kudos on the great photos and explaination.....for those who enjoy rummaging through magazines, oftentimes just to rummage, back a couple of years ago or so, Rifle or Handloader did a feature article (by Scoville?) regarding the same problems and fixes.....in today's legal climate, I was flat amazed that any magazine would have the courage to print and promote directions for messing with a modern firearm safety mechanism.....I am still impressed.....

  8. #8
    Boolit Mold
    Join Date
    Dec 2011
    Location
    Minnesota
    Posts
    1
    I just purchased an 1886 extra light and shot it for the first time yesterday. The hammer is a problem, no doubt. I had one mis-fire out of the 20 rounds shot. Part of what brought me to this website was my Google search to find a "fix" for this.

    Hopefully this isn't too old of a thread and hasn't been beat to death too much.

    My question is for Steveb: what did you use to cut the metal you removed from the hammer strut? Looking at your pictures (really nice job on these), it appears that you cut off a little more than half of the lower strut...is that about right?

  9. #9
    Boolit Grand Master

    MtGun44's Avatar
    Join Date
    Nov 2006
    Location
    eastern Kansas- suburb of KC
    Posts
    15,023
    The other issue with the Extra-Lite is the stupid firing pin lock. Mine was badly timed and
    did not release properly until the plunger was full depressed. This was in addition to the
    energy lost in the rebounding hammer.

    I tried to replace the firing pin with a regular 1886 firing pin but they changed the design
    so an original design solid firing pin will not fit.

    Bill
    If it was easy, anybody could do it.

  10. #10
    Boolit Bub
    Join Date
    Apr 2009
    Location
    Ontario Can.
    Posts
    43
    You can also do this modification without removing the lower tang from frame. Just remove the base bracket of the mainspring ( the small screw up through tang) you also have to drive out the small pin in lower tang. This is also a leaf spring that takes up trigger slack. Cut lower strut with a dremel cut-off wheel, it is quite hard. Re assembly requires a little pressure on leaf spring to get pin back in over it. This is how I have done several 92.

  11. #11
    Boolit Buddy


    GMW's Avatar
    Join Date
    Sep 2008
    Location
    North Eastern Woods of PA
    Posts
    167
    Is there a fix for the 1895 also? I have a new one and was just wondering.

  12. #12
    Boolit Master
    Join Date
    Mar 2011
    Posts
    1,320
    Strange that this thread was resurrected after so many years!

    I just dropped my son and his wife off at the airport for their plane ride back to California. On the way home I stopped into a gun shop and they had hours before taken in an unfired, 1886 Winchester TakeDown. Box papers everything. Like new. Consignment deal. They wanted $1295. I made a stupid offer and the owner accepted it! Needed Christmas Bills money.......

    But he had a gunsmith remove the tang safety and installed a nice tang sight. I'm fine with this as I hated the tang safety.

    I want to remove the rebound function on the hammer. But I understand if you simply do what Steve did, there is no "half-cock" safety. The rifle will fire from half cock.

    Can someone verify this.

    Love the new rifle, can't wait to shoot it!
    Roy B
    Massachusetts

    www.rvbprecision.com

  13. #13
    Boolit Grand Master

    MtGun44's Avatar
    Join Date
    Nov 2006
    Location
    eastern Kansas- suburb of KC
    Posts
    15,023
    No half cock from memory, far away from the gun right.

    Bill
    If it was easy, anybody could do it.

  14. #14
    Boolit Master
    timkelley's Avatar
    Join Date
    Dec 2007
    Location
    On the Little Salmon River
    Posts
    657
    Is this a sticky somewhere?
    Thanx, Tim Kelley
    SFC US Army (Ret)
    NRA Life

    Still have noclue!

    "IN GOD WE TRUST"

  15. #15
    Boolit Master
    Join Date
    Mar 2011
    Posts
    1,320
    I removed the rebound on my 1886.........Lightened the trigger return spring.

    On full cock it has a 3.5 pound trigger pull. On half cock it is a bit over ten pounds and with short travel it sets off a primer 50% of the time.

    I'll be ordering the browning hammer and trigger.........
    Roy B
    Massachusetts

    www.rvbprecision.com

  16. #16
    Boolit Grand Master

    MtGun44's Avatar
    Join Date
    Nov 2006
    Location
    eastern Kansas- suburb of KC
    Posts
    15,023
    Don't assume they will fit! I bought a Browning firing pin and it is intentionally
    redesigned to NOT work. No knowledge of the hammer and trigger, but I would not
    be surprised if they did the same thing.

    At minimum, the thumb safety will not work without cutting a slot in the hammer.

    Bill
    If it was easy, anybody could do it.

  17. #17
    Boolit Master
    Join Date
    Mar 2011
    Posts
    1,320
    One of the main reason for ordering the replacement parts is to remove the tang safety (for a tang sight or some folks weld up the hole and reblue) and go back to a half cock safety which is more familiar to lots of lever action shooters.
    Roy B
    Massachusetts

    www.rvbprecision.com

  18. #18
    Boolit Master Canuck Bob's Avatar
    Join Date
    Dec 2009
    Location
    Alberta, Canada
    Posts
    697
    I think Steve from Steves Gunz welded up one and it came out nice. It was an 1886 by memory over on Paco's site.

    I like the tang safety so its not an issue for my 92. The rebounder has to go though. A lot of folks feel the ejector spring is much too strong on these rifles. It flattens my thin 32-20 brass horribly. Currently I hold the empty case down when I extract. Gotta fix that soon as well. My trigger system is loaded with a lot of little springs and parts that will get changed somehow. I'm too cheap to buy Browning parts so Devcon Steel Epoxy might be involved.

  19. #19
    Boolit Master


    Join Date
    May 2015
    Location
    Anchorage, AK
    Posts
    1,113
    Resurrecting this one as it appears the original link by SAA Jim has gone dead. I've done this mod on a winnie 94AE Trapper in 45 Colt and several Mirouko 1892s with good results. The main spring can be reduced on this mod substantially to reduce trigger pull and still maintain sufficient impact for magnum pistol and rifle primers. Note that the new lawyer trigger system uses an inertia fp along with the obvious inertia hammer. G

  20. #20
    Boolit Master

    Loudenboomer's Avatar
    Join Date
    Nov 2007
    Location
    North Western Minnesota
    Posts
    803
    It's a good thread to resurrect. I did steveb's tune on my extralite japchester 86. No more cold weather misfires and a better trigger pull to boot.

Page 1 of 3 123 LastLast

Posting Permissions

  • You may not post new threads
  • You may not post replies
  • You may not post attachments
  • You may not edit your posts
  •  
Abbreviations used in Reloading

BP Bronze Point IMR Improved Military Rifle PTD Pointed
BR Bench Rest M Magnum RN Round Nose
BT Boat Tail PL Power-Lokt SP Soft Point
C Compressed Charge PR Primer SPCL Soft Point "Core-Lokt"
HP Hollow Point PSPCL Pointed Soft Point "Core Lokt" C.O.L. Cartridge Overall Length
PSP Pointed Soft Point Spz Spitzer Point SBT Spitzer Boat Tail
LRN Lead Round Nose LWC Lead Wad Cutter LSWC Lead Semi Wad Cutter
GC Gas Check