RotoMetals2MidSouth Shooters SupplySnyders JerkyLoad Data
Inline FabricationRepackboxReloading EverythingTitan Reloading
Lee Precision Wideners
Page 29 of 39 FirstFirst ... 1920212223242526272829303132333435363738 ... LastLast
Results 561 to 580 of 768

Thread: Project - PID on Lee Pro 4 20 furnace

  1. #561
    Boolit Buddy
    Join Date
    Sep 2014
    Location
    Houston, TX
    Posts
    212
    Quote Originally Posted by Mike W1 View Post
    That drawing doesn't show temperature alarms to me. All those lights do is show when the power is turned on and also going out. In order to show a temperature alarm they'd have to be wired to the proper contacts on the PID and whichever PID it is would make a difference on which contacts would be use.
    Thanks for pointing that out, I was just reading the datasheet, its the SYL-2352 and pins 1,13,14 are for the alarms which can also be used with LED's. Glad I checked because what I would like is the switch to indicate on/off and the LED's to indicate low/high temperatures.

  2. #562
    Boolit Buddy
    Join Date
    Sep 2014
    Location
    Houston, TX
    Posts
    212
    I think I will just use the switch as I have it without the illumination since I already have the holes cut into the case. I will get an extra 120VAC light and drill that into the front of the case and use that as my on/off indicator (cleaner and easier). Should be able to wire it up this weekend.

  3. #563
    Boolit Master

    Mike W1's Avatar
    Join Date
    Nov 2008
    Location
    Rural Sumner, IA
    Posts
    1,317
    Quote Originally Posted by stanford View Post
    I think I will just use the switch as I have it without the illumination since I already have the holes cut into the case. I will get an extra 120VAC light and drill that into the front of the case and use that as my on/off indicator (cleaner and easier). Should be able to wire it up this weekend.
    All you have to do is supply the neutral to your switch and it should light when you turn it on.
    Mike

    Benefactor Member NRA
    Life Member Iowa Firearms Coalition
    US Army Vet

    There are two ways to conquer and enslave a nation.
    One is by the sword. The other is by debt.”
    John Adams 1826

  4. #564
    Boolit Master

    Mike W1's Avatar
    Join Date
    Nov 2008
    Location
    Rural Sumner, IA
    Posts
    1,317
    Quote Originally Posted by stanford View Post
    Thanks for pointing that out, I was just reading the datasheet, its the SYL-2352 and pins 1,13,14 are for the alarms which can also be used with LED's. Glad I checked because what I would like is the switch to indicate on/off and the LED's to indicate low/high temperatures.
    That's the same controller I used and it's a little gem. You do have to supply pin 1 with a power lead BTW.
    Mike

    Benefactor Member NRA
    Life Member Iowa Firearms Coalition
    US Army Vet

    There are two ways to conquer and enslave a nation.
    One is by the sword. The other is by debt.”
    John Adams 1826

  5. #565
    Boolit Master el34's Avatar
    Join Date
    May 2013
    Location
    N Texas
    Posts
    1,190
    Quote Originally Posted by stanford View Post
    Thanks for pointing that out, I was just reading the datasheet, its the SYL-2352 and pins 1,13,14 are for the alarms which can also be used with LED's. Glad I checked because what I would like is the switch to indicate on/off and the LED's to indicate low/high temperatures.
    I'm pretty sure you can do exactly what you want. Looking at the switch it shows that terminals 1 and 2 are the actual switch contacts, just as your meter check showed. Terminal 2 also is internally connected to one side of the light. And the picture also shows the third terminal (non-silver) is only the other light connection.

    Mike was 100% correct.

    Your AC input black wire goes to 1, the switch output is 2. If AC neutral (white wire) is hooked to terminal 3 the internal neon lamp will light when the switch is on.

    I have an Auber manual and it shows the alarm outputs are only relay contacts. Maybe I missed it but I didn't see that you could change the alarm outputs to output a DC voltage suitable for lighting LEDs.

    Several folks have used neon lights from Radioshack for alarm indicators. The relay contacts are hooked up to switch 110vac to the neons. This works out well because there is no available low voltage DC source that you'd need for LEDs.

    You'd hook 110v hot to PID terminal 13, which is common to the two alarm relays. Terminal 1 goes to one side of alarm1 neon, terminal 14 to one side of the alarm2 neon. Then the other wire from each neon connects to AC neutral.

    Radio Shack has red, amber, and green neons, I have one of each on my PID controller.

    http://www.radioshack.com/miniature-...#start=0&sz=12
    The third and fourth down shows the red and green 120v neons, the next page has the red.

    Click image for larger version. 

Name:	IMAG0399.jpg 
Views:	138 
Size:	50.3 KB 
ID:	121764
    Last edited by el34; 11-13-2014 at 11:30 PM.
    "The urge to save humanity is almost always a false front for the urge to rule." --H. L. Menchen

  6. #566
    Boolit Master

    Mike W1's Avatar
    Join Date
    Nov 2008
    Location
    Rural Sumner, IA
    Posts
    1,317
    My bad as they say. Pin 13 gets the 110v, NOT 1! Glad el caught that one.
    Mike

    Benefactor Member NRA
    Life Member Iowa Firearms Coalition
    US Army Vet

    There are two ways to conquer and enslave a nation.
    One is by the sword. The other is by debt.”
    John Adams 1826

  7. #567
    Boolit Master el34's Avatar
    Join Date
    May 2013
    Location
    N Texas
    Posts
    1,190
    Quote Originally Posted by Mike W1 View Post
    My bad as they say. Pin 13 gets the 110v, NOT 1! Glad el caught that one.
    Teamwork rocks!
    I'm hoping stanford sticks with what he wants, it is easy peasy.
    "The urge to save humanity is almost always a false front for the urge to rule." --H. L. Menchen

  8. #568
    Boolit Buddy
    Join Date
    Sep 2014
    Location
    Houston, TX
    Posts
    212
    Thanks guys.

    El34, I meant to say neon not LED. I could not find a green neon from any of the radio shacks in my area, all they had were red and amber. I am going to think about the entire process again before I get started. I don't want to make it too difficult or too simple.

    Thanks again for the help guys.

    el34, I like your box, labeling and everything....

  9. #569
    Boolit Master el34's Avatar
    Join Date
    May 2013
    Location
    N Texas
    Posts
    1,190
    Quote Originally Posted by stanford View Post
    Thanks guys.

    El34, I meant to say neon not LED.
    el34, I like your box, labeling and everything....
    Sorry I sounded critical about the light. I've noticed people assume all lights are LEDs and if they bought an LED to connect to 110vac they'd be horribly disappointed.

    The green light on mine comes on when the pot is within 15deg of my set temp. I like it.

    And the labeling- it's a spreadsheet! Really, I used Excel graphics, easy peasy, and printed it out. Then put it in a semi-rigid plastic sheet protector. That's all it is and it was fun doing it. Putting my castboolits username on it was sort of a salute to the forum.
    "The urge to save humanity is almost always a false front for the urge to rule." --H. L. Menchen

  10. #570
    Boolit Bub JD74's Avatar
    Join Date
    Dec 2014
    Location
    Houston Texas
    Posts
    42
    Looks like I have a new project for the new year

  11. #571
    Boolit Buddy

    Join Date
    Dec 2013
    Location
    A State of Confusion
    Posts
    258
    Just getting started and decided to go with the Lee 4-20 bottom pot for casting and even before it came I had a PID panel made up for it. Need some pics, but I went with an RTD controller and inserted a small aluminum block between the bottom of the pot and the bottom panel, used a little heat sink compound atop it and centered it on the bottom of the pot to locate the sensor so it will give a good representation of the pot temp and led the leadwires back into the enclosure by drilling another set of holes like the heater uses. Not pretty, just a panel with no enclosure, but it will work as intended..

    Now to get some WW into a form that I can bear to throw in the pot... LOL

  12. #572
    Moderator Emeritus


    JonB_in_Glencoe's Avatar
    Join Date
    Mar 2010
    Location
    Land of 10,000 Lakes
    Posts
    15,878
    I finally joined the PID club.
    I bought some of the parts for this project 18 months ago.
    PID from Hong Kong was defective...I finally got a replacement.

    My first casting session with it today and did the auto-tune...twice,
    it didn't seem quite right the first time, but the second time did it, I think ?

    I just used a thermometer clip for the PID, I like that for easy remove-ablilty for cleaning/fluxing or transfering the TC to another pot.

    ~~~~~~~~~~~~~~
    “If someone has a gun and is trying to kill you, it would be reasonable to shoot back with your own gun.”
    ― The Dalai Lama, Seattle Times, May 2001

  13. #573
    Boolit Master

    Join Date
    Mar 2005
    Location
    Peace River, Alberta
    Posts
    2,121
    I would put a cookie sheet or large cake pan under that lead pot - it saves a lot of mess and cleanup. Also a thrift sale or garage sale cookie sheet to hold the cloth that we catch the cast bullets on.
    I learned this the awkward way.
    Go now and pour yourself a hot one...

  14. #574
    Boolit Buddy

    Join Date
    Dec 2013
    Location
    A State of Confusion
    Posts
    258
    Okay, a few pics of my mods...don't mind the wiring, need a little cleanup on that and some deburring and protection for the RTD leadwires, but functionally it works well.. just sorted a few buckets of WW to start things up with.

    Click image for larger version. 

Name:	IMG_1776 (600x800) (2).jpg 
Views:	125 
Size:	36.5 KB 
ID:	125141

    Click image for larger version. 

Name:	IMG_1774 (600x800).jpg 
Views:	77 
Size:	22.0 KB 
ID:	125142

    Click image for larger version. 

Name:	IMG_1772 small.jpg 
Views:	118 
Size:	34.8 KB 
ID:	125143

  15. #575
    Moderator Emeritus


    JonB_in_Glencoe's Avatar
    Join Date
    Mar 2010
    Location
    Land of 10,000 Lakes
    Posts
    15,878
    Quote Originally Posted by 10x View Post
    I would put a cookie sheet or large cake pan under that lead pot - it saves a lot of mess and cleanup. Also a thrift sale or garage sale cookie sheet to hold the cloth that we catch the cast bullets on.
    I learned this the awkward way.
    That is not a bad idea, but the pot and the block it sits on are bolted down to the table. Yeah, it's a bit messy, but not that difficult to clean up. It is a dedicated casting area, so I don't clean it that often, I have been casting each of the last three days and will be casting tomorrow.
    ~~~~~~~~~~~~~~
    “If someone has a gun and is trying to kill you, it would be reasonable to shoot back with your own gun.”
    ― The Dalai Lama, Seattle Times, May 2001

  16. #576
    Boolit Master el34's Avatar
    Join Date
    May 2013
    Location
    N Texas
    Posts
    1,190
    Quote Originally Posted by Sticky View Post
    Okay, a few pics of my mods...don't mind the wiring, need a little cleanup on that and some deburring and protection for the RTD leadwires, but functionally it works well.. just sorted a few buckets of WW to start things up with.

    Click image for larger version. 

Name:	IMG_1776 (600x800) (2).jpg 
Views:	125 
Size:	36.5 KB 
ID:	125141
    Nice job! What shifted you to an RTC instead of a thermocouple? Goods and bads about both. Good article-
    http://www.smartsensors.com/spec.htm
    "The urge to save humanity is almost always a false front for the urge to rule." --H. L. Menchen

  17. #577
    Boolit Buddy

    Join Date
    Dec 2013
    Location
    A State of Confusion
    Posts
    258
    Quote Originally Posted by el34 View Post
    Nice job! What shifted you to an RTC instead of a thermocouple? Goods and bads about both. Good article-
    http://www.smartsensors.com/spec.htm
    Thanks! I have worked with RTD temp controls for many years and as long as you aren't running over 1k F, they work great. This was made with some old spare parts I have accumulated, so cost was not a factor, just that I am comfortable with RTDs for this kind of temp range. We actually use both RTD's and thermocouples in my line of work, but most of our temp controls use RTD's, so that is what I went with as I have had good success with them over the years. I also didn't want a sensor in the pot, so sticking it up under the bottom of the melt pot should work out fine, I hope... time will tell.

    Just took my first whack at rendering some COWW's, came out pretty well, I think. Thanks to the weatherman for a nice day today so I could sit outside and cook up about half a bucket to get me started.. On to the next phase soon, seeing if I can get the lead into a bullet like shape.. LOL

  18. #578
    Boolit Buddy
    Join Date
    May 2014
    Location
    DFW
    Posts
    381
    Instead of creating a new post, I will add my own PID project for my Lee Pro 4-20 here


    I am casting 100% with the ladle, so I plugged the hole, and I will mount it close to the base:


    I had a surplus high current +5Volt DC power supply, and its housing happen to be a good size for this project since it had the grounded power plug, ON-OFF switch, and even a surge protector:


    I drilled and tap a small mount for the temp sensor:


    Sensor is like 1/8" or so from the bottom:


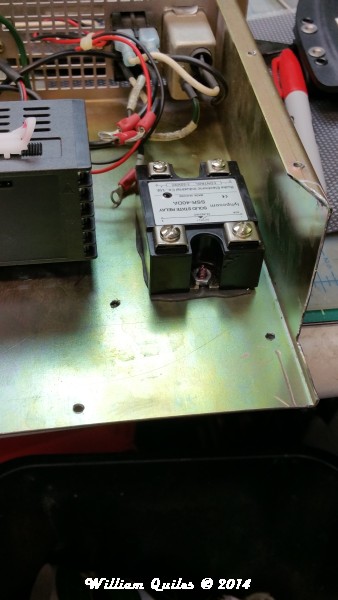
    The heatsink that came with my 40A SSR had "zero" paste/thermal pad - so it was basically useless "as is", so I decided to use a thermal pad material (I already had for my electronic projects), and the whole steel case is now the heatsink:


    Everything wired (except the heating coil - need to test it first):

  19. #579
    Boolit Buddy
    Join Date
    May 2014
    Location
    DFW
    Posts
    381
    Tested everything:


    Yes, it is up-side down in this picture:


    Completed unit:


    I might plug those two holes on top, and I might put some feet to raise it a little (like 1/2" or so), but for now it should work well

    Will
    Last edited by wquiles; 01-01-2015 at 02:42 PM.

  20. #580
    Moderator Emeritus


    JonB_in_Glencoe's Avatar
    Join Date
    Mar 2010
    Location
    Land of 10,000 Lakes
    Posts
    15,878
    Nice work !

    Quote Originally Posted by wquiles View Post
    ~~~~~~~~~~~~~~
    “If someone has a gun and is trying to kill you, it would be reasonable to shoot back with your own gun.”
    ― The Dalai Lama, Seattle Times, May 2001

Page 29 of 39 FirstFirst ... 1920212223242526272829303132333435363738 ... LastLast

Posting Permissions

  • You may not post new threads
  • You may not post replies
  • You may not post attachments
  • You may not edit your posts
  •  
Abbreviations used in Reloading

BP Bronze Point IMR Improved Military Rifle PTD Pointed
BR Bench Rest M Magnum RN Round Nose
BT Boat Tail PL Power-Lokt SP Soft Point
C Compressed Charge PR Primer SPCL Soft Point "Core-Lokt"
HP Hollow Point PSPCL Pointed Soft Point "Core Lokt" C.O.L. Cartridge Overall Length
PSP Pointed Soft Point Spz Spitzer Point SBT Spitzer Boat Tail
LRN Lead Round Nose LWC Lead Wad Cutter LSWC Lead Semi Wad Cutter
GC Gas Check