I thought it was your stock, nice idea thanks for putting it up for us to see. The cap doffing stays.

|
   
   
|


|


I thought it was your stock, nice idea thanks for putting it up for us to see. The cap doffing stays.
Lucky Joe
"There's always a way."


The funny thing is that if many people see an AR, they think of it as the "evil black rifle" whereas if they were to see the same thing with walnut furniture, it becomes no different than many other sporting rifles out there in their eyes... If I was to do it, I would place the longer (20") barrel on it, not the 16" M4 type that I have on my current "evil black rifle" AR... Probably a rifle that would stay in the gun safe and periodically be taken to the range... I would hate to scratch up the walnut by actually taking it hunting...Originally Posted by Lucky Joe

Live fast, die young, leave a cute widow...
I know we don't want to disfigure out firearms, however after many years carrying wood stocked guns out in the field and woods they still look pretty darn good. Perhaps I've just been lucky or extra careful, I do try to keep them nice and still use them.
Lucky Joe
"There's always a way."
[QUOTE=grumman581;1573030]The funny thing is that if many people see an AR, they think of it as the "evil black rifle"
-------------------------------------------------------------------------------------------------------
I spell it differently.
"Ugly black rifle".
Now,,, I have to admit they CAN look "Nice".

Some absolutely amazing creations. I'm envious of anyone who can make stuff. I echo gandydancers' comment about being lucky enough to make ear wax!!!!!
As a new member, I am totally in awe of the ingenuity of these projects.
"Is that a gun in your pocket or are you happy to see me?"
Mae West
reloader45,
Welcome to the forum. Stick around and you'll soon be spelling awe, AWE.
Lucky Joe
"There's always a way."

you guys are all way better than me. Here's what I made:
I've been trying MANY different powders lately and changing the seat depth so the base of the bullet is right over the powder. I've needed to measure the powder to top of the case MANY times and it's not easy with calipers.
So I made a fixture that makes it VERY easy to measure the distance between the charge and case mouth:
Each mark is .1" apart, I filled the groove with a sharpie color to keep track of which mark is which (black is .5" and 1.0")
Makes it easy to know the powder fill level.

Thats cool! A handy tool.
"I'll help you down the trail and proud to!" Rooster Cogburn.
"Slap some bacon on a biscuit and let's go! We're burnin' daylight! " - Will Anderson (John Wayne) "The Cowboys."
SASS Life Member No 82047
http://s89.photobucket.com/albums/k228/4fingermick/
Psycholigist to Sniper; 'What did you feel when you shot the felon Sargeant?'
Sniper to Psycholigist; 'Recoil Ma'am.'
From my Irish Ancestors: "You've got to do your own growing, no matter how tall your grandfather was."
I like the look of the first AR, but it needs some top quality chequering to really set it off.
"I'll help you down the trail and proud to!" Rooster Cogburn.
"Slap some bacon on a biscuit and let's go! We're burnin' daylight! " - Will Anderson (John Wayne) "The Cowboys."
SASS Life Member No 82047
http://s89.photobucket.com/albums/k228/4fingermick/
Psycholigist to Sniper; 'What did you feel when you shot the felon Sargeant?'
Sniper to Psycholigist; 'Recoil Ma'am.'
From my Irish Ancestors: "You've got to do your own growing, no matter how tall your grandfather was."
Now that is slick! Well done.
Isaac
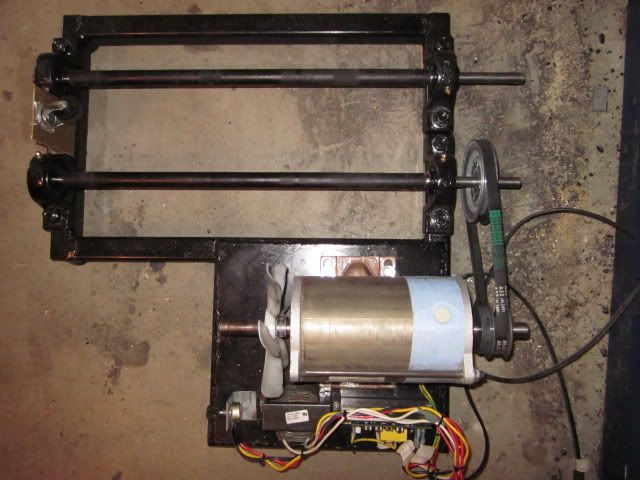
I have had a lot of requests for detailed Tumbler plans, how to choose pulley's for the motor and drive shafts and how I made my drum.
I have combined all three posts that I have done recently into one source for easier reference.
Finished Product:
I used a treadmill motor with dc motor controller and variable speed pot. You can also use any ac motor that will fit with the correct pulleys. I explain how to choose the correct pulley's bellow.
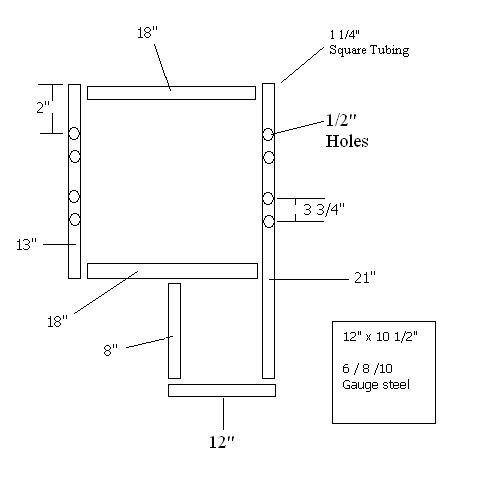
Plans:
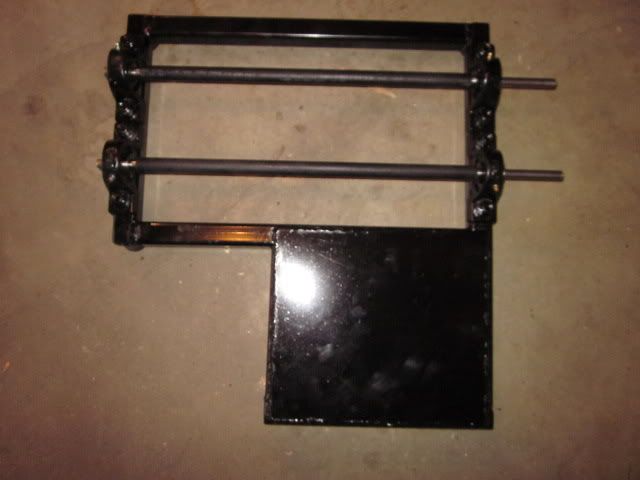
I used 1 1/4" Steel Tubing for the frame because that is what I had on hand. You can use larger Tubing if you want, just adjust the dimensions accordingly.
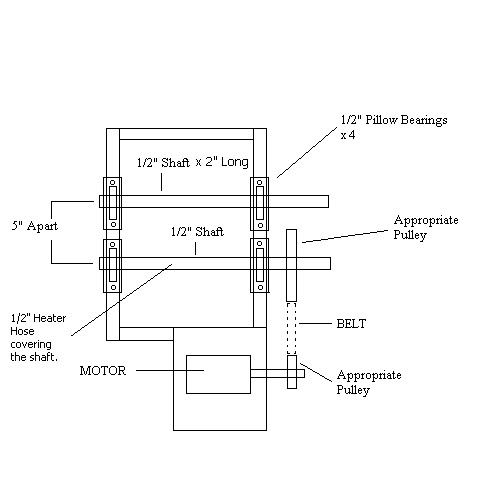
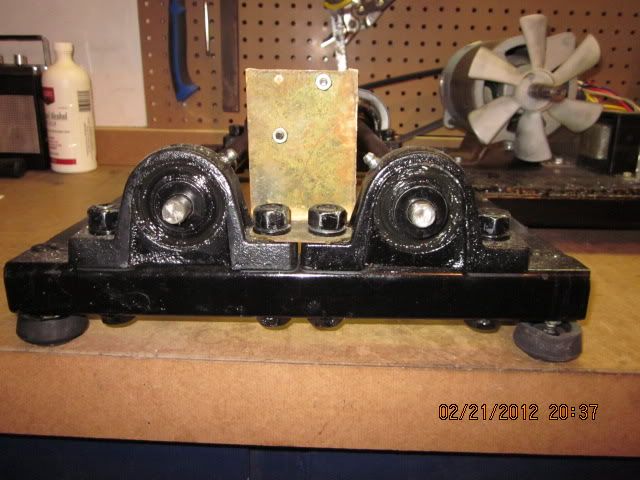
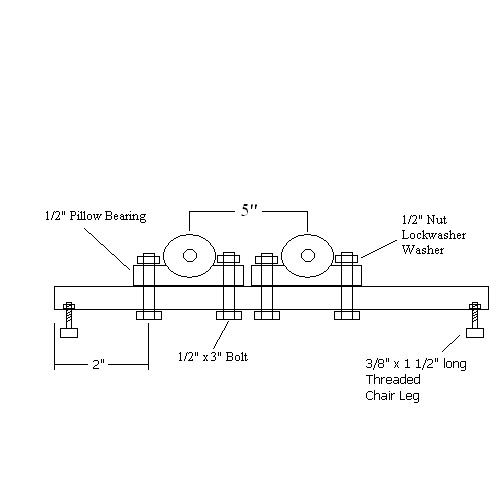
I used 1/2" size Pillow Bearing Blocks that had a 1/2" mounting holes. I have seen some with 3/8" mounting holes but these were on sale so they will do.
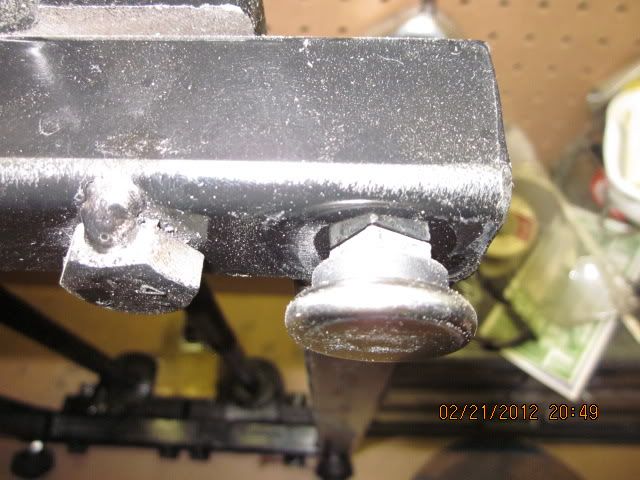
The important part is that when you mount the pillow bearings the center to center measurement of the 1/2" shafts are 5" apart. In my case I drilled the first 1/2" bolt hole 2" from the end and then measured the distance of the holes in the bearing blocks to ensure when they were mounted I got the 5" that I needed. In most cases the center to center holes on the bearing blocks are 3 3/4" but check yours first to see if there is a difference. You can see that the mounted blocks are almost touching. The little piece of brass with the roller wheel between the shafts is to prevent the tumbler drum from hitting the end and keeping it on the shafts. My friend that has a lathe is making me up a bearing mounting post for a more permanent installation.
For the feet I used a 3/8" x 1 1/2" long threaded Chair Leg. I drilled a hole in the frame and put the nut on from the inside and then just tack welded it. I put a rubber cup over it to keep the tumbler from moving but weight alone I am sure it wouldn't go anywhere anyways. I tack welded the 1/2" pillow bearing mounting bolts for easier installation.
How to choose the Pulley's for the motor and drive shaft.
To calculate the size of the pulleys needed with a certain speed of the motor we can use this simple formula.
Motor RPM x Motor Pulley Diameter = Driven Pulley Diameter x Driven RPM
After we are done figuring, this only gives us the speed of the driven shaft on the tumbler
Since we want the speed of the driven shaft on the tumbler we can re write the formula as:
Motor RPM x Motor Pulley Diameter
---------------------------------------------- = Driven Rpm (Speed of the driven shaft)
Driven Pulley Diameter
Then you use the speed of the driven shaft on the tumbler to figure out what the speed of your Tumbler�s Drum is going to be. I combined both formulas into one to make it easier to figure out the speed of the drum. I made up some letter designations to make it easier to follow the formula and here they are:
Motor Rpm= M
Motor Pulley Diameter= MP
Driven Pulley Diameter = DP
Diameter of Driven Shaft = DS
Diameter of Tumbler Drum = TD
Driven RPM of the Drum = DR
M x MP x DS
------------------- = DR or the speed of drum on the tumbler.
TD x DP
Lets try one .
You found a motor at the dump that has a sticker on it that says it turns at 1725 RPM.
You go to Lowes and find a pulley that fits the motor and it has a diameter of 2�.
You buy some bearings for the shaft to run on and they are � � size for your �� shafts.
You buy a 6� pulley for the driven shaft for the tumbler drum to run on.
You make a 6� tumbler drum out of a empty plastic jar.
How quick will your tumbler drum be turning at?
With our handy dandy formula we can plug in some numbers and find out.
1725rpm x 2� x ��shaft
--------------------------- = 47.9 RPM or about 48 RPM the tumbler drum will be going.
6� drum x 6�pulley
The Thumlers regular speed is 30 rpm and the high speed is 40 rpm. We don�t want anything quicker than 60 rpm because the brass and contents will just stick to the outside wall due to centripetal force. So in this case we guessed correctly for the size of drum we want and the pulley needed to obtain that speed.
So let�s say we find some 5/8� bearings on sale and our drum size is 8� instead of the 6� we had before.
Using the same motor and pulley sizes what would be our drum speed?
1725 x 2� x 5/8�
------------------- = 44.9 RPM So 45 RPM is right in the ballpark .
8� x 6�
You can always buy an adjustable pulley for the motor that varies so you can fine tune the speed of the drum but figuring out what size of drum you want to make and the smallest size of the motor pulley, you can mix and match the size of the shaft and pulley on that shaft so you don�t have to spend extra money experimenting on what you want.
If you know the size of your Drum that you want to make and the size of the motor pulley then with algebra we can manipulate the formula to come up with the size of the pulley on the driven shaft.
M x MP x DS
---------------------= DP (The size of the pulley needed to put on the driven shaft)
DR x TD
Let�s try one out.
You have a 7� drum, a 1725 rpm motor with a 3� pulley on it and you have some 7/8� bearings and 7/8� shaft to use for your tumbler. What size of pulley do I need to put on the 7/8� shaft to give me 60 RPM for the Drum?
1725 RPM x 3� x 7/8�
-------------------- = 10.8� (You would need about a 11� pulley)
60 RPM x 7�
It would be hard to find an 11� pulley so your better bet would be to drop the 3� pulley on the motor to a 2� pulley which running it thru the formula again would give you about a 7� pulley which is more realistic.
You have the driven shaft pulley diameter of 7� on a 5/8� shaft and you want to know what size of pulley I need to buy to put on the motor to give me 55 rpm for my 8� drum.
Manipulate the formula to give you this.
DR x TD x DP
------------------ = MP (Size of the pulley needed on the motor shaft)
M x DS
Let�s try it.
55RPM x 8� x 7�
-------------------- = 2.85� ( You would buy a 3� pulley and that will get you close)
1725 RPM x 5/8�
With an adjustable DC motor like on a treadmill then just buy any two pulley's that you need and you can adjust the speed of the motor to get what you want.
How much to make the Tumbler?
3� pulley 6.00
4.5� pulley 9.00
� � shaft for 5 � 9.00
�� Pillow Bearing 13.00 each (52.00 total)
�� heater hose 4.00
Base mounts 12.00 (rubber cups I put over adjustable screw in legs)
1 1/4� Square tubing $30.00 for a 8 foot length and I had 4� left over
Motor found at scrap yard
Total $122.00
Drum
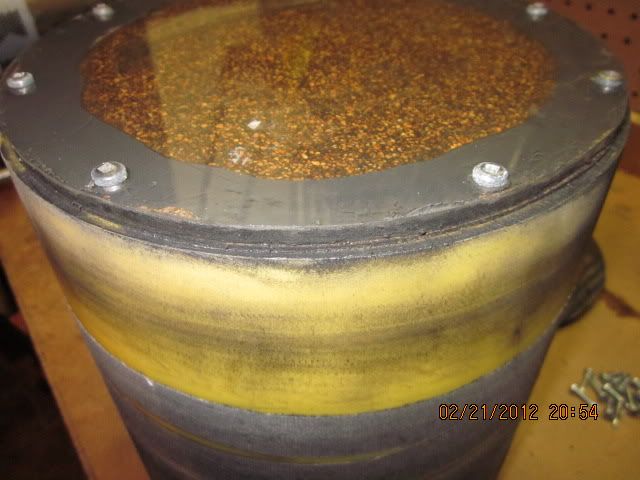
For the drum I used a piece of 10" PE pipe that I get from work that is thrown out. I cut a piece of Plexiglas that I already had and mounted it on one end with some gasket cork and RTV Silicone seal.
On the inside I mounted with brass screws some strips of plastic that I had laying around to help with mixing the brass and pins up.
On the top I glued RTV on the PE pipe then put a layer of gasket material on top of it then another layer of gasket material and then glued the Plexiglas on top of that. So I had glue/gasket/gasket/glue and Plexiglas. Drilled holes all the way around and drove long screws thru it all into the PE pipe. When it was dried I had a flat surface with gasket on the PE pipe and a flat surface on the Plexiglas. I cut out the inside of the gasket on the pipe and now I have a perfect water tight seal.
I screwed one of the screws to tight and cracked the Plexiglas and had to start over as you can see in this picture. The new end caps were made out of steel and will never crack.
If you need anymore info drop me a line.
Democracy is two wolves and a lamb voting on what to have for lunch.
Liberty is a well-armed lamb contesting the vote. -Benjamin Franklin, 1759
I'm surprised with all these great innovations! I cannot compete in any way with what people have come up with for their big operations, especially people doing the metal work, but I figured someone by this point would have put up a homemade trickler! It's a simple thing to save some money on.
Mine is a sample vial (for freshwater research, had laying around) and a pen mate cheap ballpoint pen case, with a 9/16 bolt as a handle. I have the blocks of wood underneath to go from 357 to something smaller/larger. Holes just shy of the diameter of the pen tube are drilled in the pen case so the powder comes through the shaft down on a turn. It looks shotty but it works like a champ.

Also I just threw a trash can next to the press so the re-sized cases can be pushed off and new ones done repeatedly, speeds up resizing tremendously and only cost a wood screw.
I know these are just small stuff but it's what i've figured out so far. All the other things on here are crazy good adaptations, I have been really impressed!
FL
"If the tools you have do the job you need done then you shouldn't worry yourself with how much money your neighbor spent on his tools, but rather compete at the shooting bench." - UNIQUEDOT
I joined this site for ideas and boy have I found some! My first project was a press capable of loading rounds for my new .338 EDGE at 3.785 OAL and .50BMG something my other "blue" press couldn't do.I used the plans located on this site and scaled them slightly to fit the materials I had on hand.
Set up this trimmer for cutting down 9mm Luger to 9X18 Makarov. When you release the case it drops along with shavings down into tub so no clean up required. It is mounted on a telescoping metal bracket so i can use it sitting down or standing for long sessions.
Here you are my modified Auto ejector.
The best thing on it is the fully adjustable - removable knob on the top of it.
To be honest it wasn't made by me I just put it on the paper and it become a reality

Last edited by rasto; 06-11-2012 at 11:22 AM.

Rasto, Nice work!
Wow! pretty awesome on what you can do on a mill and lathe!
This really isn't homemade per-se, but has helped me speed up the prep process and save on my hands. Have a cheap Drill Master drill that you can put on "cruise control" and increase or decrease speed, which will hold a cheap Lee Primer pocket cleaner, and it also will grip the middle portion of my RCBS deburring tool made by L.E. Wilson. Set on the edge of my reloading bench over a trash can, set the speed, and am able to clean primer pockets and debur the inside of cases much quicker.
The same set-up works great w/ the Lee case length cutters. Doesn't take long to prep 100 pieces of brass that way.
Edit-here is a homemade tool. I wanted to try ladle casting, but am shy about buying equipment. This is the ladle that came from a hole saw and a chainsaw file...
[IMG]
Last edited by Any Cal.; 05-19-2012 at 01:31 AM.
 Posting Permissions


| BP | Bronze Point | IMR | Improved Military Rifle | PTD | Pointed |
| BR | Bench Rest | M | Magnum | RN | Round Nose |
| BT | Boat Tail | PL | Power-Lokt | SP | Soft Point |
| C | Compressed Charge | PR | Primer | SPCL | Soft Point "Core-Lokt" |
| HP | Hollow Point | PSPCL | Pointed Soft Point "Core Lokt" | C.O.L. | Cartridge Overall Length |
| PSP | Pointed Soft Point | Spz | Spitzer Point | SBT | Spitzer Boat Tail |
| LRN | Lead Round Nose | LWC | Lead Wad Cutter | LSWC | Lead Semi Wad Cutter |
| GC | Gas Check |

 Reply With Quote